
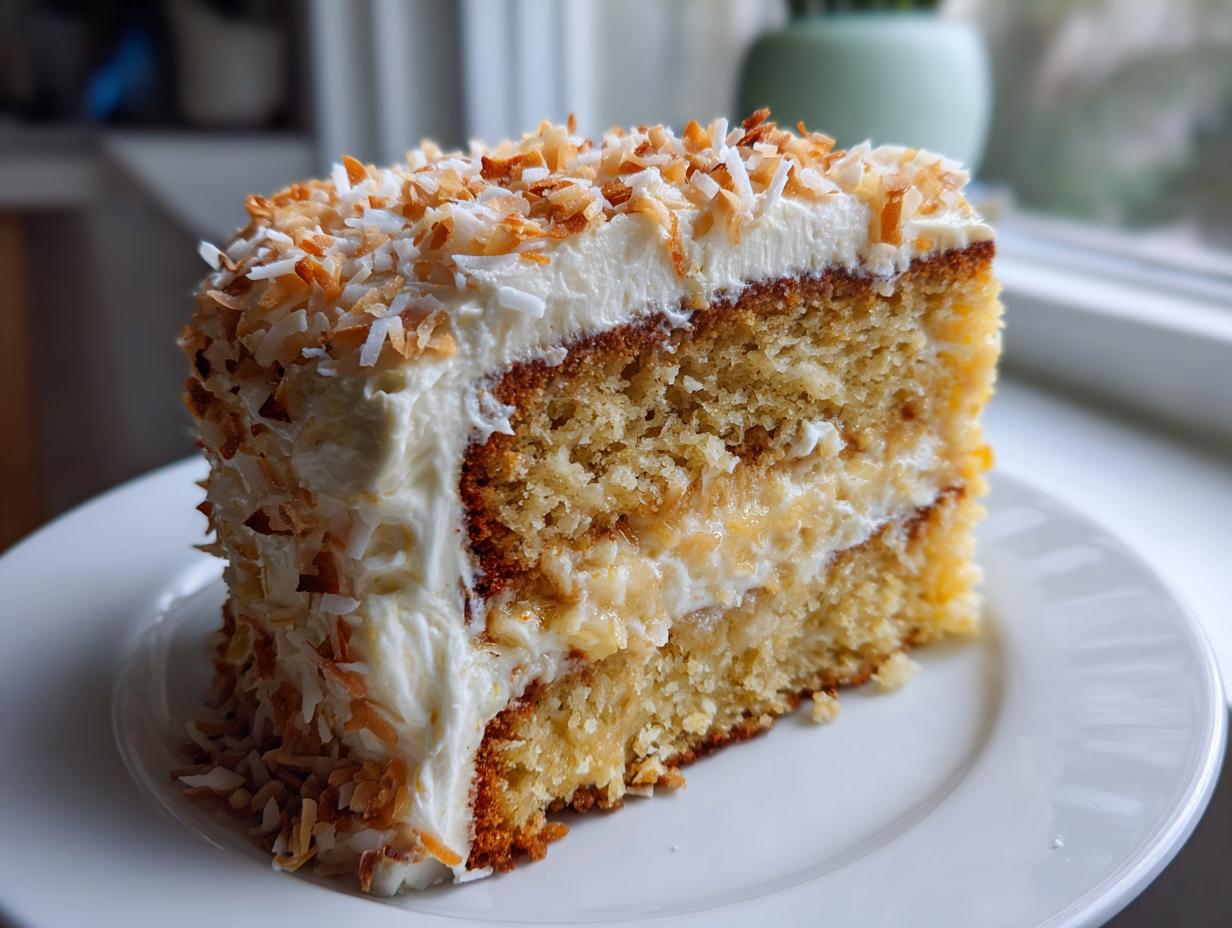
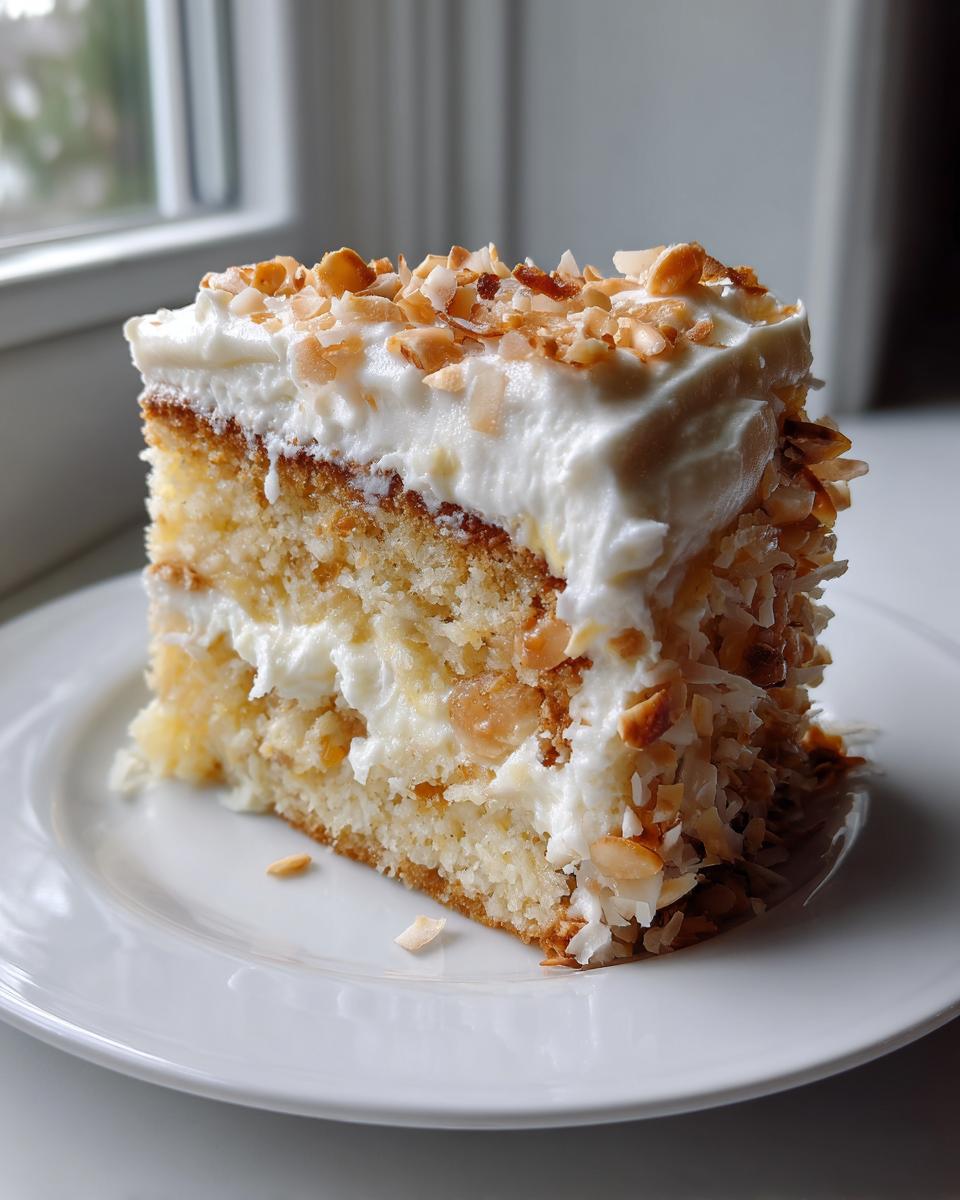
When I think about baking for a huge celebration—a wedding, a milestone anniversary—I always drift toward the tropics. Forget those stiff, dry cakes we sometimes settle for! We need flavor, moisture, and a little bit of sunshine in every slice, don’t we? That’s exactly what the Hawaiian wedding cake delivers. It’s an absolute showstopper because it manages to be incredibly rich and dense, thanks to all that fruit and those beautiful nuts, yet stays impossibly moist. My grandmother, who taught me everything about the heart of home baking, always said that the best traditions are the ones you can taste. And this cake? It tastes like a memory you want to keep making. Trust me when I say this tropical dessert deserves a place on your menu.
- What Makes This The Ultimate Moist Hawaiian Wedding Cake?
- Gathering Ingredients for Your Hawaiian Wedding Cake
- Step-by-Step Instructions to Bake a Perfect Hawaiian Wedding Cake
- Expert Tips for Your Best Hawaiian Wedding Cake Ever
- Serving Suggestions for This Tropical Dessert Recipes Showcase
- Storage and Reheating Instructions for Hawaiian Wedding Cake
- Variations on the Classic Hawaiian Wedding Cake
- Frequently Asked Questions About Hawaiian Wedding Cake
- Nutritional Estimates for This Tropical Treat
What Makes This The Ultimate Moist Hawaiian Wedding Cake?
So, what is it about this cake that makes it the standard for island celebrations? It’s not just one thing, it’s the whole choir singing together! This Hawaiian wedding cake is famous because it’s built on incredible texture and deep, natural sweetness. It’s designed to be the main event, not just an afterthought.
- Moisture derived from crushed pineapple and buttermilk—never dry!
- The delightful chewiness of sweetened coconut.
- The buttery crunch of toasted macadamia nuts.
- A lavish, tangy cream cheese frosting that cuts through the richness perfectly.
When you ask, “What is Hawaiian Wedding Cake made of?” the answer is really about balance. It’s the perfect marriage of tropical fruit and rich nuts baked into a tender crumb. It’s the kind of cake that people remember long after the party is over.
The Key Tropical Components of Hawaiian Wedding Cake
You absolutely must use crushed pineapple straight from the can, juice and all! That watery juice melts right into the batter and keeps the whole thing from ever thinking about drying out. That liquid, combined with the slight tang of buttermilk, creates an almost unbelievably tender crumb.
And please, take the extra five minutes to toast those macadamia nuts! If you just drop them in raw, they taste flat. Toasting them right before you fold them in wakes up their buttery flavor. You’ll notice the difference in every single perfect bite. It’s these little steps that show we respect the recipe, right?
Gathering Ingredients for Your Hawaiian Wedding Cake
Okay, now for the fun part: getting everything ready! Remember, with a cake this special—a true celebration centerpiece—the quality of your ingredients is what separates good from absolutely unforgettable. We’re keeping things straightforward, but make sure your butter and cream cheese are perfectly softened. If you need a little refresher on getting that frosting base right, make sure you check out my guide on cream cheese frosting fundamentals.
Cake Batter Ingredients
You need the backbone for that moist texture here. I always insist on real, unsalted butter—none of those substitutes—and good large eggs. They are the structure of this beauty!
- 2 1/2 cups all-purpose flour
- 1 teaspoon baking soda
- 1/2 teaspoon salt
- 1 cup unsalted butter, softened
- 2 cups granulated sugar
- 4 large eggs
- 1 teaspoon vanilla extract
- 1 (8 ounce) can crushed pineapple, undrained (don’t drain it!)
- 1 cup buttermilk
- 1 cup sweetened shredded coconut
- 1 cup chopped macadamia nuts, toasted
Cream Cheese-Macadamia Nut Frosting Ingredients
This frosting is sweet, tangy, and loaded with nuttiness. Everything needs to be softened here so we don’t end up with lumps!
- 1 1/2 cups powdered sugar
- 8 ounces cream cheese, softened
- 1/2 cup unsalted butter, softened
- 1 teaspoon vanilla extract
- 1/4 cup chopped macadamia nuts, toasted (for garnish)
Step-by-Step Instructions to Bake a Perfect Hawaiian Wedding Cake
Alright, let’s get baking! Getting this cake right is all about following the rhythm, and that’s why I put together this structure—it’s my favorite part of this moist layer cake baking guide for show-stopping desserts. We break it down into manageable chunks so you get that classic, rich texture it’s famous for. Pay attention to the mixing order; it’s crucial for keeping things tender!
Preparing the Cake Layers
First things first: preheat that oven to 350 degrees F (175 degrees C). Go ahead and grease and flour your two 9-inch round cake pans really well. You want a flawless release, and with sticky tropical cakes, we don’t take chances! In one bowl, go ahead and whisk together your flour, baking soda, and salt. Set that aside.
In your big mixer bowl, cream that softened butter and granulated sugar until it looks fluffy—I mean really light and pale yellow. Beat in those eggs one at a time, making sure each one is incorporated before adding the next. Stir in the vanilla extract. Now, we alternate! Gradually add the dry ingredients, switching back and forth with the buttermilk mixture. Always start and end with the dry ingredients. Mix *just* until combined. Seriously, stop right there—we don’t want to overmix after adding the flour.
Baking and Cooling the Hawaiian Wedding Cake
Divide that gorgeous batter evenly between the prepared pans. Slide them into your preheated oven for about 30 to 35 minutes. You’ll know they are done when a wooden pick inserted right into the center comes out clean. That’s the classic test, but remember, moist crumbs clinging to the pick are a good sign! Let those beauties cool in their pans for 10 minutes flat. After that, flip them gently onto a wire rack to cool completely. They must be totally cooled before we even think about frosting, okay?
Making the Cream Cheese Frosting
While the layers are resting, let’s make that amazing topping. You need your cream cheese and butter fully softened—this is non-negotiable for a smooth finish. Beat them together with your powdered sugar and vanilla extract until the mixture is utterly smooth and creamy. You should never feel any sugar graininess! Once your cakes are completely cool, you can stack them up, generously frost the top and sides, and sprinkle those remaining toasted macadamia nuts all over for a perfect finish.

Expert Tips for Your Best Hawaiian Wedding Cake Ever
If you want this cake to truly stand out—and since we are aiming for the best, of course we do—you need to focus on technique, not just mixing. Consider this your personal Coconut Macadamia Nut Cake Tutorial featuring island flavor! These little adjustments I learned over the years are what give you that rich, professional result every single time you bake.
Perfecting the Macadamia Nut Toasting
This is simple, but watch them like a hawk! When you spread those chopped macadamia nuts out on a baking sheet and pop them into the 350-degree oven, they go from perfectly fragrant to sadly burned in like, two seconds. Check them at the 8-minute mark. They should be lightly golden and smell amazing. Pull them out immediately, even if they look like they could go a minute longer. They’ll keep cooking slightly on the hot pan.
Achieving Peak Cake Moisture
Moisture is the secret weapon of any great fruit-filled bake. You absolutely must bring your butter and eggs to room temperature before you start creaming. Cold ingredients don’t emulsify well, and that ruins the airy structure we need! Also, don’t skip the buttermilk. That slight acidity reacts with the baking soda to give structure while keeping the crumb unbelievably tender. Honestly, if you follow the ingredient temperatures, you’ve already made this cake 90% better than the last time you tried it. For more in-depth tips on keeping things moist, check out my advice on baking tips for fruit-filled cakes.
Serving Suggestions for This Tropical Dessert Recipes Showcase
When you present this beauty, you want the plate to look as vibrant as it tastes! For a true wedding feel, lean into those island vibes. I love dusting just a little extra toasted coconut around the base before slicing. It frames the cake so nicely.
Since the cake is so rich and fruity on its own, keep the side offerings light and bright. A simple bowl of fresh, gorgeous berries works wonders. Or, if you want something zesty to cut through that cream cheese frosting, whip up a beautiful citrus salad. It’s one of my top picks for all my summer celebration cake ideas because it cleans the palate perfectly between bites!
Storage and Reheating Instructions for Hawaiian Wedding Cake
Even though this cake is so good you’ll want to eat it all right away, you need to know how to keep those tropical flavors fresh! Because we used that wonderful cream cheese frosting, storing it correctly is important for food safety and texture. If you frosted your cake, keep it covered tightly in the fridge. It stays beautifully moist for about four days this way, which is great for making ahead!
If you happen to have leftover, unfrosted layers, wrap them tightly in plastic wrap first—that’s the secret move for all Easy Island Inspired Desserts! They’ll be fine on the counter overnight, but the fridge is better for longer storage. When you pull it out of the cold, just let it sit on the counter for about an hour before serving so the frosting comes back to that perfect creamy texture.
Variations on the Classic Hawaiian Wedding Cake
Sometimes you follow a recipe exactly, and sometimes you just need a tiny twist to make it yours! This base recipe is so robust that it handles small changes beautifully without losing that signature moist, tropical character we love. For all my fellow bakers looking for extra Macadamia Nut Dessert Inspiration, here are a couple of foolproof swaps.
First, let’s talk citrus. If you want to amp up the brightness? Zest one full lime right into the cake batter along with your vanilla. That little bit of fresh lime cuts through the sweetness of the pineapple and coconut perfectly. It makes the cake feel even lighter, which is amazing!
Second, if you’re baking for a huge crowd—say, 100 people—and don’t want to stack endless layers, remember the note on sheet cakes! You can easily transfer all this batter into a 9×13 inch pan. You’ll just need to add about 5 to 10 extra minutes to the baking time. It’s the exact same flavor profile, just in a simpler form. If you love the coconut element here, you might also want to check out my recipe for the best bakery-style coconut cake!
Frequently Asked Questions About Hawaiian Wedding Cake
When you’re making a cake this special, you always have some questions pop up when you’re standing in your kitchen staring at the batter! That’s totally normal. I’ve gathered up the top things folks ask me, especially when they are looking for variations on these tropical dessert recipes. Let me set your mind at ease!
Can I use fresh pineapple instead of canned in this Hawaiian Wedding Cake?
You absolutely can, but you have to be prepared for a bit more work! Canned pineapple is packed in juice that helps maintain perfect moisture levels in the batter. If you use fresh pineapple, you will need to dice it and simmer it down slightly with a bit of sugar until it reduces and gets a bit syrupy. Fresh pineapple is more watery, and if you just dump it in raw, it can throw off the balance and make your cake heavier. If you’re aiming for that signature super-moist texture, I really guide folks toward the canned, undrained version for tested reliability.
What is the best way to toast macadamia nuts?
The best way? Keep it simple every time! Spread your roughly chopped nuts in a single layer on a dry baking sheet. Pop them into a 350-degree oven. This is crucial: set a timer for 8 minutes and then check them constantly after that. They toast *fast*. You want them nutty brown and aromatic. Immediately slide them onto a cool plate to stop the residual heat from burning them. That slight nutty flavor is what takes this cake from good to one of the best tropical desserts out there!
Can I make this a poke cake variation?
Oh, yes! If you want to elevate the “wetness” factor even further, you can absolutely turn this into a *pineapple poke cake* style dessert. Once the cake layers are cooled but still on the rack (before frosting!), use a chopstick or the handle of a wooden spoon to poke holes all over the surface—don’t poke through to the bottom, just deep into the cake.
Then, instead of pouring syrup over the raw batter, you just brush a warmed simple syrup mixed with a teaspoon of rum extract (or lime juice) right over the top layer. This just drives extra moisture right into the crumb before you frost it. It’s an easy way to make sure this cake stays perfect for days.

Nutritional Estimates for This Tropical Treat
Now, I know we aren’t baking this Hawaiian wedding cake for its low-calorie count—it’s a celebration cake, after all! But I believe in transparency in the kitchen. These numbers are just estimates based on the ingredients listed above, so keep in mind that exact values can shift a little depending on the pineapple brand or how heavy your frosting hand is.
- Serving Size: 1 slice
- Calories: 450
- Sugar: 45g
- Fat: 25g (14g Saturated)
- Carbohydrates: 55g
- Protein: 5g
It’s rich, it’s festive, and it packs a punch of tropical joy! Enjoy every measured bite, knowing you crafted something truly special for your loved ones.
PrintThe Ultimate Moist Hawaiian Wedding Cake with Cream Cheese-Macadamia Nut Frosting
Bake a moist, tropical Hawaiian Wedding Cake featuring crushed pineapple, shredded coconut, and toasted macadamia nuts, topped with a rich cream cheese frosting.
- Prep Time: 25 min
- Cook Time: 35 min
- Total Time: 60 min
- Yield: 12 servings 1x
- Category: Dessert
- Method: Baking
- Cuisine: American/Tropical
- Diet: Vegetarian
Ingredients
- 2 1/2 cups all-purpose flour
- 1 teaspoon baking soda
- 1/2 teaspoon salt
- 1 cup unsalted butter, softened
- 2 cups granulated sugar
- 4 large eggs
- 1 teaspoon vanilla extract
- 1 (8 ounce) can crushed pineapple, undrained
- 1 cup buttermilk
- 1 cup sweetened shredded coconut
- 1 cup chopped macadamia nuts, toasted
- 1 1/2 cups powdered sugar (for frosting)
- 8 ounces cream cheese, softened (for frosting)
- 1/2 cup unsalted butter, softened (for frosting)
- 1 teaspoon vanilla extract (for frosting)
- 1/4 cup chopped macadamia nuts, toasted (for garnish)
Instructions
- Preheat your oven to 350 degrees F (175 degrees C). Grease and flour two 9-inch round cake pans.
- In a medium bowl, whisk together the flour, baking soda, and salt. Set this aside.
- In a large bowl, cream together the softened butter and granulated sugar until light and fluffy. Beat in the eggs one at a time, mixing well after each addition. Stir in the vanilla extract.
- In a separate bowl, mix the crushed pineapple (with its juice) and the buttermilk.
- Gradually add the dry ingredients to the wet ingredients, alternating with the buttermilk mixture, beginning and ending with the dry ingredients. Mix until just combined. Do not overmix.
- Gently fold in the shredded coconut and the 1 cup of toasted macadamia nuts.
- Divide the batter evenly between the prepared cake pans.
- Bake for 30 to 35 minutes, or until a wooden pick inserted into the center comes out clean.
- Let the cakes cool in the pans for 10 minutes before inverting them onto a wire rack to cool completely.
- Prepare the frosting: Beat the powdered sugar, softened cream cheese, softened butter, and vanilla extract together until smooth and creamy.
- Once the cakes are completely cool, frost the layers and the top of the cake. Garnish the top with the remaining toasted macadamia nuts.
Notes
- To toast macadamia nuts, spread them on a baking sheet and bake at 350 degrees F for 8 to 10 minutes, watching closely to prevent burning.
- For a richer flavor, substitute almond extract for half of the vanilla extract in the cake batter.
- If you prefer a sheet cake, use a 9×13 inch baking pan and increase the baking time by about 5 to 10 minutes.
Nutrition
- Serving Size: 1 slice
- Calories: 450
- Sugar: 45g
- Sodium: 250mg
- Fat: 25g
- Saturated Fat: 14g
- Unsaturated Fat: 11g
- Trans Fat: 0.5g
- Carbohydrates: 55g
- Fiber: 2g
- Protein: 5g
- Cholesterol: 85mg