
There is nothing on earth quite like that first bite of a homemade savory snack. That incredible, satisfying crunch that store-bought crackers just never achieve. For me, moving past the manufactured stuff meant finding the absolute best version of the classic Southern cheese straws. You can read all about our philosophy over on the About Page, but know this: Julian insisted on authenticity for American classics.
We aren’t messing around with flimsy shortcuts here; this is the definitive, buttery, perfectly crisp, and just slightly spicy Southern style you dream about. Trust me, once you press that spiced dough through the cutter, you’ll know you’ve found your new go-to appetizer. They are legendary for disappearing instantly off the snack platter!
- Why These Classic Southern Cheese Straws Are Your New Favorite Savory Pastry Snacks
- Essential Ingredients for Authentic Spicy Cheese Straws
- Step-by-Step Guide to Making Perfect Cheese Straws
- Tips for Success with Traditional Southern Cheese Straws
- Variations: Beyond Classic Cheddar Cheese Straws
- Serving Suggestions for Your Cheesy Appetizer Twists
- Storage and Reheating Instructions for Best Cheese Straws
- Frequently Asked Questions About Homemade Cheese Crackers
- Nutritional Estimates for These Easy Baked Appetizers
- Share Your Experience Making These Classic Cheese Straws
Why These Classic Southern Cheese Straws Are Your New Favorite Savory Pastry Snacks
Forget those tired, factory-made crackers! My goal with these cheese straws was to create something profoundly superior so you’ll never buy a box again. They are intensely buttery, perfectly savory, and just beg to be passed around the room. These truly stand out among all the other Savory Pastry Snacks you might try.
- They are the ultimate Buttery Savory Straws—crisp down to the center, never soft in the middle.
- They make for the easiest Entertaining Easy Bites because honestly, who doesn’t adore hot cheese?
- Making them completely from scratch guarantees that perfect, addictive saltiness only homemade goodness has.
The Perfect Crisp Texture for Homemade Cheese Crackers
The secret sauce here is the ratio of butter to flour. When we mix them just right, we end up with something far beyond standard Homemade Cheese Crackers. You get that beautiful, delicate shatter when you bite down. That’s because we aren’t using any weird fillers; it’s pure fat and flour creating structure, resulting in a crispness that lasts, even if you make them a day ahead.
Ideal for Holiday Finger Foods and Game Day Snacks
If you’re hosting, these are your MVP snack! They look elegant twisted on a platter but require zero fuss from you other than rolling and cutting. They fly off the table during football season, making them essential Game Day Snacks. And come December, trust me, these are the first things people reach for when they see the spread of Holiday Finger Foods.
Essential Ingredients for Authentic Spicy Cheese Straws
To get that deep, savory flavor that screams Southern classic, you absolutely cannot skimp on your cheese selection. For our homemade cheese straws, we need the real deal: extra-sharp cheddar. It provides the necessary tang to cut through all that beautiful butter. This isn’t the time for mild stuff; we want flavor that packs a punch right from the start!
Ingredient Specifications and Preparation Notes
Here is what you need to pull together this fantastic batch of savory wonders. Remember, measuring your ingredients accurately is key for the right texture!
- 1 cup unsalted butter, make sure it’s nice and softened.
- You need 2 cups of sharp cheddar cheese, grated—and please grate it yourself!
- 2 cups all-purpose flour.
- 1/2 teaspoon cayenne pepper. This is what gives us that signature Southern kick, so don’t skip it if you like a little fire!
- 1/2 teaspoon salt and 1/4 teaspoon black pepper.
- 1/4 cup cold water—you might not need all of it, just add it slowly, one tablespoon at a time, until your dough forms a nice, firm ball. Stop mixing as soon as it comes together!
Step-by-Step Guide to Making Perfect Cheese Straws
Okay, this is the fun part where the magic happens! Even though this recipe only takes about 34 minutes total—and only 14 minutes in the oven—the technique is pure gold. We want crispy, crunchy perfection, and that all starts with how we treat the butter and cheese.
Preparing the Dough for Your Cheese Straws
First things first: get that oven hot! We’re setting the temperature to a nice, hot 400°F (200°C) right away, and line those baking sheets with parchment paper so we don’t have any sticking drama later.
Now, grab your biggest bowl. This is my favorite part in any savory bake: creaming that softened butter with all that sharp cheddar cheese. Beat it until it gets light and fluffy. You want air in there! Once that’s looking perfect, mix your dry stuff—flour, cayenne, salt, pepper—in a separate bowl. Add the dry ingredients to the butter mixture slowly. I mean slowly. If you dump it all in, you’ll just end up with tough crackers, not light, glorious cheese straws.
Finally, the water! Add that ice-cold water just one tablespoon at a time until the whole thing miraculously turns into a firm ball of dough. It should feel workable but not sticky. Stop right there!
Shaping and Baking Your Buttery Savory Straws
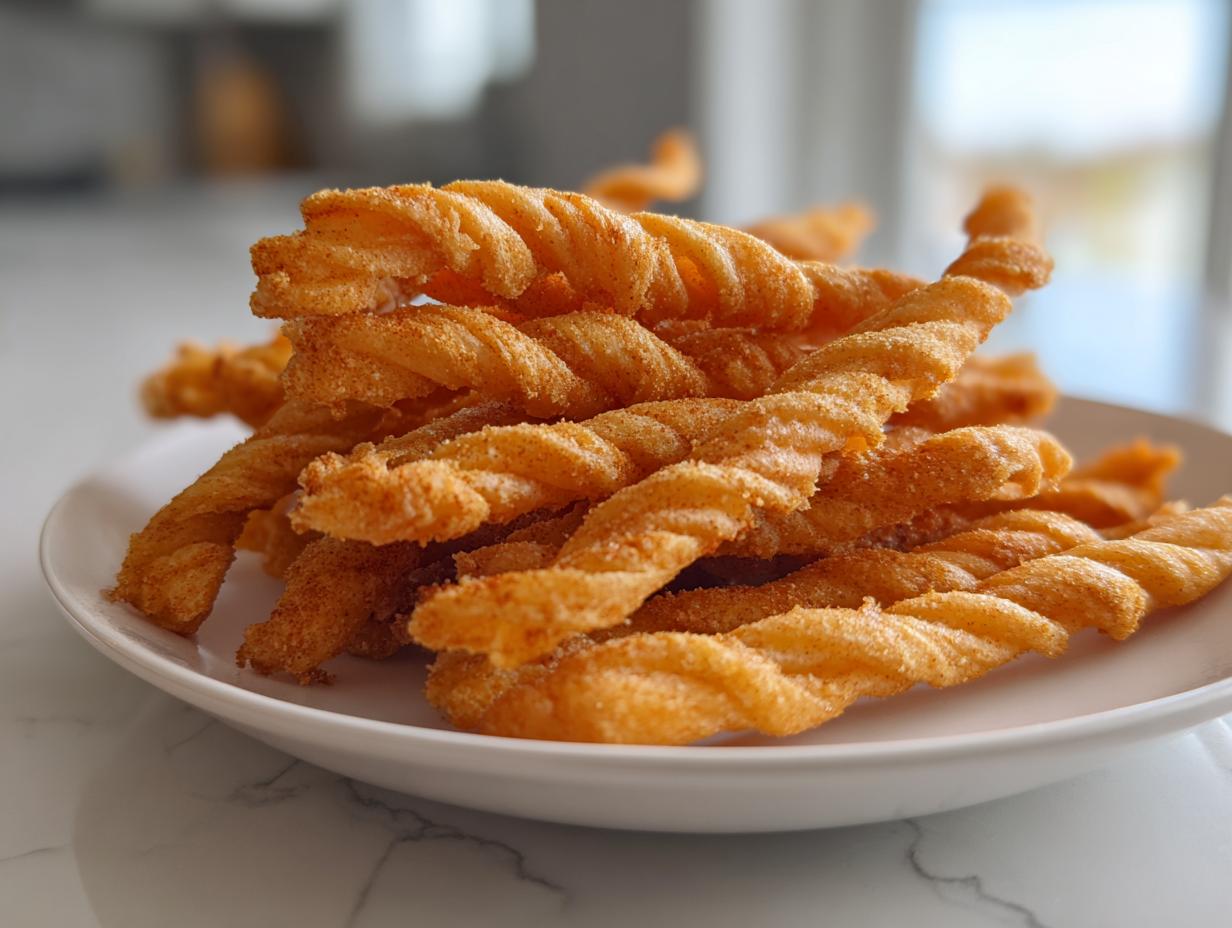
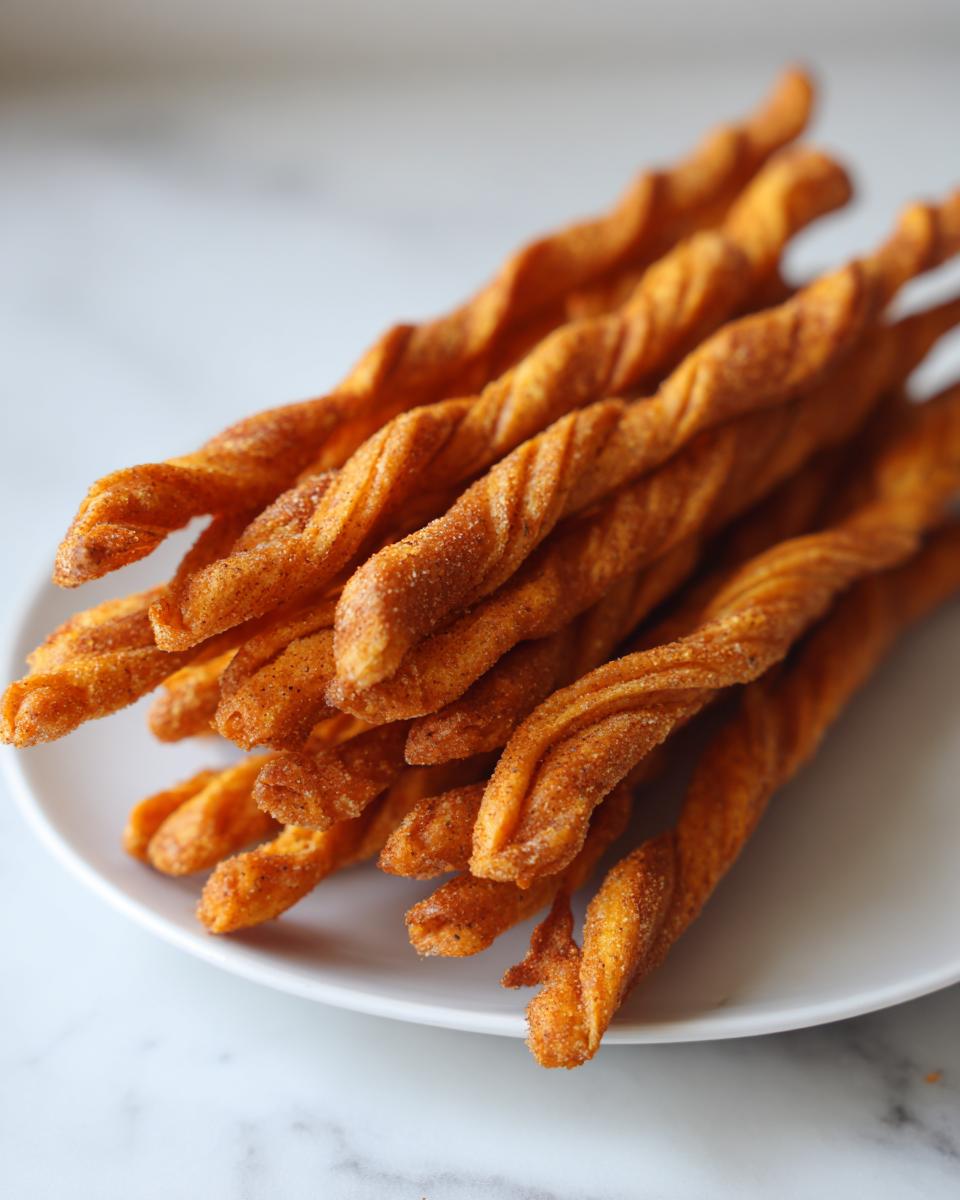
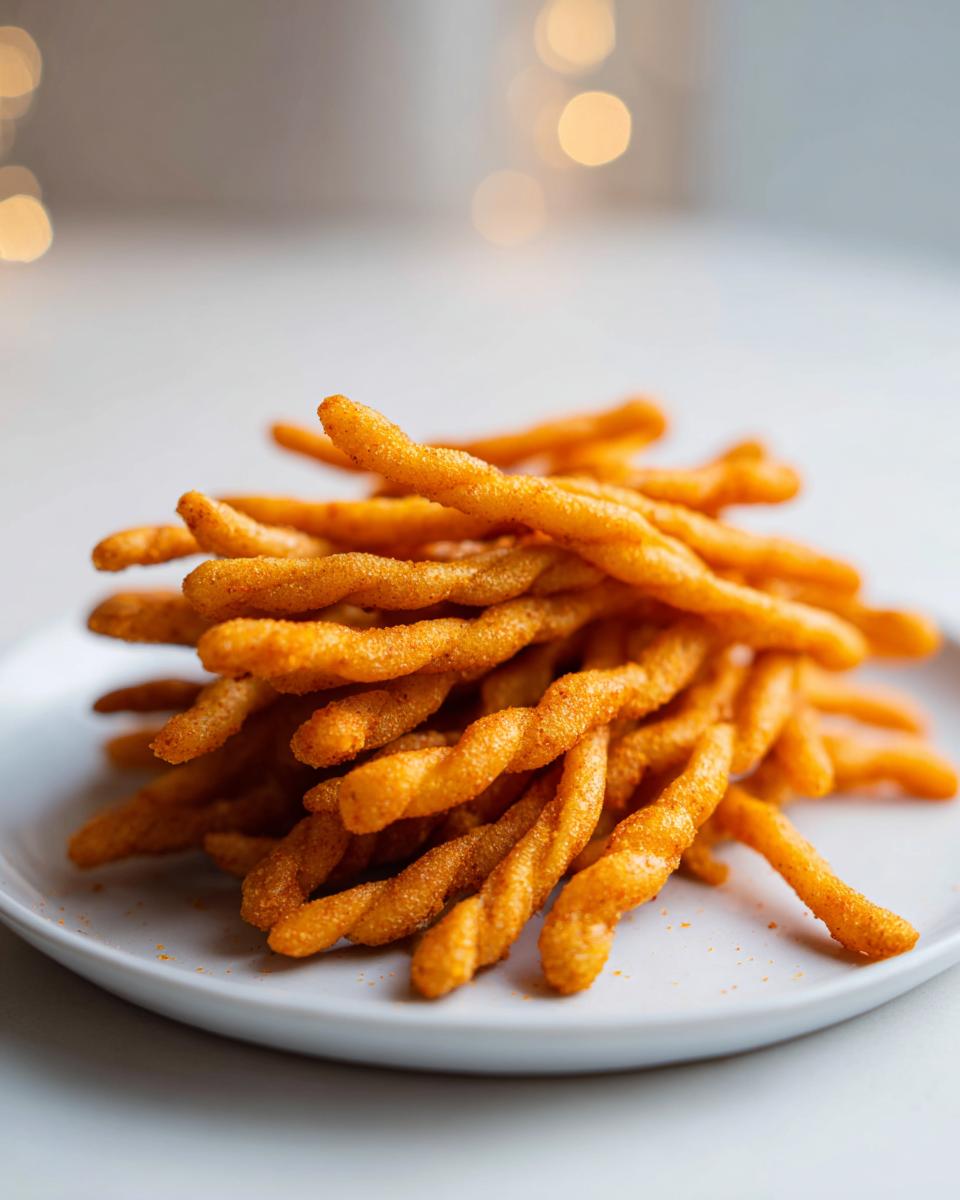
Time to turn that dough into straws! Divide your dough into two pieces. Dust your counter lightly, and roll each piece out until it’s about 1/8-inch thick. Don’t go too thick, or they will stay a bite soft in the middle instead of snapping when you eat them. Use your knife or pizza cutter to slice strips that are about 1/2-inch wide and maybe 5 or 6 inches long. Now, the signature move: give each strip a little gentle twist. See how they look like little springs? Perfect!
Lay those twisted beauties on your lined sheets. Pop them into that hot oven for 10 to 14 minutes. You are looking for golden brown edges. Don’t pull them out too soon! The most important thing I want you to remember is that these Buttery Savory Straws will get crispier once they come out. So, transfer your glorious batch—you should get about 4 dozen total—to a wire rack right away to cool. They’ll crisp up beautifully as they chill!
Tips for Success with Traditional Southern Cheese Straws
I know, I know, it’s hard to mess with a recipe that tastes this good, but I’ve learned a few things over the years of making these cheese straws that can really take them from great to absolutely iconic, especially if you’re trying to stick to Traditional Southern Recipes. It’s all about respecting the dough and knowing your ingredients!
Ingredient Substitutions for Your Cheese Straws
The recipe calls for that sharp cheddar because it’s classic, but sometimes you want to mix it up a little, right? You can definitely follow the note and swap out half of that cheddar for some nutty Parmesan. It changes the flavor profile completely—makes it a bit sharper and brings out that salty thing we love.
Also, if you’re feeling nervous about that cayenne kick, don’t panic! You can dial it way back to just 1/8 teaspoon, or leave it out entirely if you’re serving kids or folks who can’t handle the heat. And look, I know some of you folks are working with different flours now. If you need to try for Gluten Free Cheese Straws alternatives, a good quality 1:1 gluten-free blend will usually work if you substitute cup-for-cup for the flour. Just watch the water content because GF flours can soak up liquid differently, and don’t expect the exact same snap as the all-purpose version.
Make Ahead Snacks for Parties: Chilling the Dough
This is a huge secret weapon for anyone who entertains! You absolutely do not have to make these the day of the party, which is why they are fantastic Make Ahead Snacks for Parties. Once you mix the dough—Steps 1 through 5—wrap it up tightly in plastic wrap. You can chill that beautiful, savory dough for up to three full days! Seriously, three days!
When you’re ready to bake, just pull it out of the fridge, let it sit on the counter for about 15 minutes so it softens up just enough to roll without cracking, and then proceed with rolling and twisting (Steps 6 through 10). It saves so much stress when you can get the dough ready ahead of time. They come out just as fresh and crisp, I promise!
Variations: Beyond Classic Cheddar Cheese Straws
While this classic version is my absolute heart and soul, I love messing with a good thing once I’ve mastered the basic structure. If you aren’t careful, you’ll get stuck only making one kind of snack forever! These **cheese straws** are such a brilliant base for playing around with different herbs and heat levels. It’s so easy to pivot these buttery savory bases into something totally new for your next gathering.
Creating Rosemary Parmesan Appetizer Twists
If you want to lean into something a little more sophisticated, ditch some of that sharp cheddar and introduce some Parmesan. This creates a real Italian-style flavor bomb! For this variation, I suggest swapping out one full cup of the cheddar for a cup of freshly grated Parmesan cheese. The flavor really amps up, and it turns them into something perfect for a wine night.
When do you add the herbs? You want them mixed right into the dry ingredients—the flour, salt, and pepper. Toss in about two tablespoons of finely minced fresh rosemary along with the Parmesan. You toss them together, and when they bake, that rosemary blooms, giving you these gorgeous, fragrant Rosemary Parmesan Appetizer twists. They look fancy, but they take zero extra work!
Making Spicy Cheese Crackers Recipe with Extra Heat
Maybe you found my original recipe just wasn’t hitting that heat level you crave? I get it! Sometimes you need a snack that really makes you sit up and pay attention. If that’s you, we need to boost that spice factor to nail that perfect Spicy Cheese Crackers Recipe feel.
The easiest way? Just double the cayenne pepper in the dry mix. If you have some smoked paprika lying around, throw in half a teaspoon of that too. The paprika won’t add a ton of heat, but it deepens that gorgeous orangey color and gives the straw a lovely, smoky depth that pairs wonderfully with the sharp cheddar. Trust me, a little extra heat never hurt anyone when it comes to a good baked snack!
Serving Suggestions for Your Cheesy Appetizer Twists
Now that you have these gorgeous, crisp cheese straws, figuring out how to serve them is the best part! These Cheesy Appetizer Twists are rich and buttery, so they pair beautifully with things that offer a little bright contrast. I love setting them out on a big wooden board alongside some sharp olives or cornichons to cut through the richness.
For drinks, they are fantastic with a dry white wine or maybe even a crisp, cold hard cider. Honestly, though? They are great all by themselves with a good cold beer on a Sunday afternoon while watching the game. You don’t need much else when you have a perfectly seasoned, savory shortbread cracker like this!
Storage and Reheating Instructions for Best Cheese Straws
These buttery wonders are best eaten the day they are made, but since they are so easy to prep ahead, you need to know how to keep that crunch alive! You must store your finished cheese straws in a truly airtight container at room temperature. No peeking, no opening the container every five minutes to smell them!
If they do manage to sit around for a couple of days and lose a little snap, don’t worry! Just spread them back out on a baking sheet and pop them in a still-warm 300°F oven for about 3 to 5 minutes. That little blast of warmth dries out any residual humidity, and bam! They are crunchy all over again. Easy peasy!
Frequently Asked Questions About Homemade Cheese Crackers
It’s funny how even a simple recipe like this can bring up so many questions! I get it, though; baking is chemistry, and sometimes you just need that extra bit of reassurance before you start rolling out those beautiful cheese straws. If you still have questions after checking out the recipe, feel free to reach out to us!
Can I use pre-shredded cheese for these cheese straws?
Oh gosh, please don’t! This is probably my biggest baking pet-peeve. While it’s tempting because it saves, like, two minutes of grating, pre-shredded cheese is coated in anti-caking agents—usually potato starch or cellulose—so the shreds don’t stick together in the bag. Those dang agents absolutely stop the cheese from melting smoothly into your butter mixture. If you want that creamy, cohesive dough that holds its shape and texture, you have got to grate your sharp cheddar fresh from the block. It makes all the difference in how your cheese straws turn out!
What is the best cheese to use besides sharp cheddar?
Sharp cheddar is the traditional star here because of its punchy flavor. But if you want to play around, Gruyère is fantastic! It melts like a dream and has this wonderfully nutty, slightly sweet flavor profile that still works, though it won’t be as intensely tangy as the classic version. Or, if you want a milder, stretchier snack, try switching half the cheddar for Monterey Jack. It gives you a great pull. Just remember, cheese choice absolutely impacts the final flavor and texture of your Homemade Cheese Crackers.
Why did my cheese straws spread out instead of holding their twist?
If your little twisted beauties melted flat and lost all that lovely shape, nine times out of ten, it’s because your butter was too warm. When you cream the butter and cheddar, it needs to be softened, not greasy or melty. If the butter gets too soft, it incorporates too much air, and when it hits the oven, it just liquefies and spreads everything thin. Another culprit could be just overworking the dough after the flour goes in. We want minimal stirring once the dry stuff is added so the gluten stays relaxed. Warm butter + overmixing = flat, sad straws!
Nutritional Estimates for These Easy Baked Appetizers
I know some of you are counting macros or just generally curious about what you’re snacking on when you make these incredible cheese straws. Since these are baked savory bites made with butter and cheese, they aren’t exactly a light salad, but remember, they are homemade, and that’s what matters most!
Based on my recipe breakdown above, here is the estimated nutritional breakdown for about three straws, which seems like a reasonable serving size for these addictive little things. But, and this is important, please take this as a rough guideline. If you use smoked Gouda instead of sharp cheddar, or if you add herbs, these numbers will change! These estimates are based strictly on the ingredients listed in the recipe card.
- Calories: Approximately 120 per serving (3 straws).
- Fat: Around 9g total, with about 5g being saturated fat from that delicious butter and cheese.
- Carbohydrates: Low, about 7g.
- Protein: A nice bump of about 4g, thanks to all that cheddar!
So, while they are decadent, they are a fantastic, savory addition to any party spread. Enjoy them responsibly, knowing exactly what fantastic ingredients went into them!
Share Your Experience Making These Classic Cheese Straws
Wow, you made it to the end! I really hope you felt that connection to the South while baking this batch; these cheese straws are truly special for me and the whole Julia Meal family. Now that you’ve pulled them out of the oven and tasted that amazing, sharp, spicy crunch, I desperately want to hear about it!
Did you stick strictly to the recipe, or did you try one of the little flavor pivots we talked about? Please, please leave me a rating below using the five-star system! It tells me if these classic savory bites are living up to their legacy in your kitchen. And if you took any gorgeous photos of your twisted, cheesy goodness, snap a picture and tag us on social media!
Seeing how you serve these perfect appetizers—whether they’re piled high for a holiday feast or just making a Tuesday evening better—is honestly the best part of my job. It keeps that spirit of sharing alive. Thanks so much for making these cheese straws with me today. Don’t forget to check out our privacy policy if you have any concerns about sharing your feedback!
PrintClassic Spicy Southern Cheese Straws

Make traditional, savory, and crisp Southern cheese straws using sharp cheddar and a hint of spice. These are perfect for appetizers and parties.
- Prep Time: 20 min
- Cook Time: 14 min
- Total Time: 34 min
- Yield: About 4 dozen 1x
- Category: Appetizer
- Method: Baking
- Cuisine: American
- Diet: Vegetarian
Ingredients
- 1 cup unsalted butter, softened
- 2 cups sharp cheddar cheese, grated
- 2 cups all-purpose flour
- 1/2 teaspoon cayenne pepper (adjust for spice level)
- 1/2 teaspoon salt
- 1/4 teaspoon black pepper
- 1/4 cup cold water (approximately)
Instructions
- Preheat your oven to 400°F (200°C). Line baking sheets with parchment paper.
- In a large bowl, cream together the softened butter and grated cheddar cheese until light and fluffy.
- In a separate bowl, whisk together the flour, cayenne pepper, salt, and black pepper.
- Gradually add the dry ingredients to the butter mixture, mixing on low speed until just combined.
- Add the cold water, one tablespoon at a time, until the dough comes together into a firm ball. Do not overmix.
- Divide the dough in half. On a lightly floured surface, roll each half out to about 1/8-inch thickness.
- Use a knife or pizza cutter to cut the dough into strips about 1/2-inch wide and 5 to 6 inches long.
- Twist each strip gently a few times to form a straw shape. Place the straws on the prepared baking sheets.
- Bake for 10 to 14 minutes, or until the edges are golden brown and crisp.
- Transfer the cheese straws to a wire rack to cool completely. They will crisp up as they cool.
Notes
- For a less spicy version, reduce the cayenne pepper to 1/8 teaspoon or omit it entirely.
- You can substitute half the cheddar cheese with Parmesan cheese for a different flavor profile.
- Make the dough ahead of time, wrap it tightly, and chill it for up to 3 days before rolling and baking.
Nutrition
- Serving Size: 3 straws
- Calories: 120
- Sugar: 0.2
- Sodium: 150
- Fat: 9
- Saturated Fat: 5
- Unsaturated Fat: 4
- Trans Fat: 0.2
- Carbohydrates: 7
- Fiber: 0.3
- Protein: 4
- Cholesterol: 25