
When I think about the desserts that truly stop a conversation—the ones that make you close your eyes on the first bite—it always comes down to chocolate. Forget fussy cakes; nothing beats digging into a slice of truly decadent, smooth pie. That’s why I’m so excited to share what I consider the absolute pinnacle: The Ultimate Rich Chocolate Silk Pie. This recipe bridges the gap between what my professional kitchen training taught me about texture and the warm, accessible joy of making something wonderful at home, just like Julian Maxwell believes in.
Honestly, mastering the perfect **chocolate pie** is a rite of passage for any home baker. My goal here isn’t just to give you directions; it’s to hand you the keys to making a velvety, impossibly rich filling that tastes like it took all day, even though we’re streamlining some of those fancy restaurant steps. Trust me, once you try this filling, you won’t look back. This is the dessert I bring to every holiday because it just screams celebration!
We’re going to build this masterpiece from a flaky, handmade crust up to a cloud of whipped cream topping. If you’re looking for simple, delicious desserts that feel like a million bucks, you’re absolutely in the right place. Be sure to check out my guide on other easy, delicious desserts if you need more inspiration after this pie is gone!
- Why This Is The Best Homemade Chocolate Pie Recipe (E-E-A-T)
- Ingredients for the Ultimate Chocolate Pie
- How to Make Chocolate Pie From Scratch: Step-by-Step Instructions
- Ingredient Notes and Simple Chocolate Pie Substitutions
- Tips for the Perfect Chocolate Pie Presentation
- Make Ahead Chocolate Pie and Storage Guide
- Troubleshooting Common Chocolate Pie Issues
- Frequently Asked Questions About This Chocolate Pie Recipe
- Nutritional Estimates for Your Chocolate Pie Slice
Why This Is The Best Homemade Chocolate Pie Recipe (E-E-A-T)
Look, I’ve made every pie known to man, and I can tell you true: this isn’t just another recipe card you found online. Julian spent ages perfecting the balance of creaminess and structure here. It’s what makes this the absolute best homemade chocolate pie you’ll ever tackle. We obsess over results so you don’t have to!
Here’s what sets this recipe apart. It’s all about that texture and flavor depth:
- Truly Velvety Texture: We use a classic custard base paired with real bittersweet chocolate for a filling that melts in your mouth, unlike those overly fluffy imposters.
- Deep Chocolate Flavor: The combination of cocoa powder *and* good quality chopped chocolate ensures every bite hits that deep, satisfying note you crave.
- Foolproof Fudginess: We meticulously tested the cornstarch and egg yolk ratios to lock in that perfect, slightly dense, fudgy chocolate pie filling consistency. No runny messes here!
While this version is baked, it sets up so beautifully that it acts just like a no-bake recipe when chilled. If you want to check out how we handle deep chocolate flavor in a cake format, take a peek at my fudgy flourless chocolate cake recipe!
Ingredients for the Ultimate Chocolate Pie
Picking the right ingredients is half the battle, especially when you’re aiming for a truly decadent chocolate dessert. For this recipe, quality matters—specifically the fat and the chocolate. Don’t skimp here; it really pays off when you get that intensely satisfying flavor profile.
We keep things very disciplined in sections: crust, filling, and topping. Keep them separate until it’s time to assemble. My biggest tip right off the bat? Make sure that butter for the crust is ice cold. It creates those beautiful flaky layers we are aiming for that elevate any chocolate pie crust idea.
For the Flaky Pie Crust
This is a simple, all-butter crust, but the butter has to be cold, cold, cold! That’s the secret to avoiding a dense base.
- 1 1/2 cups all-purpose flour
- 1/2 teaspoon salt
- 1/2 cup cold unsalted butter, cubed
- 3 to 4 tablespoons ice water
For the Rich Chocolate Silk Pie Filling
This is where the magic happens. We’re using both cocoa and real chocolate here to build that multi-layered, rich chocolate silk pie flavor.
- 1 cup granulated sugar
- 1/4 cup unsweetened cocoa powder
- 1/4 cup cornstarch
- 1/2 teaspoon salt
- 2 cups whole milk
- 3 large egg yolks, lightly beaten
- 4 ounces bittersweet chocolate, finely chopped
- 2 tablespoons unsalted butter
- 1 teaspoon vanilla extract
For the Velvety Whipped Topping
Keep everything for this topping chilled, especially your bowl and whisk attachments. A fluffy topping prevents the whole dessert from tasting too heavy.
- 1 1/2 cups heavy whipping cream
- 2 tablespoons powdered sugar
- 1/2 teaspoon vanilla extract
How to Make Chocolate Pie From Scratch: Step-by-Step Instructions
Okay, ready to get baking? This is where we turn those beautiful separate ingredients into the classic chocolate pie recipe that will wow everyone. We’re moving through three real phases here: getting that crust perfect and crisp, building that amazing custard filling, and then letting patience do the rest of the work. Remember, this isn’t a rushed job; good things take time!
Preparing and Blind Baking the Chocolate Pie Crust
First things first, let’s tackle that crust. Mix your flour and salt, then use your fingers or a pastry cutter to work in that cold butter until it looks like coarse crumbs—you want those little pea-sized chunks. Don’t overwork it! Add your ice water one tablespoon at a time until it just holds together when you squeeze it. Form that disk, wrap it up, and let it chill for 30 minutes. That chilling time is non-negotiable; it keeps the butter solid so you get flakiness!
Preheat your oven to 375 degrees F. Roll out your dough and gently ease it into your 9-inch pie plate. Crimp the edges however fancy you like. Now, cover the dough with parchment paper and fill it up with pie weights or dried beans. We blind bake this to keep it from shrinking! Pop it in for 15 minutes. Remove the weights and paper, and honestly, bake it for just 5 to 7 more minutes until it looks faintly golden. Set it aside completely to cool; a warm crust equals a soggy belly, and trust me, we want zero sogginess.
Creating the Fudgy Chocolate Pie Filling
While the crust cools down, we build the star: the fudgy chocolate pie filling. In a saucepan, whisk together the sugar, cocoa powder, cornstarch, and salt really well—you have to get those clumps out now! Slowly whisk in the milk until everything is smooth. Put this on medium heat, and you must stir constantly until it thickens up and really boils. Let it boil for just one minute while stirring.
Here’s the critical step for a luxurious custard, so pay attention! In a separate bowl, whisk your three egg yolks. Now, you have to temper them. Take about half a cup of that hot milk mixture and whisk it *slowly* into the yolks—if you dump it fast, you’ll scramble them! Once they’re happy, slowly pour that tempered yolk mixture back into the saucepan. Keep stirring over medium heat until it bubbles and thickens again. Turn off the heat, stir in the chopped bittersweet chocolate, the final two tablespoons of butter, and the vanilla until it’s all glossy and melted beautifully. Wow, the smell!
Pour that hot filling right into your cooled crust. Press a piece of plastic wrap right onto the surface—this is crucial to stop that weird skin from forming while it cools. Pop the whole thing into the fridge for at least four hours, but honestly, overnight is even better!
If you want to check out how I whip up my own quick chocolate ganache—another wonderful topping option—check out these ganache ratios and uses!
Finishing the Velvety Chocolate Pie
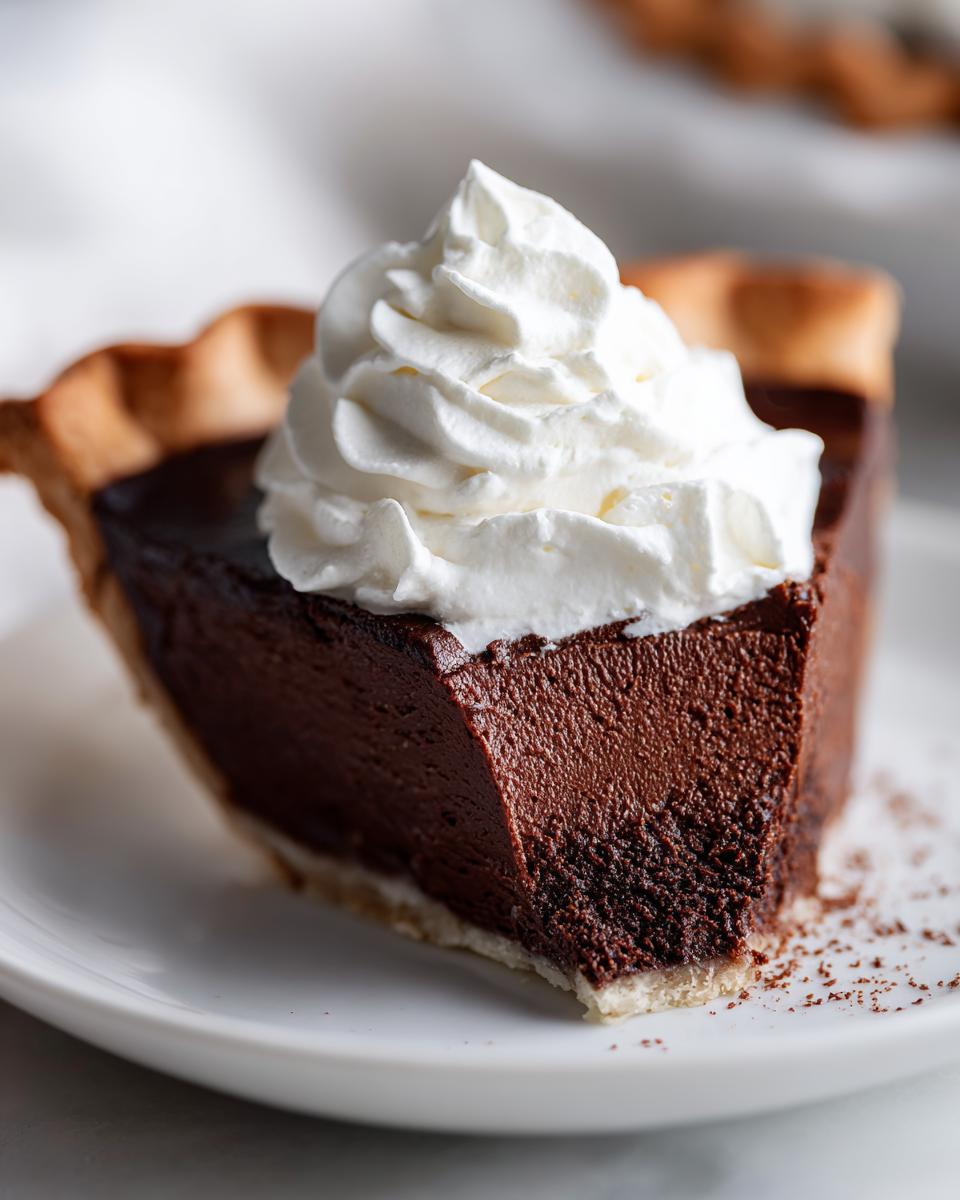
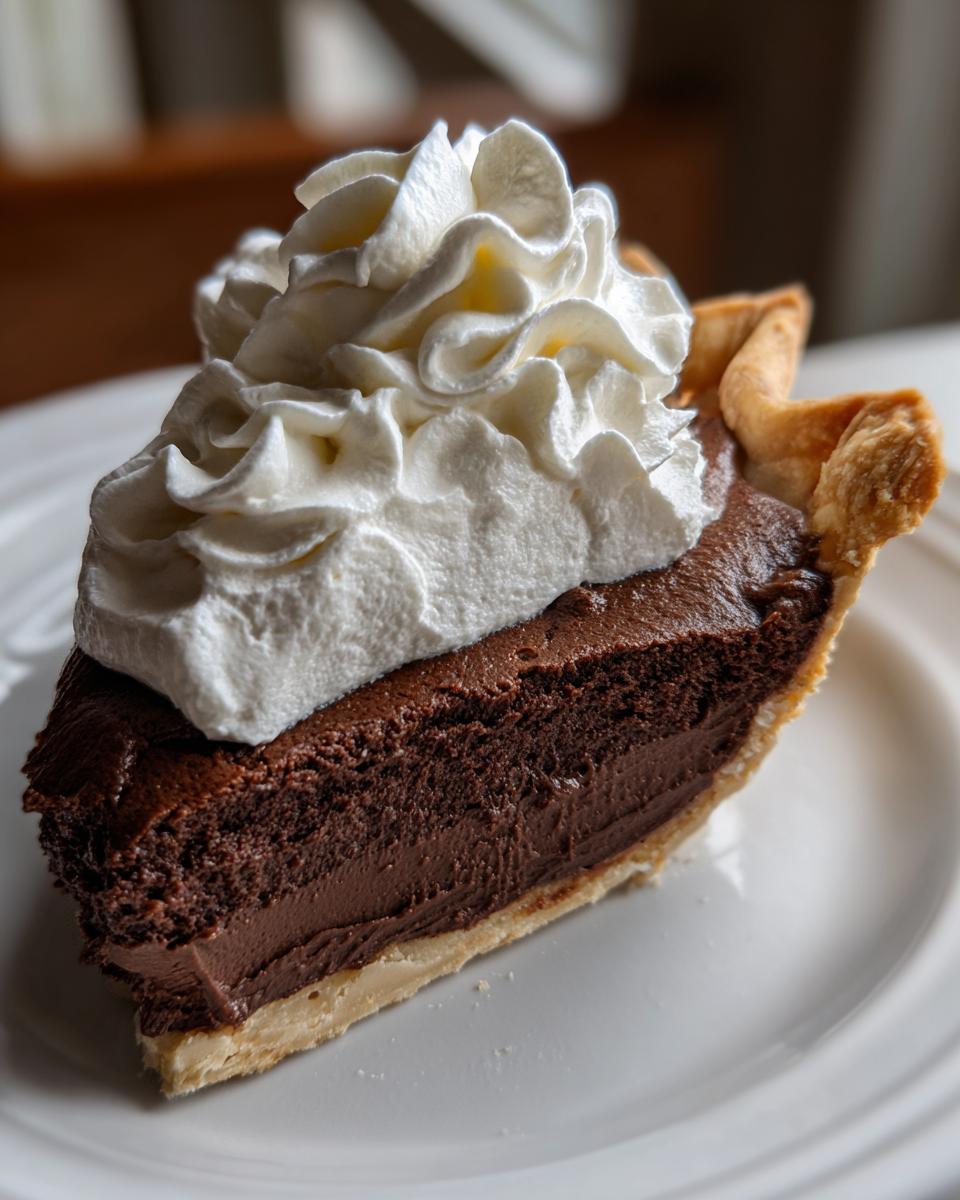
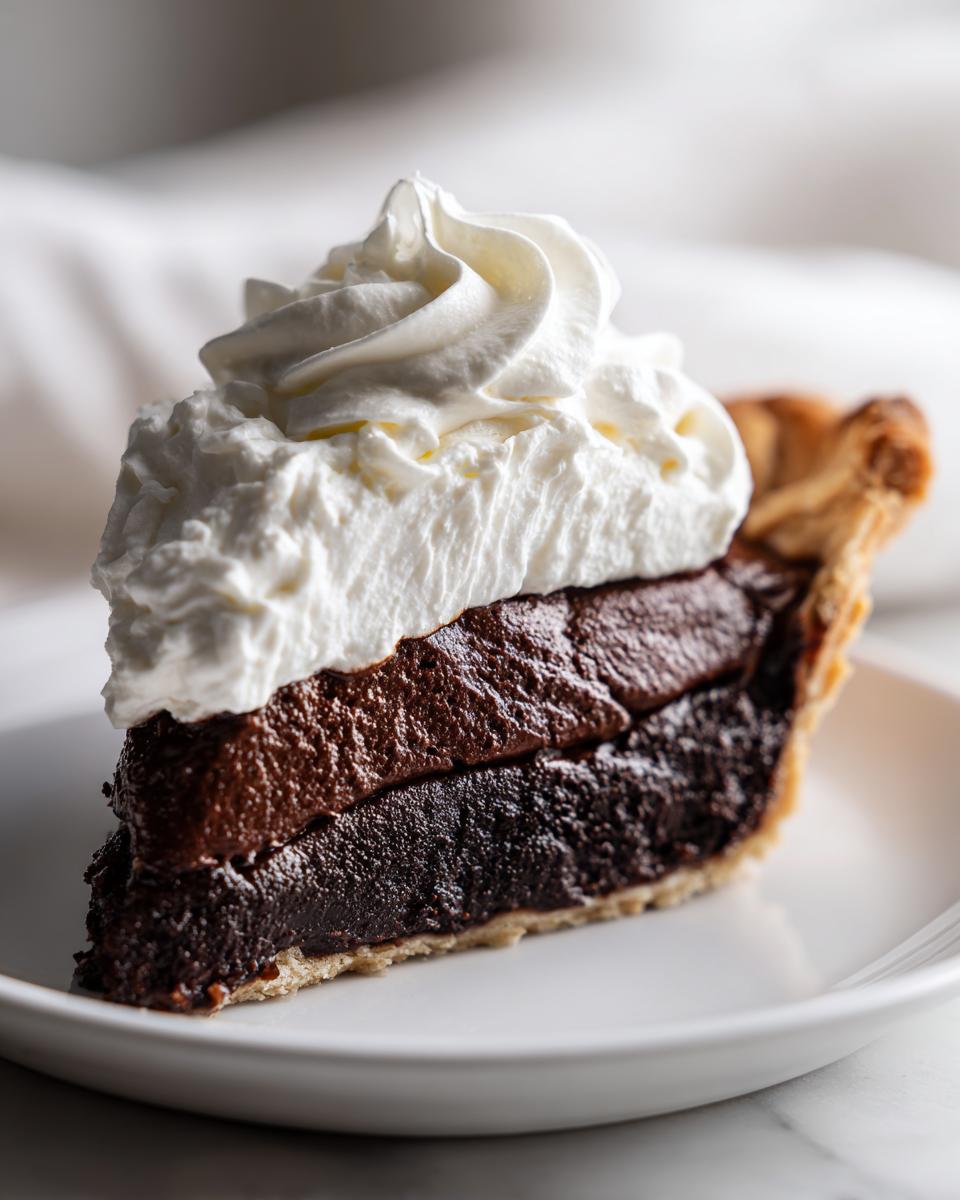
Once your filling is super firm, it’s time for the crowning glory! In a chilled bowl, beat your heavy cream, powdered sugar, and vanilla until you get stiff peaks. This topping should be light and airy to contrast the dense filling. Spread or pipe that cloud over the set pie right before you plan to serve it. Remember, this topping doesn’t store well for days, so finish it fresh!
Ingredient Notes and Simple Chocolate Pie Substitutions
I know sometimes you look at a recipe and realize you’re missing one tiny thing, but don’t panic! This recipe is pretty flexible, but remember, we’re going for *rich* here. If you wanted a lighter dessert, you could easily pivot into an easy chocolate cream pie vibe by swapping the bittersweet chocolate for milk chocolate, though you’ll lose some depth.
The biggest substitution I get asked about is the crust. Want a true no bake chocolate pie? Skip all those steps for the flour crust! Grab a pre-made graham cracker crust instead. You still need to chill the filling for hours, but you save about 45 minutes of work. Also, if you’re out of heavy cream, you can absolutely use a good quality store-bought whipped topping, but Julian insists the fresh cream puts you miles ahead in flavor!
For more quick chocolate ideas that don’t require baking the crust, look into my guide on easy 3-ingredient chocolate mousse!
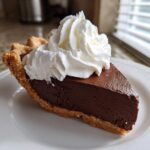
Tips for the Perfect Chocolate Pie Presentation
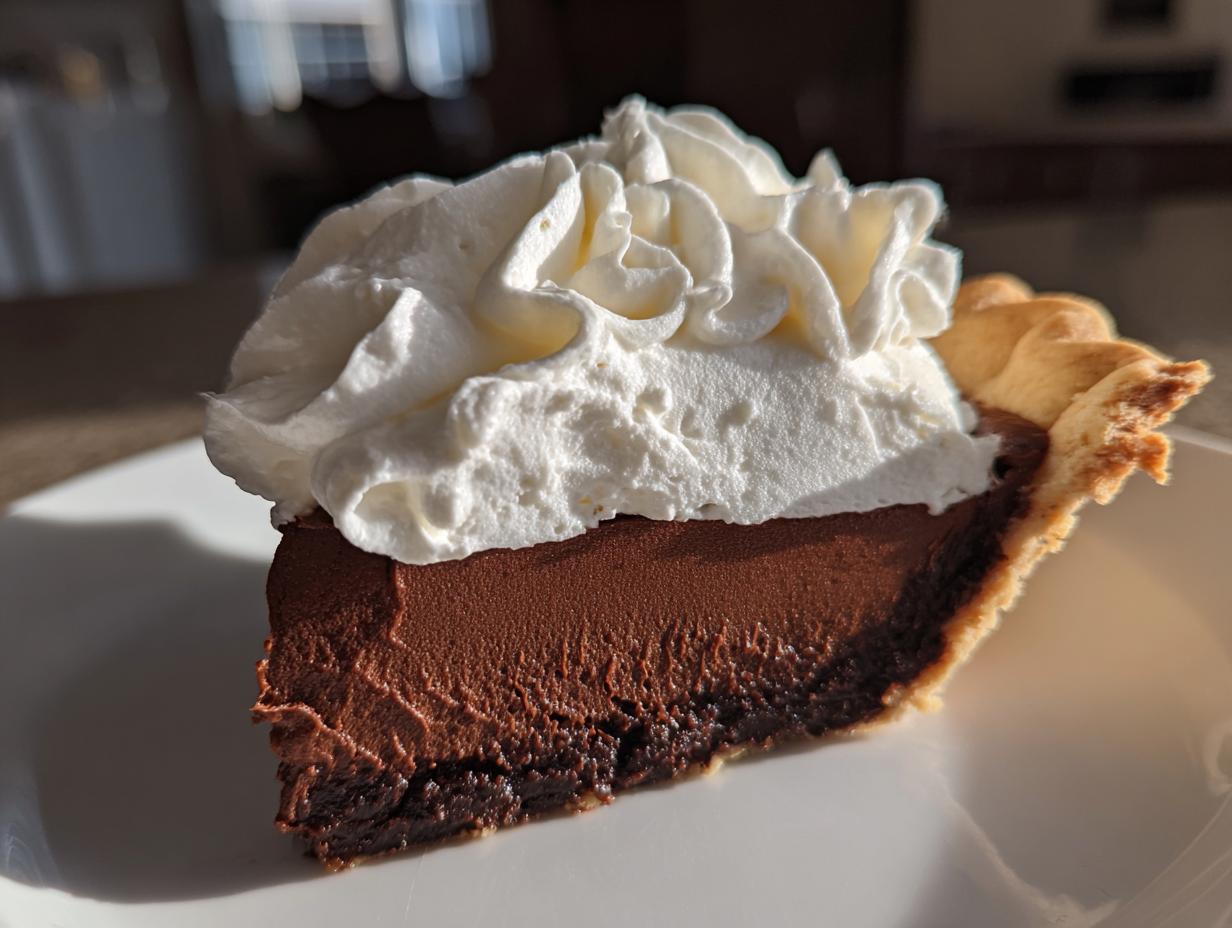
Presenting this stunning **chocolate pie** is almost as fun as eating it. Since the filling is so dark and luxurious, you want the whipped cream topping to really stand out. I always use a large offset spatula and swirl the whipped cream high—texture is elegance!
If you are serving this for a more formal setting, skip the full layer of topping and just pipe elegant rosettes around the edges. Then, dust the whole center with some high-quality unsweetened cocoa powder. For an extra special touch, use a vegetable peeler to shave tiny curls of that bittersweet chocolate over the top right before it hits the table. It looks incredibly professional, but honestly, it’s just melted chocolate shavings!
For the best frosting look, check out my guide on quick creamy chocolate frosting—you can use that as an alternative topping if you prefer something sturdier than whipped cream.
Make Ahead Chocolate Pie and Storage Guide
This is, thankfully, a fantastic make ahead chocolate pie dessert! You absolutely must chill the filling for those four hours before topping it. You can make the crust, blind bake it, and store it airtight at room temperature for up to a day before filling. Perfect for holiday scheduling, right?
The best way to store the finished pie—with the whipped topping applied—is covered loosely with plastic wrap in the refrigerator. Make sure the plastic isn’t touching the whipped cream, or it will stick and smear. We find this pie is best eaten within two days. The longer it sits, the more the crust starts to absorb that moisture, even if it’s rich! If you’re looking for make-ahead recipes that let you skip all this chilling, I’ve collected a few of my favorites to make that process easier.
Troubleshooting Common Chocolate Pie Issues
Custard pies can be anxiety-inducing, I get it! The number one fear is that fudgy chocolate pie filling ending up runny. If your filling seems too thin after chilling, it usually means you didn’t boil the slurry long enough in Step 5, or you didn’t temper those yolks carefully enough. If it really is too thin, you can sometimes slowly reheat the mixture (without the crust!) and whisk in just a teaspoon more cornstarch mixed with a tiny bit of cold water, then bring it back to a bare simmer.
If you see a weird skin on top, you forgot the plastic wrap trick! If the crust burns while blind baking, just cover the edges with aluminum foil halfway through the baking process. Don’t sweat it; every baker has had a pie crisis!
Frequently Asked Questions About This Chocolate Pie Recipe
Can I turn this baked pie into a true French Silk Pie?
That’s a great question! A true French Silk Pie is actually butter, sugar, and eggs whipped until ribbon-like, folded with melted chocolate, and served cold, usually in a crunchy crust. This recipe leans more toward a velvety chocolate pie custard. If you use a graham cracker crust instead of pastry and skip the baking of the custard (just chill until set), you’re very close to an easy chocolate cream pie style!
Does this recipe work for a deep dish chocolate pie?
Sure! You can definitely use a deeper 10-inch pie dish. Just know you’ll need to increase your filling ingredients by about 1/3 or so to make sure it fills it nicely. You’ll also need to watch the baking time for that crust; it might need an extra minute or two.
Can I use instant pudding mix instead of making the custard?
You certainly *can* use instant pudding for a very quick dessert, but if you do that, you’ve essentially made a very simple dessert recipe—not this rich, decadent version. The custard base with egg yolks and cornstarch gives you that deep, professional flavor that the boxed mixes just can’t replicate. If you’re looking for other quick options, check out my picks for easy dessert recipes with chocolate!
How important is the bittersweet chocolate choice?
It’s super important. We specify bittersweet because the sugar in the filling is already quite sweet. Using a 60% to 70% cocoa chocolate ensures you get that rich, deep flavor without making the final product overly sugary. It’s key to the intensity of this chocolate pie.
Nutritional Estimates for Your Chocolate Pie Slice
We all know a dessert this amazing isn’t exactly a health food, but knowing the general estimates helps when planning the menu! Remember, these figures are just approximations based on the specific ingredients listed in the recipe, and your serving size or ingredient choices will change the final count.
- Serving Size: 1 slice
- Calories: 450
- Sugar: 35g
- Sodium: 210mg
- Fat: 28g
- Saturated Fat: 16g
- Unsaturated Fat: 12g
- Trans Fat: 0.5g
- Carbohydrates: 45g
- Fiber: 3g
- Protein: 6g
- Cholesterol: 110mg
Ingredient Notes and Simple Chocolate Pie Substitutions
I know sometimes you look at a recipe and realize you’re missing one tiny thing, but don’t panic! This recipe is pretty flexible, but remember, we’re going for *rich* here. If you wanted a lighter dessert, you could easily pivot into an easy chocolate cream pie vibe by swapping the bittersweet chocolate for milk chocolate, though you’ll lose some depth.
The biggest substitution I get asked about is the crust. Want a true no bake chocolate pie? Skip all those steps for the flour crust! Grab a pre-made graham cracker crust instead. You still need to chill the filling for hours, but you save about 45 minutes of work. Also, if you’re out of heavy cream, you can absolutely use a good quality store-bought whipped topping, but Julian insists the fresh cream puts you miles ahead in flavor!
For more quick chocolate ideas that don’t require baking the crust, look into my guide on easy 3-ingredient chocolate mousse!
Tips for the Perfect Chocolate Pie Presentation
Presenting this stunning chocolate pie is almost as fun as eating it. Since the filling is so dark and luxurious, you want the whipped cream topping to really stand out. I always use a large offset spatula and swirl the whipped cream high—texture is elegance!

If you are serving this for a more formal setting, skip the full layer of topping and just pipe elegant rosettes around the edges. Then, dust the whole center with some high-quality unsweetened cocoa powder. For an extra special touch, use a vegetable peeler to shave tiny curls of that bittersweet chocolate over the top right before it hits the table. It looks incredibly professional, but honestly, it’s just melted chocolate shavings!
For the best frosting look, check out my guide on quick creamy chocolate frosting—you can use that as an alternative topping if you prefer something sturdier than whipped cream.
Make Ahead Chocolate Pie and Storage Guide
Listen, I love a gorgeous, **decadent chocolate dessert**, but I don’t always have time to make everything the day of a party! The good news is that this recipe is fantastic for planning ahead. You can absolutely make the crust, blind bake it, let it cool completely, and store it airtight for a full day before you even think about the filling.
The filling itself sets up so nicely that I let it chill completely uncovered—that’s right, plastic wrap touching the surface!—for at least 6 hours, but I almost always make it the day before serving. When you’re ready to present it, just whip up your cream topping and spread it on. Never try to store the pie *with* the whipped cream already on; it gets soggy fast!
If you need more specific timing tips or want to see where else you can save time, I’ve put together some great strategies in my dedicated guide on make ahead chocolate pie planning!
Troubleshooting Common Chocolate Pie Issues
Custard pies, especially something as rich as this, can throw a little curveball if you aren’t careful. The biggest panic point is always a runny filling! If you slice into your beautiful pie after chilling and it just oozes everywhere, nine times out of ten, it means the starch didn’t fully activate. You probably didn’t bring that milk mixture to a full boil long enough in Step 5.
Oops! If it’s too late, you can sometimes save it by carefully scooping the filling back into the saucepan (without the crust!) and whisking in just one more teaspoon of cornstarch mixed with a teensy bit of cold milk, then simmer until it thickens gently. For the skin issue, I’ve told you a thousand times: plastic wrap pressed right onto the surface when chilling! It’s the only way to keep that beautiful, smooth, **velvety chocolate pie** surface pristine.
Frequently Asked Questions About This Chocolate Pie Recipe
Is this similar to a deep dish chocolate pie?
This recipe is technically sized for a standard 9-inch pie plate, which gives you a great, tall filling! If you wanted a true deep dish chocolate pie, you’d need to scale up the ingredients by about a third to ensure you have enough filling to reach the top of a deeper dish. I find the standard size keeps the texture perfectly balanced, but go deep if you love extra fudge!
Can I make this into an easy chocolate cream pie instead?
You are so close! An easy chocolate cream pie often uses whipped topping or a lighter meringue and usually doesn’t involve the bittersweet chocolate step, relying just on cocoa for flavor. To convert this, use a graham cracker crust instead of pastry and skip baking the filling entirely—just chill it until firm. You’ll use the same filling recipe, but you won’t temper the yolks or cook it; you’ll just melt the chocolate in with the hot milk mixture and chill. It’s quicker, but honestly, less rich than the baked silk version here.
What’s the best way to serve this for a holiday gathering?
For the best chocolate pie for holidays, I always lean into the make-ahead aspect! Make the crust and filling the day before. The day of the party, whip up your cream topping fresh and assemble it about an hour before serving. That ensures the cream is stiff and gorgeous. A light dusting of cocoa or some toasted nuts on top makes it look stunning on a crowded dessert table.
What if I want a Chocolate Meringue Pie instead?
Oh, that’s a whole different adventure! A meringue topping is airy and baked, while this decadent dessert uses a dense, chilled whipped cream topping. If you want to try the meringue route, you’d stop after Step 8 (the filling is poured and chilled), then top it with a meringue mixture and briefly bake it until the top is golden brown. Keep in mind, the texture contrast will be completely different!
If you are looking for more straightforward, less fussy options, I’ve collected some of my favorite easy dessert recipes with chocolate that might be perfect for your weeknight baking!
Nutritional Estimates for Your Chocolate Pie Slice
Listen, I know we’re making something truly special here, a slice of heaven, so we aren’t going to focus too hard on macros, but I like to keep the data handy just in case someone asks! For those of you tracking things, here are the ballpark figures Julian calculated based on the precise ingredient list above.
Just keep in mind that these numbers are estimates. If you swap out whole milk for reduced fat, or use high-quality dark chocolate versus semi-sweet, the final values for your ultimate rich chocolate silk pie are going to shift a bit. Use these numbers as a general guide!
- Serving Size: 1 slice
- Calories: 450
- Sugar: 35g
- Sodium: 210mg
- Fat: 28g
- Saturated Fat: 16g
- Unsaturated Fat: 12g
- Trans Fat: 0.5g
- Carbohydrates: 45g
- Fiber: 3g
- Protein: 6g
- Cholesterol: 110mg
The Ultimate Rich Chocolate Silk Pie
Make this decadent, velvety chocolate silk pie from scratch. This recipe yields a rich, fudgy filling in a crisp crust, perfect as a simple dessert or for holiday gatherings.
- Prep Time: 30 min
- Cook Time: 30 min
- Total Time: 60 min
- Yield: 8 servings 1x
- Category: Dessert
- Method: Baking and Chilling
- Cuisine: American
- Diet: Vegetarian
Ingredients
- 1 1/2 cups all-purpose flour
- 1/2 teaspoon salt
- 1/2 cup cold unsalted butter, cubed
- 3 to 4 tablespoons ice water
- 1 cup granulated sugar
- 1/4 cup unsweetened cocoa powder
- 1/4 cup cornstarch
- 1/2 teaspoon salt
- 2 cups whole milk
- 3 large egg yolks, lightly beaten
- 4 ounces bittersweet chocolate, finely chopped
- 2 tablespoons unsalted butter
- 1 teaspoon vanilla extract
- 1 1/2 cups heavy whipping cream
- 2 tablespoons powdered sugar
- 1/2 teaspoon vanilla extract
Instructions
- Prepare the crust: Mix flour and salt. Cut in the cold butter until the mixture resembles coarse crumbs. Add ice water one tablespoon at a time until the dough just comes together. Form into a disk, wrap, and chill for 30 minutes.
- Preheat your oven to 375 degrees F. Roll out the dough and fit it into a 9-inch pie plate. Crimp the edges. Prick the bottom all over with a fork. Line the crust with parchment paper and fill with pie weights or dried beans.
- Bake for 15 minutes. Remove the weights and paper and bake for another 5 to 7 minutes until lightly golden. Cool completely on a wire rack.
- Make the filling: In a medium saucepan, whisk together sugar, cocoa powder, cornstarch, and salt. Gradually whisk in the milk until smooth.
- Cook over medium heat, stirring constantly, until the mixture thickens and comes to a boil. Boil for 1 minute, stirring constantly. Remove from heat.
- In a separate bowl, whisk the egg yolks. Slowly temper the hot milk mixture into the yolks, whisking constantly. Return the mixture to the saucepan.
- Cook over medium heat, stirring, until the mixture thickens again and bubbles. Remove from heat. Stir in the chopped bittersweet chocolate, 2 tablespoons of butter, and vanilla extract until smooth.
- Pour the hot filling into the cooled pie crust. Press plastic wrap directly onto the surface of the filling to prevent a skin from forming. Chill for at least 4 hours, or until firm.
- Make the topping: In a chilled bowl, beat the heavy cream, powdered sugar, and vanilla extract until stiff peaks form.
- Spread or pipe the whipped cream topping over the chilled pie just before serving. Keep refrigerated.
Notes
- For a no-bake option, use a pre-made graham cracker crust and chill the filling until completely set.
- If you prefer a lighter topping, substitute the whipped cream with store-bought whipped topping.
- To achieve a truly velvety texture, ensure you temper the egg yolks slowly to prevent scrambling.
Nutrition
- Serving Size: 1 slice
- Calories: 450
- Sugar: 35g
- Sodium: 210mg
- Fat: 28g
- Saturated Fat: 16g
- Unsaturated Fat: 12g
- Trans Fat: 0.5g
- Carbohydrates: 45g
- Fiber: 3g
- Protein: 6g
- Cholesterol: 110mg