
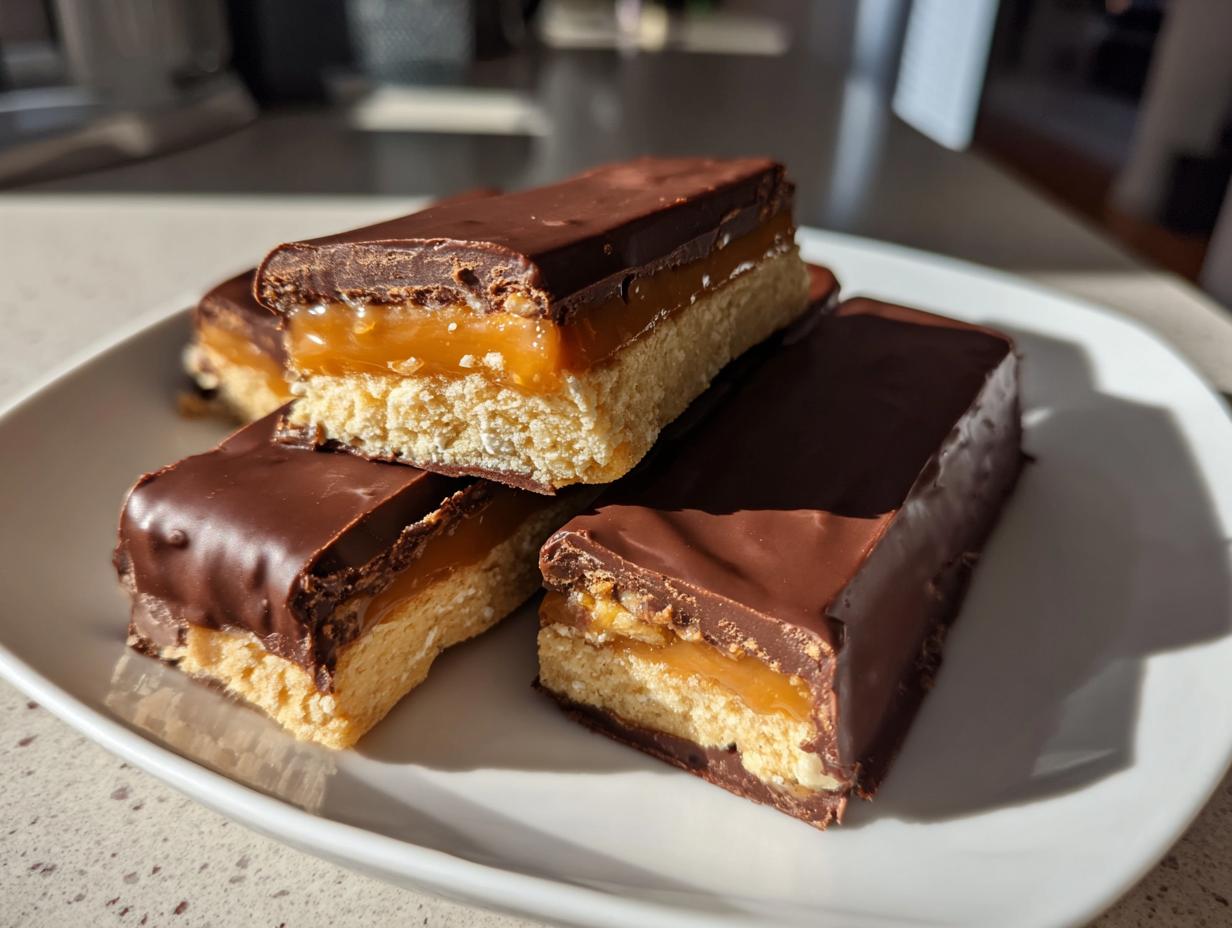
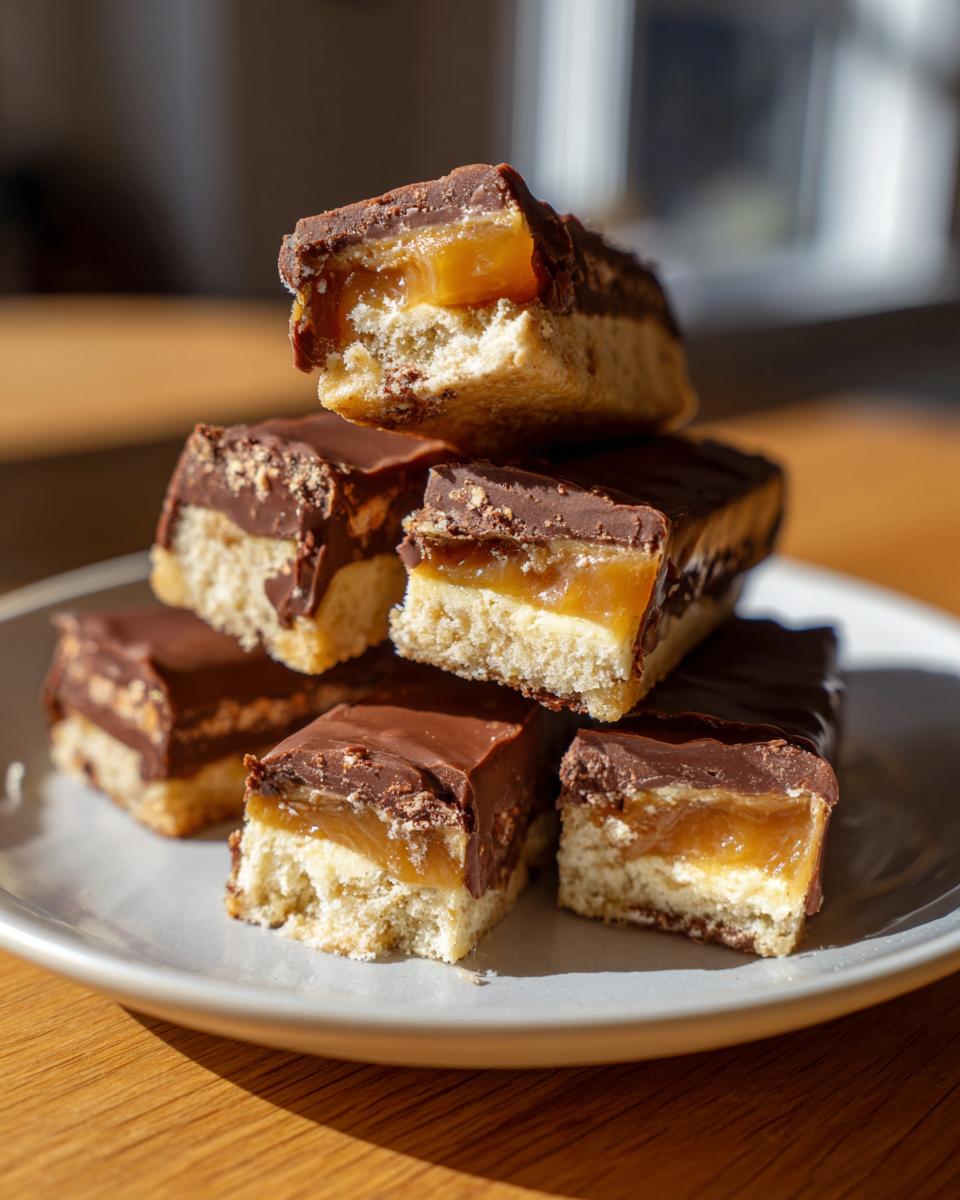
There are some cravings that only a specific, layered crunch can satisfy, and when that craving hits, nothing else will do! Forget making a trip to the store; I want you to experience the pure joy of tearing into a candy bar you made yourself. Trust me, once you try these Ultimate Homemade Twix Bars, you’ll never look back. The shortbread base is richer, the caramel is impossibly gooey, and the chocolate coating just melts right. Recreating those iconic candies in my own kitchen is one of those small, perfect achievements that makes all the whisking worthwhile. We’re taking that familiar, fantastic combination and making it the best version possible right here. If you love making simple, satisfying treats, you’ll find more inspiration in my collection of simple, delicious desserts.
- Why This Homemade twix Bars Recipe Works (E-E-A-T)
- Gathering Ingredients for Your Ultimate twix Style Treats
- Step-by-Step Instructions for Homemade twix Bars
- Tips for Success Making Copycat twix Recipe
- Variations on the twix Inspired Desserts
- Storage and Making Ahead for Your Decadent Dessert Bars
- Frequently Asked Questions About Making twix
- Estimated Nutritional Data for Homemade twix
- Share Your Ultimate twix Creation
Why This Homemade twix Bars Recipe Works (E-E-A-T)
The reason this recipe beats the wrapper hands down is simple: we control the quality of every layer. It’s about texture balance, my friends. You get that perfect crisp-then-tender Buttery Shortbread Recipe, followed by a tidal wave of Gooey Caramel Filling, all sealed up with rich chocolate. When I learned to cook professionally, precision was everything, and that applies here too. Using real, high-quality butter and proper sugars makes a visible difference in both flavor depth and texture stability.
The Secret to the Perfect Shortbread Cookie Base
You don’t want crumbly sand; you want structure! The trick to the best Shortbread Cookie Base is in the first step: creaming the butter and sugar until it’s pale and fluffy. Don’t rush that! That aeration is what keeps the shortbread tender after baking, so it gives way beautifully when you bite into it, instead of just snapping off.
Achieving Easy Chewy Caramel
Caramel can be intimidating, but it shouldn’t be. The key here is patience and a heavy bottomed pan. You must stir constantly when that mixture is bubbling—that stops scorching and ensures all the sugars break down evenly. That attention to detail delivers that glorious, Easy Chewy Caramel stretch without becoming hard candy. That’s my little secret for bringing the best of the twix flavor home.
Gathering Ingredients for Your Ultimate twix Style Treats
Before we dive into the assembly line that turns these simple components into magic, we need to make sure your pantry is stocked correctly. I’ve broken down exactly what you need below, grouped by the component it belongs to. Remember, for these Chocolate Caramel Treats, the quality of the base ingredients really shines through, especially in that shortbread!
It’s crucial to have your butter softened for the base, but your brown sugar for the caramel must be packed firmly into the cup. Get your ingredients ready—this is called mise en place, and it keeps us from scrambling later when the caramel is bubbling! If you’re looking for more straightforward recipe setups like this, check out my rundown on simple, delicious desserts.
Here is what you need to gather for your Homemade Candy Bar Style project:
For the Shortbread Base:
- 1 cup (that’s two full sticks!) of unsalted butter that is properly softened—you should be able to dent it easily with your finger.
- 1/2 cup granulated sugar.
- 2 cups of all-purpose flour. This is the backbone!
- Just a small pinch, 1/4 teaspoon, of salt to balance everything out.
For the Gooey Caramel Filling:
- One standard 14-ounce can of sweetened condensed milk. Don’t drain it!
- 1/2 cup of light brown sugar; make sure it’s packed down well.
- 1/4 cup of unsalted butter (half a stick, softened helps it melt faster).
- 1 teaspoon of pure vanilla extract—use the real stuff here, please!
- Another small pinch, 1/4 teaspoon, of salt.
For the Chocolate Coating:
- 12 ounces of semi-sweet chocolate chips. I usually go for a good quality brand here.
- 1 tablespoon of coconut oil or good quality shortening. This little bit of fat is non-negotiable, as it keeps the chocolate glossy and thin enough for dipping.
Step-by-Step Instructions for Homemade twix Bars
Okay, here’s where the magic really happens! We’re assembling our layers to create that perfect crunch-chew-snap combination we all adore. Don’t rush through the chilling phases—that’s the secret to getting that gorgeous, clean slice later on. I always put on some music; baking these layered bars is best done with a bit of focus and enjoyment. You can find some other fantastic tips for similar recipes over at Just So Sweet if you want to see how others tackle these beauties!
Baking the Buttery Shortbread Cookie Base
First things first, get that oven heated up to 350°F (175°C). Line your 8×8 inch pan with parchment paper, making sure you leave a little overhang on the sides—that’s your handle for lifting the whole thing out later! Cream your butter and sugar until it looks light, then mix in the flour and salt until it just comes together into that lovely soft dough. Press that dough firmly and evenly across the bottom of the pan. Bake it for about 18 to 20 minutes. You’re looking for the edges to just barely start turning golden brown. Pull it out, but don’t worry about letting it cool completely yet.
Creating the Gooey Caramel Filling
While that base is setting up, let’s make the heart of the bar. In your saucepan over medium heat, combine the condensed milk, brown sugar, and butter. Stir constantly! Once it starts bubbling gently, drop the heat to low and keep stirring for five to seven minutes. This constant motion is key for getting that beautiful Gooey Caramel Filling thickness without burning the bottom. Take it off the heat, stir in your vanilla and salt, and then we move fast!
Layering, Chilling, and Cutting the twix
Immediately pour that warm caramel evenly over your warm (but not piping hot!) shortbread crust. Pop the whole pan back into the 350°F oven for just 10 more minutes. This second bake helps it settle in. Now comes the hard part: patience! You must let these cool completely on the counter, and then transfer them to the fridge for at least two hours—though I often leave mine overnight. Chilling is non-negotiable if you want those clean, perfect slices for your Homemade twix Bars; if they are warm, they’ll just smear everywhere.
The Final Chocolate Dipped Delights Coating
Once your bars are rock solid from the chill, take them out and slice them into whatever size pieces you like best. These are your Chocolate Dipped Delights now! In a microwave-safe bowl, combine the chocolate chips and that tiny bit of coconut oil. Microwave in short, 30-second bursts, stirring really well in between each time, until it’s perfectly smooth. Dip each chilled bar completely, set them on parchment paper, and let the chocolate set up. If you’re impatient like me, 15 minutes in the fridge sets it right up. Don’t forget to explore more fun ways to make sweet things like this here!
Tips for Success Making Copycat twix Recipe
If you’ve followed the layering, you’re already 90% of the way there to an incredible Copycat twix Recipe. But let me give you two quick pointers that elevate this from good to legendary. First, if your caramel seems too runny after step two, just keep it on a *very* low simmer for another minute or two—it thickens fast once it hits the full boil point. Second, for that perfectly uniform, professional look that always impresses people, I don’t slice the bars until they are rock hard from the freezer, not just the fridge. Freezing eliminates any chance of shearing the layers.
My personal trick for presentation? After you dip them in chocolate, let them set up briefly, then use a small offset spatula to gently scrape the very bottom edge where the chocolate pools. It removes that thick little ‘foot’ of chocolate, making your Chocolate Caramel Treats look super clean. For more baking inspiration that requires this kind of attention to detail, take a look at my list of simple, delicious desserts. And if you want to see how someone else handled those layers, check out the wonderful tips at The Cook’s Treat.
Variations on the twix Inspired Desserts
This foundational recipe for twix is amazing baked as is, but honestly, half the fun of making things from scratch is putting your own spin on it! We can keep all that wonderful shortbread and caramel structure but play with the toppings until we find our new favorite thing. Don’t feel bound by the standard formula—this is your kitchen!
For a really popular twist that cuts the sweetness perfectly, try finishing the bars with a sprinkle of flaky sea salt right on top of the caramel layer before it goes into the oven for its final 10 minutes. That salty contrast against the sweet caramel and dark chocolate is just heavenly. Or, if you’re feeling fancy, skip the semi-sweet chips and use a mix of milk chocolate and dark chocolate chips for the coating. It gives a much richer, deeper flavor profile to your Chocolate Caramel Treats.
Now, I always tell people that if you are looking for a way to adapt this recipe to be lighter on the standard ingredients, there are some fantastic options out there. While my recipe relies on that classic flour shortbread, I’ve seen brilliant bakers substitute things like almond flour in the base for a nuttier crunch. If you are specifically watching gluten or dairy, you can check out this wonderful resource for Healthy Twix Bars (GF, DF, Refined Sugar-Free) that takes a completely different approach but still delivers that layered joy.
If you want to stick close to the original but change the wrapper, try using pretzels instead of shortbread! Bake a crust of crushed pretzels mixed with a little melted butter—it gives you great salty crunch before the caramel layer. See? So many ways to enjoy these wonderful twix inspired desserts. For more recipes that you can easily twist and turn to fit your taste, remember to dig through my guide on simple, delicious desserts.
Storage and Making Ahead for Your Decadent Dessert Bars
One of the best things about making these layered treats—your beautiful Decadent Dessert Bars—is that they taste even better the next day! Seriously, letting the chocolate, caramel, and shortbread truly marry overnight makes the absolute best bite. But you need to store them correctly to keep that gooey caramel from getting too soft or sticky.
Generally, I keep these at room temperature, provided your kitchen isn’t boiling hot. Store them in a single layer in an airtight container. If you layer them right away, the chocolate coating can stick to the bars above it, making a huge mess when you try to pull them apart! If you stack them, put a small square of parchment paper between each layer. They’ll last perfectly well at room temperature for about three days. Any longer than that, and I strongly recommend moving the container to the fridge.
Making the Components Ahead of Time
Yes, you can absolutely make these ahead of time! That’s the key to being sane during a busy holiday, right? The shortbread base is the sturdiest part. You can bake the shortbread crust, let it cool fully, and store it wrapped tightly on the counter for up to two days before you even apply the caramel. Honestly, the less work you have to do the day you want to serve them, the better!
My top tip, though, is to do the entire construction—baking, caramel, chilling, and dipping in chocolate—and freeze them! You can wrap the finished, chocolate-coated bars individually in plastic wrap, then place them in a freezer bag. They freeze like a dream for up to a month. When you want one, just pull it out 20 minutes before serving. That slightly frozen state makes the chocolate snap perfectly when you bite it. These are fantastic for prepping for parties or just keeping a secret stash hidden away! For more recipes that are great for making batches ahead of time, check out simple, delicious desserts.
Frequently Asked Questions About Making twix
This is where we usually clear up those last little worries before you jump into the kitchen. Making Homemade Twix Bars is incredibly rewarding, but questions always pop up! I gathered the most common things folks ask me, so hopefully, you can start with confidence.
Can I use pre-made caramel squares or store-bought caramel sauce?
Oh, I get why people ask this! Convenience is tempting, especially when you want Quick Caramel Snacks. While you *can* use pre-made caramel squares or sauce, I strongly advise against it for this recipe. Store-bought caramel often lacks the depth of flavor that comes from cooking fresh brown sugar and condensed milk together. Plus, the store-bought stuff is sometimes already too soft or too hard. For that perfect, rich, chewiness required for a true Copycat twix Recipe, sticking to the stovetop method is worth the extra ten minutes, trust me!
What is the trick to getting really clean, sharp edges on my chocolate-dipped bars?
This is all about temperature control, my friend! If your bars are even slightly warm when you try to dip them, the caramel melts out and makes a horrible mess on your chocolate pooling—no clean edges for us! The secret is to chill the bars until they are thoroughly firm, almost hard, before dipping them into the chocolate. I often freeze them for 15 minutes right before dipping! Once dipped, set them on a clean, parchment-lined sheet. If you see a little chocolate puddle forming at the base, use a thin offset spatula to gently swipe it away while the chocolate is still wet. That little technique leaves you with those beautiful, crisp edges you see in the best Bite Sized Candy Recipes.
I don’t like super sweet things. Can I adjust the sweetness levels?
Absolutely! That’s the beauty of making these Chocolate Caramel Treats at home. If you find the combination too sweet, the best adjustment comes in the chocolate coating. Instead of using semi-sweet chips, use dark chocolate chips—the 70% cacao or higher offers a wonderful bitterness that balances the sweetness of the Easy Chewy Caramel layer beautifully. Another trick is adding a tiny sprinkle of coarse sea salt over the caramel before the final baking stage; that saltiness really cuts through the sugar!
Can I freeze the finished, coated Homemade Twix Bars?
Yes, you absolutely can, and this is my favorite way to bank treats for the holidays! These Decadent Dessert Bars freeze surprisingly well because that chocolate coating acts as a waterproof seal. Wrap each bar tightly in plastic wrap first—this prevents any freezer burn or flavor absorption. Then, place them in an airtight container or a freezer-safe bag. They should stay perfect for up to two months! If you want an amazing guide to quick, no-bake versions that are similar in function, you should peek at the tips over at Kitchen Divas.
If you keep digging into my guides for simple, delicious desserts, you’ll find even more ways to make treats ahead of time!
Estimated Nutritional Data for Homemade twix
Now, since we are making these utterly decadent, layer-by-layer, these aren’t exactly your low-calorie weekday snack—and that’s okay! We deserve a treat sometimes, right? When you’re whipping up something this good, you need to know what you’re working with. I ran the final ingredient list through my tracking system to give you a realistic estimate for one of these glorious chocolate caramel treats.
Here’s the breakdown per single bar. Remember, because we are making a Homemade Candy Bar Style treat, the exact size you cut changes this! These figures are based on cutting the batch into 16 uniform bars.
- Calories: About 350 calories
- Total Fat: Roughly 22 grams (Be honest, most of that beautiful fat comes from that Buttery Shortbread Recipe base and the chocolate coating!)
- Carbohydrates: Around 38 grams
- Protein: About 4 grams
- Sugar: A sweet 35 grams
Now, let me be really clear about this, because trust is everything here at Julia Meal. These numbers are precise estimates based on the ingredient amounts listed. If you use dark chocolate instead of semi-sweet, or change the brand of condensed milk, those numbers will shift slightly behind the scenes. The fat and sugar content will vary a bit depending on the butter percentage in your chocolate coating, for example. Think of these figures as a really solid guideline, not a hard medical fact! It’s just a way to help you plan your indulgence, especially if you’re aiming for a specific count for your day. Enjoy every bite of these amazing Homemade twix!
Share Your Ultimate twix Creation
And just like that, you’ve done it! You’ve conquered the layers, you’ve mastered the caramel stretch, and you now have a batch of the Ultimate Homemade Twix Bars sitting on your counter. Isn’t that just the best feeling? That moment where you take that first bite of your own perfect, gooey, crunchy creation—that’s why I share these recipes, truly.
Now that you’ve made them, I absolutely need to hear about it! Did your chocolate set perfectly? Did you go rogue and add sea salt? Don’t be shy! Head down to the comments section and give this recipe a star rating—it helps me know which recipes truly resonate with you folks in the kitchen. Sharing your success helps me keep bringing you recipes that work flawlessly.
If you took pictures while you were working on these Homemade twix Bars, I would be so thrilled if you shared them on social media. Tag me when you do; seeing your family enjoy these nostalgic treats is the highlight of my week. It connects us, doesn’t it? It’s more than just a dessert; it’s a memory being made, just like the ones I cherish from my grandmother’s Ohio kitchen.
If you enjoyed this journey into making the best layered Chocolate Caramel Treats at home, please feel free to explore more about my cooking mission and philosophy on my About page. Thanks so much for cooking with me today. Happy baking, and enjoy every single bite!
PrintUltimate Homemade Twix Bars
Make decadent, layered candy bar treats at home featuring a buttery shortbread base, gooey caramel filling, and a rich chocolate coating.
- Prep Time: 25 min
- Cook Time: 35 min
- Total Time: 60 min
- Yield: 16 bars 1x
- Category: Dessert
- Method: Baking
- Cuisine: American
- Diet: Vegetarian
Ingredients
- For the Shortbread Base:
- 1 cup (2 sticks) unsalted butter, softened
- 1/2 cup granulated sugar
- 2 cups all-purpose flour
- 1/4 teaspoon salt
- For the Caramel Filling:
- 1 (14 ounce) can sweetened condensed milk
- 1/2 cup packed light brown sugar
- 1/4 cup (1/2 stick) unsalted butter
- 1 teaspoon vanilla extract
- 1/4 teaspoon salt
- For the Chocolate Coating:
- 12 ounces semi-sweet chocolate chips
- 1 tablespoon coconut oil or shortening
Instructions
- Prepare the shortbread: Preheat your oven to 350°F (175°C). Line an 8×8 inch baking pan with parchment paper, leaving an overhang for easy removal.
- In a large bowl, cream together the softened butter and granulated sugar until light and fluffy.
- Gradually mix in the flour and salt until a soft dough forms. Do not overmix.
- Press the shortbread dough evenly into the bottom of the prepared pan.
- Bake the shortbread for 18 to 20 minutes, or until the edges are lightly golden. Remove from the oven and let it cool slightly while you prepare the caramel.
- Make the gooey caramel filling: In a medium saucepan over medium heat, combine the sweetened condensed milk, brown sugar, and butter. Stir constantly until the butter melts and the mixture is smooth.
- Bring the mixture to a gentle boil, stirring continuously. Reduce the heat to low and cook for 5 to 7 minutes, stirring often, until the caramel thickens slightly. It should coat the back of a spoon.
- Remove the caramel from the heat and stir in the vanilla extract and salt.
- Pour the warm caramel evenly over the partially baked shortbread crust. Return the pan to the oven and bake for an additional 10 minutes.
- Cool completely: Let the bars cool completely at room temperature, then chill in the refrigerator for at least 2 hours, or until the caramel is firm.
- Prepare the chocolate coating: In a microwave-safe bowl, combine the chocolate chips and coconut oil. Microwave in 30-second intervals, stirring well after each, until the chocolate is smooth and completely melted.
- Cut the chilled caramel shortbread into bars of your desired size.
- Dip each bar into the melted chocolate, ensuring it is fully coated. Place the coated bars on a parchment-lined baking sheet.
- Allow the chocolate to set completely at room temperature, or speed up the process by chilling them for 15 minutes. Slice and serve your homemade candy bar style treats.
Notes
- For a cleaner cut, chill the bars thoroughly before slicing them into uniform pieces.
- If you prefer a softer caramel, reduce the cooking time for the filling by about 2 minutes.
- You can use milk chocolate or dark chocolate for the coating based on your preference.
Nutrition
- Serving Size: 1 bar
- Calories: 350
- Sugar: 35
- Sodium: 110
- Fat: 22
- Saturated Fat: 14
- Unsaturated Fat: 8
- Trans Fat: 0.5
- Carbohydrates: 38
- Fiber: 1
- Protein: 4
- Cholesterol: 45