
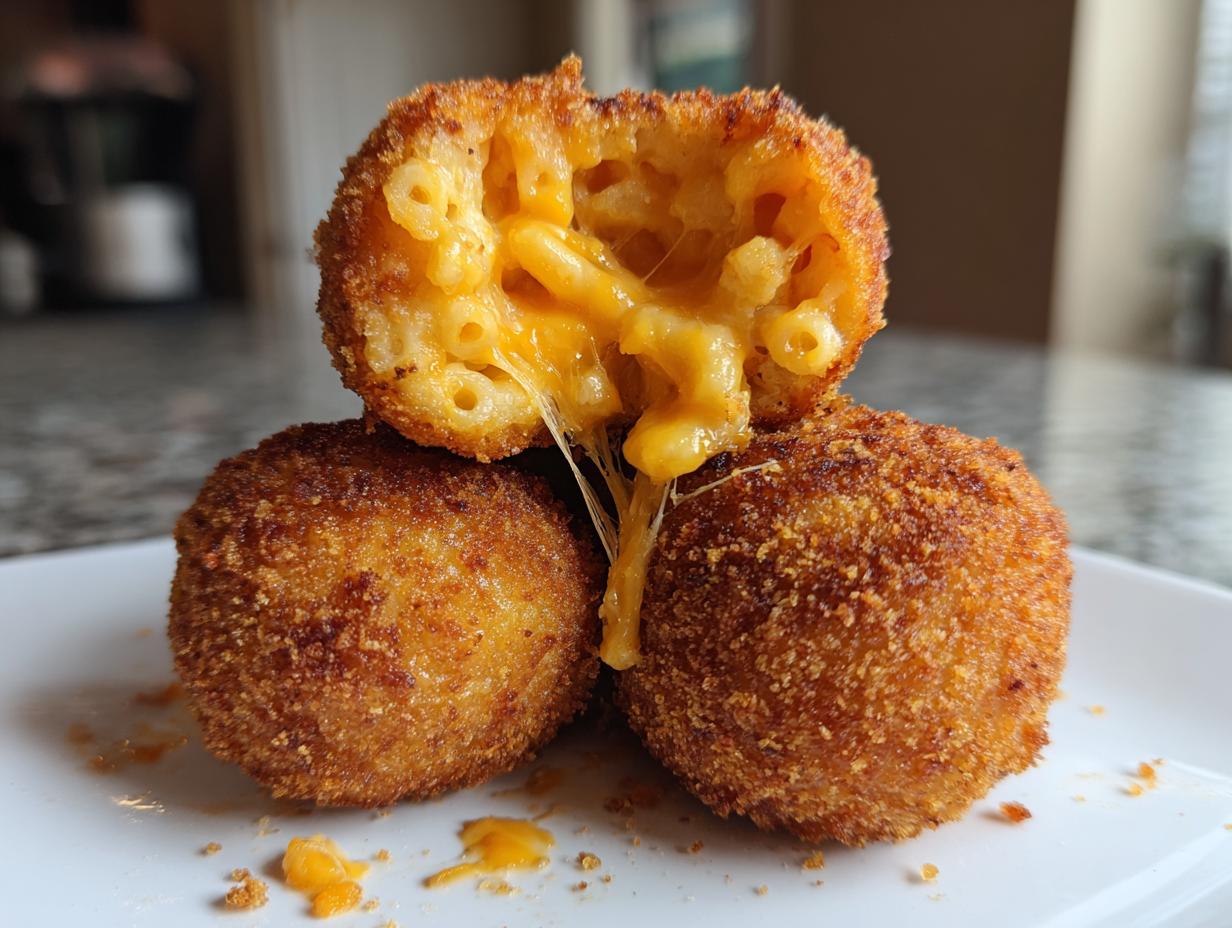
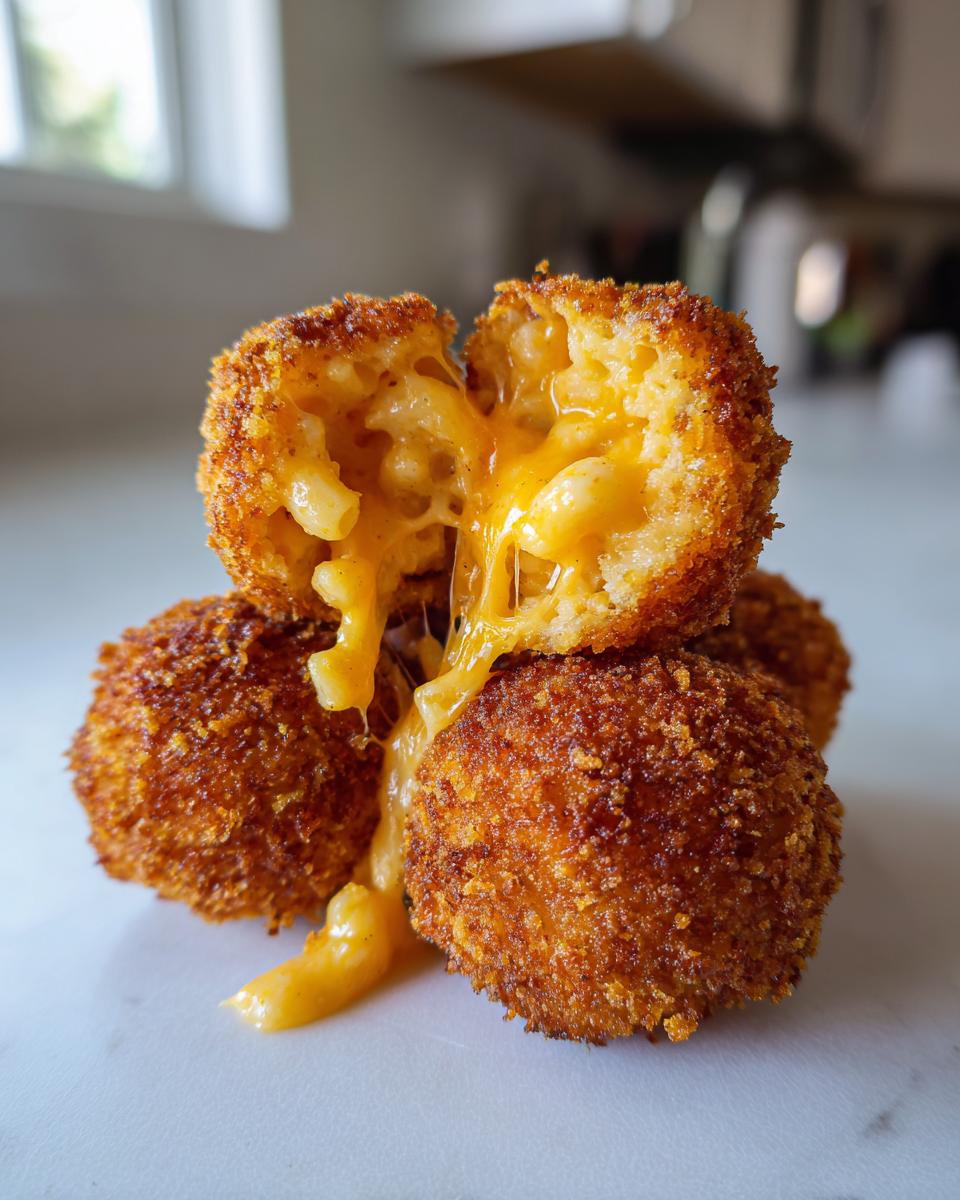
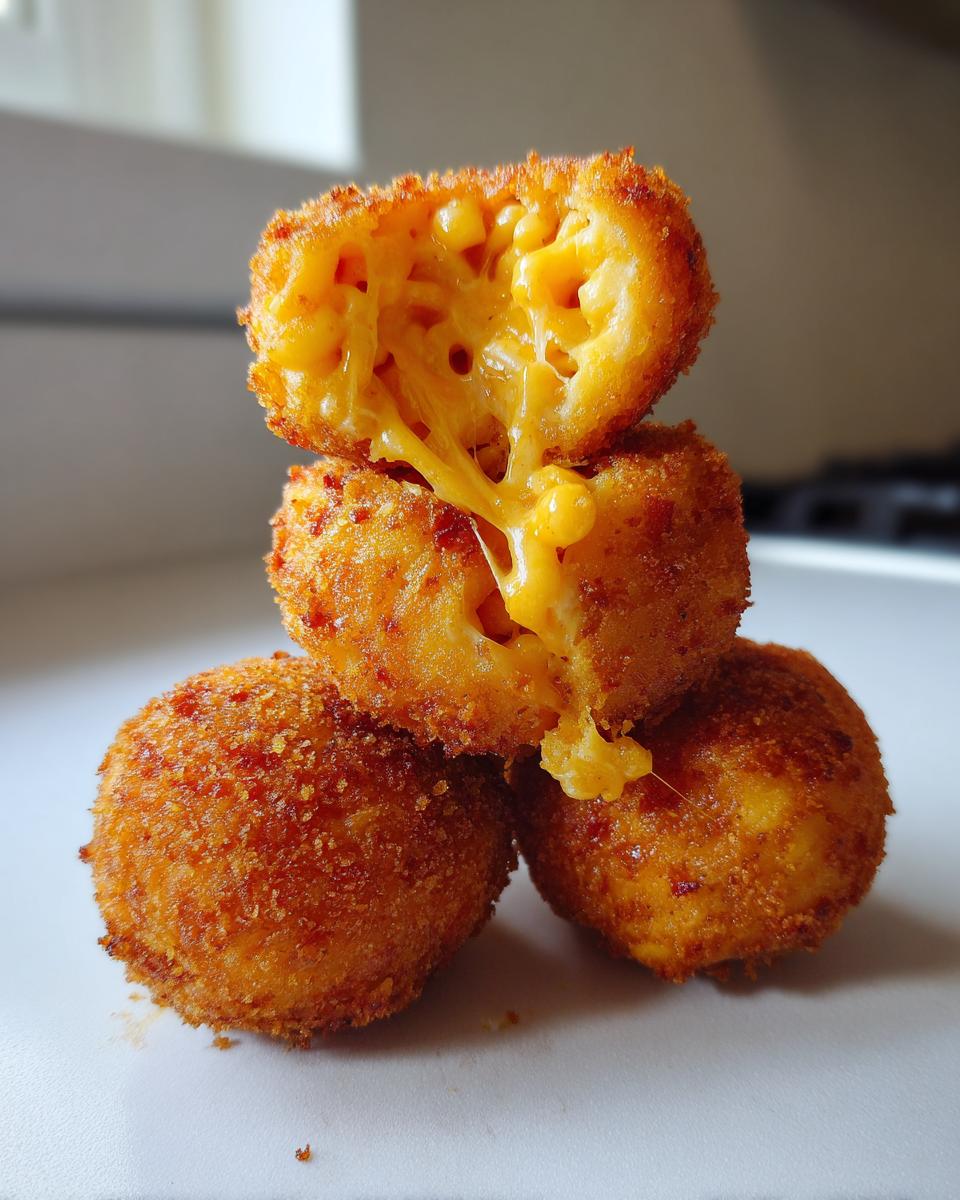
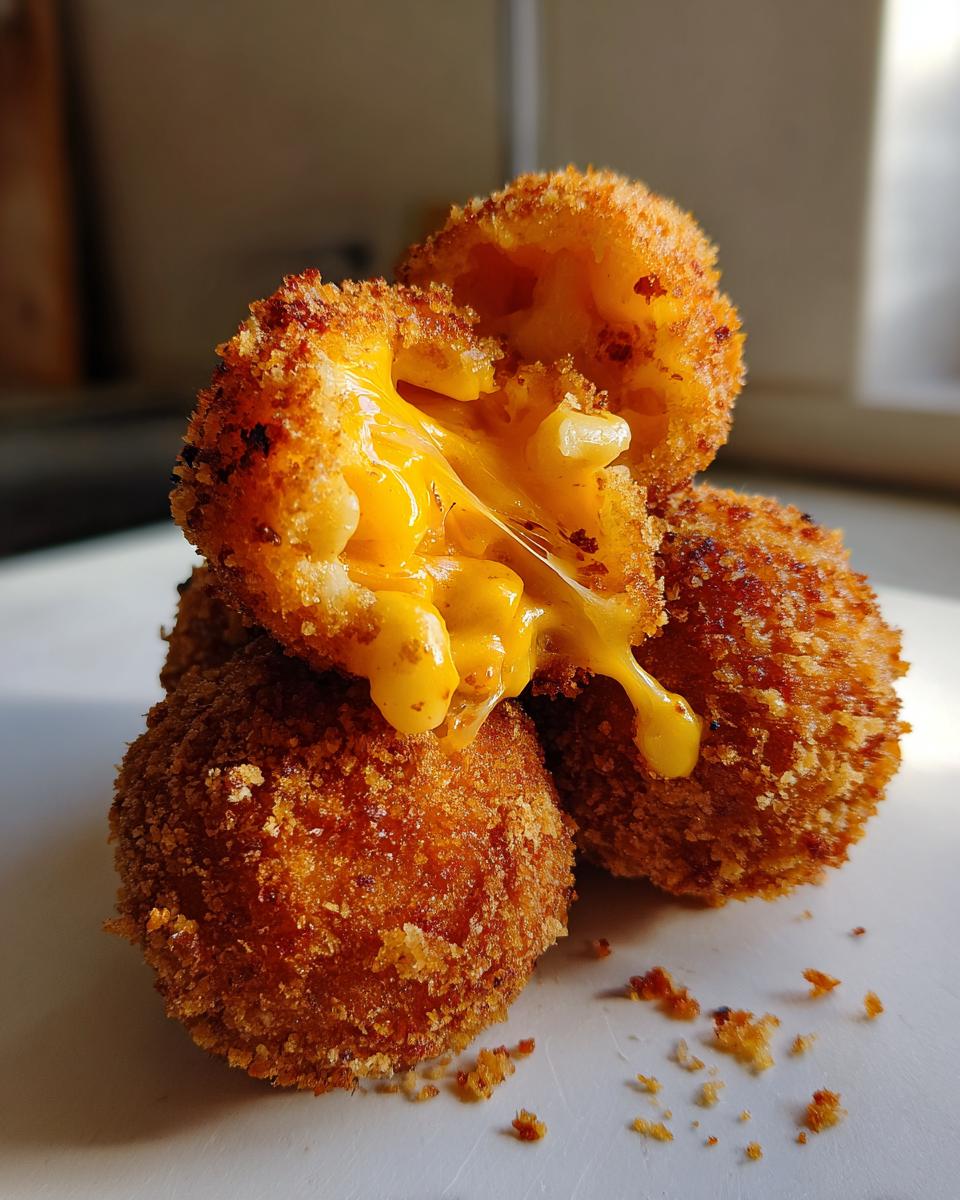
There are moments when only pure, unadulterated comfort food will do, right? For me, that always means mac and cheese, but elevated. I’m talking about taking that creamy, cheesy hug and wrapping it in the crunchiest golden shell imaginable. That’s why I spent so much time perfecting these fried mac and cheese balls. It’s the pinnacle of indulgent snacking. Here at Julia Meal, I want to make sure you nail that high-contrast texture—that deeply satisfying snap giving way to a rich, gooey cheese center. We’re covering the traditional deep-fried route for true decadence, but don’t worry, I’ve got the game-changing air fryer method too. Get ready, because these are destined to be your new favorite party food ideas!
- Why You Will Love This Ultimate Fried Mac and Cheese Balls Recipe
- Ingredients Needed for Perfect Fried Mac and Cheese Balls
- Mastering the Mac and Cheese Base for Your Fried Mac and Cheese Balls
- The Essential Breading Technique for Crispy Fried Mac and Cheese Balls
- Cooking Method 1: Achieving Deep-Fried Perfection for Fried Mac and Cheese Balls
- Cooking Method 2: Making Air Fryer Mac and Cheese Balls (Healthier Alternative)
- Serving Suggestions and Dipping Sauces for Your Cheesy Appetizer Recipe
- Tips for Success and Troubleshooting Fried Mac and Cheese Balls
- Frequently Asked Questions About Making Fried Mac and Cheese Balls
- Frequently Asked Questions About Making Fried Mac and Cheese Balls
Why You Will Love This Ultimate Fried Mac and Cheese Balls Recipe
Look, I get it. Sometimes you just need a snack that screams ‘celebration’ or ‘I deserve this.’ This recipe ticks every single box, which is why I keep pointing people toward it, especially for big events. These aren’t just little cheese lumps; they are engineered for texture!
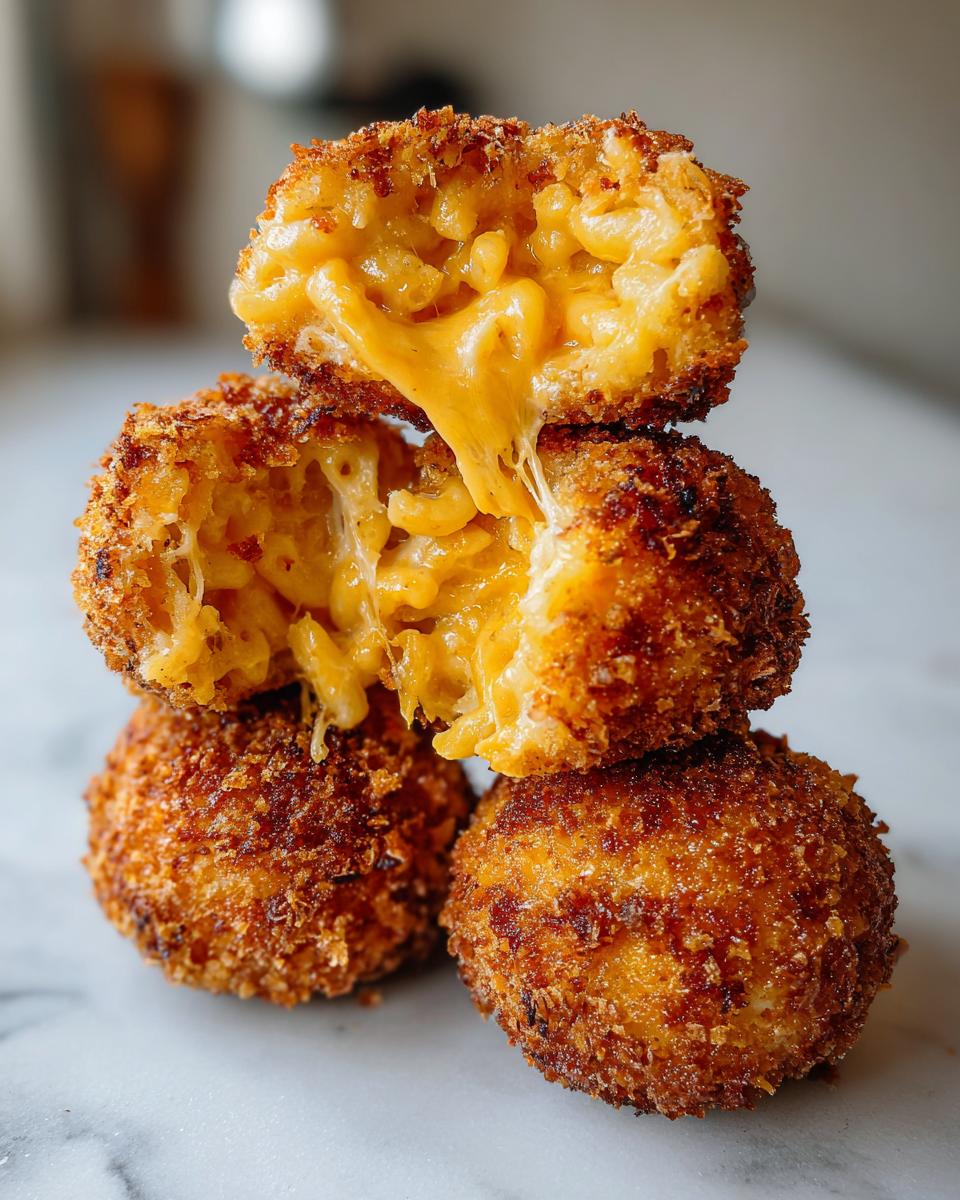
- The Perfect Texture Contrast: This is the whole point, right? You get that unbelievably crunchy breadcrumb coating—like golden armor—that snaps open to reveal molten, unbelievably gooey cheese center.
- Double Method Magic: Whether you love the classic thrill of deep fried comfort food or you’re looking for a lighter path, we cover both the deep fryer and the air fryer methods perfectly. No excuses not to make these!
- Ultimate Party Food Ideas: Forget chips and dip. These crispy mac and cheese bites are the showstopper. They make incredible game day snacks, and they disappear faster than anything else on the table. Trust me on this.
- So Much Better Than Leftovers: While you *can* use leftover mac, using this specific base recipe ensures maximum flavor and stability, which means fewer sad, soggy balls trying to escape your oil.
If you need another unbelievably easy winner for your next gathering, you have to check out my favorite Texas Trash Dip recipe next. But first, let’s focus on mastering the crunch!
Ingredients Needed for Perfect Fried Mac and Cheese Balls
Getting the right texture starts right here, with the right components in the right amounts. Every single ingredient plays a part in getting that perfect snap on the outside and that unbelievably gooey cheese center you crave. When I test these, I absolutely insist we use a blend of sharp cheddar and Monterey Jack—that extra flavor variety is what makes them taste restaurant-quality, like that famous Cheesecake Factory copycat appetizer!
For the coating, you want crispness, and nothing beats Panko. Don’t try to swap it out for standard breadcrumbs; Panko gives you that crucial light, airy, yet incredibly crunchy breadcrumb coating.
- 2 cups cooked elbow macaroni (make sure it’s cooled!)
- 1 cup shredded sharp cheddar cheese
- 1/2 cup shredded Monterey Jack cheese
- 1/4 cup grated Parmesan cheese (for depth)
- 1/4 cup heavy cream
- 2 tablespoons unsalted butter
- 1/2 teaspoon salt
- 1/4 teaspoon black pepper
- 1 cup all-purpose flour (for the first dredge)
- 2 large eggs, beaten (the binder)
- 1 1/2 cups Panko breadcrumbs (the magic crunch coating)
- Vegetable oil, for deep frying (or cooking spray if you go the air fryer route)
If you’re looking for other incredible handheld appetizers, you’ve got to bookmark the recipe for my easy cranberry brie bites—they disappear just as fast!
Mastering the Mac and Cheese Base for Your Fried Mac and Cheese Balls
Here we build the heart of the operation: that creamy, savory filling that needs to hold its shape when rolled and then melt just right when cooked. Remember how I talked about patience earlier? It starts right here in the saucepan. You absolutely need to start by making a proper roux—that’s melting the butter and whisking in the flour for about a minute. This little step thickens our sauce beautifully. Don’t rush it; let that flour cook out a little bit!
Once the roux is ready, slowly whisk in the heavy cream. Keep whisking until it’s totally smooth. Now comes the best part: turning off the heat and adding those three wonderful cheeses. You want them melted completely before you even think about adding the pasta. If the heat is too high when the cheese goes in, you risk that grainy texture we definitely don’t want in our fried mac and cheese balls. Once it’s silky, stir in your salt and pepper.
The Secret to Structure: Pasta Choice and Chilling
This is a crucial expert tip, something I learned the hard way when my first batches kept exploding in the fryer. Don’t use mushy, overcooked pasta! For these balls, you want your macaroni cooked just until it’s slightly al dente—maybe a minute shy of tender. Why? Because when you chill this mixture, the pasta continues to absorb moisture and firm up. If it’s already soft from the start, you’ll end up with soupy disappointment later.
Fold in your cooked pasta until every single elbow is coated in that luxurious cheese blanket. Then, get it into a shallow dish. This is where patience pays off big time. You absolutely need to cover this mixture and let it chill for at least four hours. Honestly, if you can let it hang out overnight, you’ll have the firmest, easiest-to-roll mixture possible. That long chill is the backbone that holds these cheesy delights together!
Once cold and firm, you can scoop and roll them, which makes them perfect for prepping ahead of time. Speaking of creamy dips, once you’ve mastered these bites, you have to try my recipe for creamy beer cheese dip—it’s the perfect partner!
The Essential Breading Technique for Crispy Fried Mac and Cheese Balls
Okay, we’ve mastered the chill—the mix is firm, and we’ve rolled them into neat little spheres (about 1.5 inches is perfect, aiming for uniformity!). This next part is non-negotiable if you want that fantastic, shatteringly crisp exterior, you know, the kind that makes a great appetizer.
You have to set up a classic three-stage breading station. Think assembly line, but for pure cheesy goodness. Grab three shallow dishes. Dish one gets the flour—this is the “grabber,” it sucks up surface moisture. Dish two is the beaten eggs—our glue! Dish three needs that beautiful Panko breadcrumb. I preach Panko breadcrumbs for a reason; regular crumbs just don’t give you the same architectural crunch we need for these homemade breadsticks-level texture.
The Three-Step Coating Process That Guarantees Crunch
We move each ball through these stations in order, and technique matters here. First, dredge the ball thoroughly in the flour. Don’t be shy; toss it around, but then give it a good shake to knock off any excess flour. Seriously, too much flour turns into a gummy mess when it hits the hot oil.
Next, dip that floured ball into the egg wash. Let it drip for just a second—we just need a thin, even layer of egg. Finally, roll it hard into the Panko. And here’s the secret sauce: use your hands to gently press the Panko onto the surface. You want those sharp Panko flakes embedded securely. Pressing them in ensures they don’t fall off when we fry them up.
The Second Chill: Never Skip This Step!
I know you’re ready to fry these things immediately; I am always impatient myself when I smell that cheese! But you absolutely have to give them a second chill. Once all your breaded balls are ready, place them back onto a parchment-lined baking sheet. Now, they need a good 30 minutes in the freezer, or at least an hour in the fridge.
This second chill is the key to keeping your fried mac and cheese balls intact. It firms up that binding egg layer and locks the Panko coating onto the cold filling underneath. If you skip this, I’m telling you, you’ll end up with cheesy, breaded soup in your oil. We worked way too hard on that creamy base to let it fall apart now!
Cooking Method 1: Achieving Deep-Fried Perfection for Fried Mac and Cheese Balls
Alright, if you want that true, unrestrained, five-star restaurant experience—the kind where the crunch is epic—then we are going deep. This is where those beautiful, cold, breaded spheres transform into golden-brown perfection. For this method, you need a heavy-bottomed pot or, ideally, a dedicated deep fryer. Stability matters here because safety is my top concern when dealing with hot oil.
You need to heat up a good 2 to 3 inches of vegetable oil. We are aiming for a precise temperature of 350°F (175°C). If your oil is too cold, those balls just soak up grease and turn into sad, soggy messes. If it’s too hot, the outside will burn while the center stays icy. Use a thermometer! Trust me, it’s the difference between an amateur snack and the best deep fried comfort food you’ve ever made.
The Frying Process: Time and Temperature Control
Once that oil hits temperature, you carefully, and I mean cautiously, lower your chilled balls into the pot. Do not overcrowd this space! Seriously, if you dump too many in at once, the oil temperature plummets, and we are back to the soggy problem. Work in small batches of four or five balls. This ensures the oil recovers its heat quickly.
Now, watch them go! They only need about 2 to 3 minutes. You’ll see them float up and start turning a gorgeous amber color. Use a slotted spoon or a spider strainer to gently turn them every so often, getting an even tan on all sides. They cook incredibly fast because the inside is already fully cooked and chilled solid!
Safety First: Handling Hot Oil
Since we are talking about hot oil, I have to give you a quick word of caution. This is serious business. Never, ever add water or frozen items directly into hot oil—water causes massive spitting and flare-ups, and frozen items cause temperature drops. Make sure your breaded balls are chilled well so there’s less surface moisture to cause trouble. Also, when you take the cooked fried mac and cheese balls out, always set your strainer right over a wire rack first, or paper towels if you must. Letting that excess oil drain off completely keeps your crunchy coating from getting soft right as it hits the plate. If you want inspiration for your next big party snack, check out these honey BBQ mini meatloaf muffins!
Cooking Method 2: Making Air Fryer Mac and Cheese Balls (Healthier Alternative)
Listen, I completely understand that deep frying isn’t everyone’s choice every time. Maybe you’re avoiding the oil, or maybe you just don’t want to stand over a pot of bubbling grease. That’s why this recipe features the amazing air fryer mac and cheese balls method right alongside the classic fry. Honestly, the air fryer excels at giving you that crispy shell without relying on tons of extra fat. It really makes these the perfect, slightly lighter game day snacks.
The setup is the same—make sure your balls are fully chilled and breaded beautifully. That second chill we talked about? That’s even more important here to keep them from deflating in the air fryer basket. For the best results, you’re going to preheat your air fryer to 380°F (195°C). That’s a nice, hot environment that gives us that snap we need.
Spraying for the Golden Finish
When air frying, you need that little bit of oil to help everything brown up perfectly and achieve that realistic fried look. Don’t just dust them; grab your oil mister or put a little olive oil or cooking spray in a small bowl and lightly mist the tops of the breaded balls. You just want a slick sheen, not enough to make them look wet. This is essentially how you get that beautiful golden finish reminiscent of the popular Cheesecake Factory copycat appetizer.
Place your balls in the basket. And this is important: they must be in a single layer. If they are piled up, the hot air can’t circulate, and guess what happens? You get soft spots! Work in batches. You’ll cook these for about 8 to 10 minutes total.
Flipping for Even Crunch
The air fryer cooks fast, but the air tends to brown the tops more aggressively than the bottoms initially. So, right around the 5-minute mark, you need to pull the basket out and give those macaroni cheese appetizers a good flip. Do this gently with tongs so you don’t knock off that beautiful Panko crust we worked so hard to set earlier.
Put them back in for the remaining 3-5 minutes. When they come out of the air fryer, they should be deep golden brown all over and, most importantly, piping hot right through the center. You can use the same handy guides for cooking frozen items in your air fryer since these are already cold, like when I make my frozen shrimp recipe—just check halfway through!
See? No deep fryer required for incredible texture! It’s flexible cooking for maximum enjoyment.
Serving Suggestions and Dipping Sauces for Your Cheesy Appetizer Recipe
Look, these fried mac and cheese balls are already showing off—they’re crispy, they’re salty, they’re the definition of a fantastic cheesy appetizer recipe. But every rockstar needs a roadie, and that’s where the sauces come in! How you serve these makes them perfect for anything from a Super Bowl spread to a slightly fancier cocktail hour. They are, without a doubt, some of the best finger foods for parties you can master.
When I serve these golden wonders, I try to offer a couple of options. You want something classic to cut through that richness, and maybe something with a little kick for those of us who need more spice in our lives!
The Essential Classic Dipper: Marinara Sauce
If you’ve seen these guys on restaurant menus, you know that warm marinara is usually the first thing handed to you. Honestly, it just works. The bright acidity of a good tomato sauce cuts right through the richness of the cheddar and Jack blend we used in the filling. It tastes familiar, comforting, and just right for cooling down the piping hot center.
When serving marinara, make sure it’s warm! Cold sauce hitting a hot fried ball is a texture mismatch we want to avoid. I usually keep a small crockpot warmer set on low just for the sauce when I’m running a big batch of appetizers.
For a Creamy Kick: Ranch or Spicy Mayo
If marinara feels too Italian for your Game Day snacks, we pivot hard toward creamy dips. My recipe notes mentioned spicy ranch, and that’s a winner. If you don’t have one handy, you can quickly whip up a version just by mixing good quality ranch dressing with a dash of hot sauce—think Frank’s RedHot or Sriracha.
Another excellent option, especially if you’re leaning toward that ‘copycat’ vibe, is a slightly spicy creamy dip. Mix some mayonnaise with a little ketchup, a tiny splash of vinegar, and some horseradish if you dare. It’s decadent, but when you’re already eating deep-fried mac and cheese, why hold back on the flavor explosion?
Presentation is Everything for Party Food
Since these are fantastic finger foods for parties, presentation matters. Don’t just dump them on a platter! Line your serving tray with some crisp lettuce leaves or shredded cabbage—this helps absorb any stray oil droplets and makes the golden color pop.
- Serve them immediately after frying or air frying while they are still molten inside.
- If you’re using multiple sauces, serve them in small, separate bowls around the platter so guests can easily dip without crossing contamination.
- If you made them earlier and are serving them at room temperature (which I don’t recommend, reheat them if you can!), make sure they are stacked loosely so the steam doesn’t soften that beautiful Panko crust.
Tips for Success and Troubleshooting Fried Mac and Cheese Balls
So, you’ve followed the steps, but maybe things didn’t go perfectly on the first try? Don’t sweat it! Every professional cook I ever shadowed—and I’ve worked alongside some absolute legends—had a batch or two that immediately dissolved into the fryer. That’s part of the journey with rich, cheesy items like fried mac and cheese balls. The secret to getting that perfect, stable sphere relies on managing temperature and moisture. If you’re here, it means you’re dedicated to making them truly special, the kind that stick in people’s memories long after the party ends.
Problem: My Balls Fell Apart While Cooking!
This is the number one heartbreak, I know. Usually, this happens for one of two reasons, and both relate back to how cold your mac and cheese base was. First, did you chill it long enough? I stress four hours, but overnight is always my recommendation. If the base is too warm when you roll it, there’s just not enough solid fat holding everything together before it hits the heat.
The second reason is skipping that final breading chill. That 30 minutes in the freezer setting the Panko crust is what locks everything down. If you rush that step, the egg wash softens too quickly in the oil and lets the cheese leach out while the Panko slides off. If this keeps happening, try my little trick from the notes:I sprinkle a tiny bit of flour right into the breadcrumb dish just to help the final coat become super tacky.
Secret Weapon: Adding Mozzarella for Maximum Gooeyness
If you’re aiming for that epic, stringy cheese pull that makes people gasp, you need more than just cheddar and Jack; you need mozzarella! Mozzarella melts perfectly without spreading out too much, which is exactly what you want for these macaroni cheese appetizers.
When you are shaping the balls (Step 4), take a small scoop of the chilled mac and cheese mixture, flatten it slightly in your palm, and then take a small, 1/2-inch cube of low-moisture mozzarella. Tuck that little cheese cube right into the center and then carefully roll and seal the mac and cheese around it. Boom! Now you have a molten core waiting to burst out when someone bites in. Just make sure you seal the exterior completely so that mozzarella can’t escape during cooking.
Fixing a Soggy Coating Post-Frying or Air Frying
A soggy coating usually means one of two things happened during the cooking phase. If you deep-fried, the oil temperature was too low, like we discussed before. The fix is simple: reheat the oil until it’s steady at 350°F before dropping in the next batch. If you used the air fryer and they came out soft, you probably overfilled the basket or forgot to spray them adequately.
Remember, the air fryer needs space! If they are touching, the moisture gets trapped between the balls, and you get steamed spots instead of crunchy ones. Spray liberally right before you pop them in. If they are already cooked and sitting out for a bit, don’t fret. A quick 3-minute blast in a 400°F oven (or a 375°F air fryer) right before serving will revitalize that crunch instantly!
Frequently Asked Questions About Making Fried Mac and Cheese Balls
Can I use leftover mac and cheese instead of making a new base?
Yes, absolutely! Using leftover mac and cheese is a fantastic way to turn dinner scraps into phenomenal party food ideas. However, your leftovers must be very cold and quite stiff. If your leftover mac and cheese is too loose or creamy, you might need to stiffen it up by mixing in an extra egg yolk or a spoonful of cream cheese before chilling and rolling. The base needs to be firm enough to handle the rolling and breading process without becoming a puddle.
How do I prevent my fried mac and cheese balls from getting soggy?
The two huge secrets to keeping them crispy are diligence in the breading stage and proper frying heat. First, make sure you press that Panko breadcrumb coating on firmly—don’t just roll it lightly. Second, an intense temperature (350°F for frying or 380°F for the air fryer) is necessary. Low heat equals absorption, which equals soggy exteriors. And remember that second chill! That locks everything down before the heat hits them.
Can I bake mac and cheese balls instead of frying or air frying?
You certainly can, although baking results in a texture that is definitely more soft/crisp than truly crunchy. If you choose to bake, treat them like the air fryer method: spray them really well with cooking spray (or melt butter and brush it on) to encourage browning. Bake on a rack set over a baking sheet at about 425°F (220°C) until they are golden brown all over, flipping them halfway. They won’t be quite as shatteringly crisp as the other methods, but they are still very tasty!
What kind of cheese is best for the gooey cheese center in fried mac and cheese balls?
For the best flavor and melt, you want a blend! I use sharp cheddar for that tangy flavor, Monterey Jack for supreme meltiness, and Parmesan for a salty kick. But if you really want that authentic restaurant pull—like you see in some of those copycat recipes—tuck a tiny cube of low-moisture mozzarella right into the center of the ball before you bread it. That’s your guaranteed stretch!
How far in advance can I prep these cheesy appetizer recipes?
These are perfect make-ahead snacks! Once you have breaded them completely (the final Panko step), place them on a baking sheet and freeze them until they are solid—this usually takes about an hour or two. Once solid, transfer them to an airtight freezer bag. They can stay frozen for up to three months! Cook directly from frozen; just add about 2-4 minutes to your deep-fry time or 3-5 minutes to your air fryer time. Isn’t that handy for big events?
PrintUltimate Crispy Fried Mac and Cheese Balls (Classic & Air Fryer Methods)

Make irresistible fried mac and cheese balls with a crunchy exterior and a gooey, cheesy center. This recipe provides instructions for both traditional deep frying and a lighter air fryer version, perfect for game day snacks or party appetizers.
- Prep Time: 30 min
- Cook Time: 15 min
- Total Time: 4 hours 45 min
- Yield: 20 servings 1x
- Category: Appetizer
- Method: Frying / Air Frying
- Cuisine: American
- Diet: Vegetarian
Ingredients
- 2 cups cooked elbow macaroni
- 1 cup shredded sharp cheddar cheese
- 1/2 cup shredded Monterey Jack cheese
- 1/4 cup grated Parmesan cheese
- 1/4 cup heavy cream
- 2 tablespoons unsalted butter
- 1/2 teaspoon salt
- 1/4 teaspoon black pepper
- 1 cup all-purpose flour (for dredging)
- 2 large eggs, beaten (for egg wash)
- 1 1/2 cups Panko breadcrumbs (for coating)
- Vegetable oil, for deep frying (or cooking spray for air fryer)
Instructions
- Prepare the Mac and Cheese Base: In a saucepan, melt the butter over medium heat. Whisk in the flour and cook for one minute. Gradually whisk in the heavy cream until smooth. Stir in the salt and pepper.
- Add Cheese: Remove the sauce from the heat. Stir in the cheddar, Monterey Jack, and Parmesan cheeses until completely melted and smooth. Fold in the cooked elbow macaroni until everything is evenly coated.
- Chill the Mixture: Spread the mac and cheese mixture into a shallow dish. Cover and refrigerate for at least 4 hours, or preferably overnight, until firm enough to roll.
- Shape the Balls: Scoop the chilled mac and cheese mixture and roll it into uniform balls, about 1.5 inches in diameter. You should get about 18-24 balls. Place them on a parchment-lined baking sheet.
- Set Up Breading Station: Prepare three shallow dishes. Place the flour in the first, the beaten eggs in the second, and the Panko breadcrumbs in the third.
- Coat the Balls: Working with one ball at a time, dredge it completely in the flour, shaking off excess. Dip it into the egg wash, allowing excess to drip off. Finally, roll it thoroughly in the Panko breadcrumbs, pressing gently to adhere the coating. Return the coated balls to the baking sheet.
- Chill Again: Freeze or refrigerate the breaded balls for at least 30 minutes. This step helps the coating set and prevents the balls from falling apart during cooking.
- Cook (Deep Fry Method): Heat 2-3 inches of vegetable oil in a heavy-bottomed pot or deep fryer to 350°F (175°C). Carefully lower 4-5 balls into the hot oil, ensuring not to overcrowd the pot. Fry for 2-3 minutes, turning occasionally, until golden brown and crispy. Remove with a slotted spoon and drain on a wire rack or paper towels.
- Cook (Air Fryer Method): Preheat your air fryer to 380°F (195°C). Lightly spray the breaded balls with cooking spray. Place them in a single layer in the air fryer basket, working in batches. Cook for 8-10 minutes, flipping halfway through, until golden brown and heated through.
- Serve immediately with your favorite dipping sauce.
Notes
- For an extra gooey center, consider adding a small cube of mozzarella cheese into the center of each ball before rolling and breading.
- If you are making these ahead of time, you can freeze the breaded balls. Place them on a baking sheet in the freezer until solid, then transfer them to a freezer bag. Cook directly from frozen, adding a few extra minutes to the cooking time.
- These are excellent served with marinara sauce or a spicy ranch dressing.
Nutrition
- Serving Size: 2 balls
- Calories: 320
- Sugar: 3
- Sodium: 450
- Fat: 18
- Saturated Fat: 10
- Unsaturated Fat: 8
- Trans Fat: 0.5
- Carbohydrates: 28
- Fiber: 1
- Protein: 12
- Cholesterol: 55