

If you’ve ever stepped into a professional kitchen or tasted a truly phenomenal bistro burger, you know the feeling: that deep, pure sweetness that only comes from time and heat. That’s the magic of perfectly cooked onions. For me, mastering caramelized onions was a turning point, moving my cooking from just ‘good’ to genuinely layered and complex. After years learning technique in busy restaurants, I realized this foundational skill shouldn’t intimidate anyone. Today, I’m sharing my entire process—the slow, meditative stovetop method and a clever oven shortcut—so you can achieve that jammy, golden perfection easily in your own home. It’s all about the technique, and trust me, once you get this down, your weeknight meals will never be the same. Check out how we can speed things up without losing flavor when you’re looking for quick, easy weeknight dinners!
- Why You Need Perfect Caramelized Onions in Your Kitchen
- Ingredients for the Best Caramelized Onions
- How to Caramelize Onions Fast: Stovetop Cooking Technique
- Oven Shortcut for Hands-Off Caramelized Onions
- Tips for Perfect Caramelized Onions Every Time
- Dishes with Caramelized Onions: From Dips to Pasta
- Storing and Reheating Your Caramelized Onions
- Frequently Asked Questions About Caramelized Onions
- Share Your Caramelized Onions Creations
Why You Need Perfect Caramelized Onions in Your Kitchen
Honestly, if you want to instantly level up your weeknight meals without resorting to complicated techniques, caramelized onions are your secret weapon. They are the ultimate homemade flavor booster. When you take the time for this process, you’re not just softening an onion; you’re creating a complex flavor bomb that unlocks whole new dimensions in simpler dishes. Think how amazing those onions will taste layered onto your next batch of homemade dinner rolls!
The Sweet Savory Onions Transformation
What we’re really chasing here is the Maillard reaction. That’s just a fancy way of saying we are slowly coaxing the natural sugars out of the onion until they start browning. That golden color signals a massive depth of sweet and savory flavor—way beyond what any raw or sautéed onion can give you. It truly changes the whole profile!
Quick Benefits of Mastering Caramelized Onions
Once you’ve got a jar of these jammy onions ready to go, you can:
- Transform simple grilled cheese sandwiches into something spectacular.
- Add incredible depth when used as an gourmet onion topping for meats or pizzas.
- Make quick, flavorful additions that qualify as awesome easy onion sides.
- Use them as the base layer for unforgettable soups and dips.
Ingredients for the Best Caramelized Onions
When it comes to achieving those incredible, deep flavors, you can’t skimp on the basics. We rely on simplicity here, but choosing quality fat makes all the difference in getting that beautiful, non-stick, slow-cooked consistency. I always use a combination of butter and olive oil. The butter brings that signature richness that you just can’t substitute, which is why I stress the quality here—it’s essential for the best caramelized onions.
Ingredient Specifics and Substitutions
You absolutely need those three large yellow onions, sliced consistently thin—that’s the real prep work! We use a tiny bit of salt at the start to help draw out the moisture. Now, the sugar is optional; I only add it if I’m in a rush, but honestly, patience works just as well. If you need to make vegan caramelized onions, just skip the butter entirely and use 3 tablespoons of good olive oil to coat everything. The broth or water is just for deglazing later, which keeps things flavorful, so don’t fuss over substitutes there!
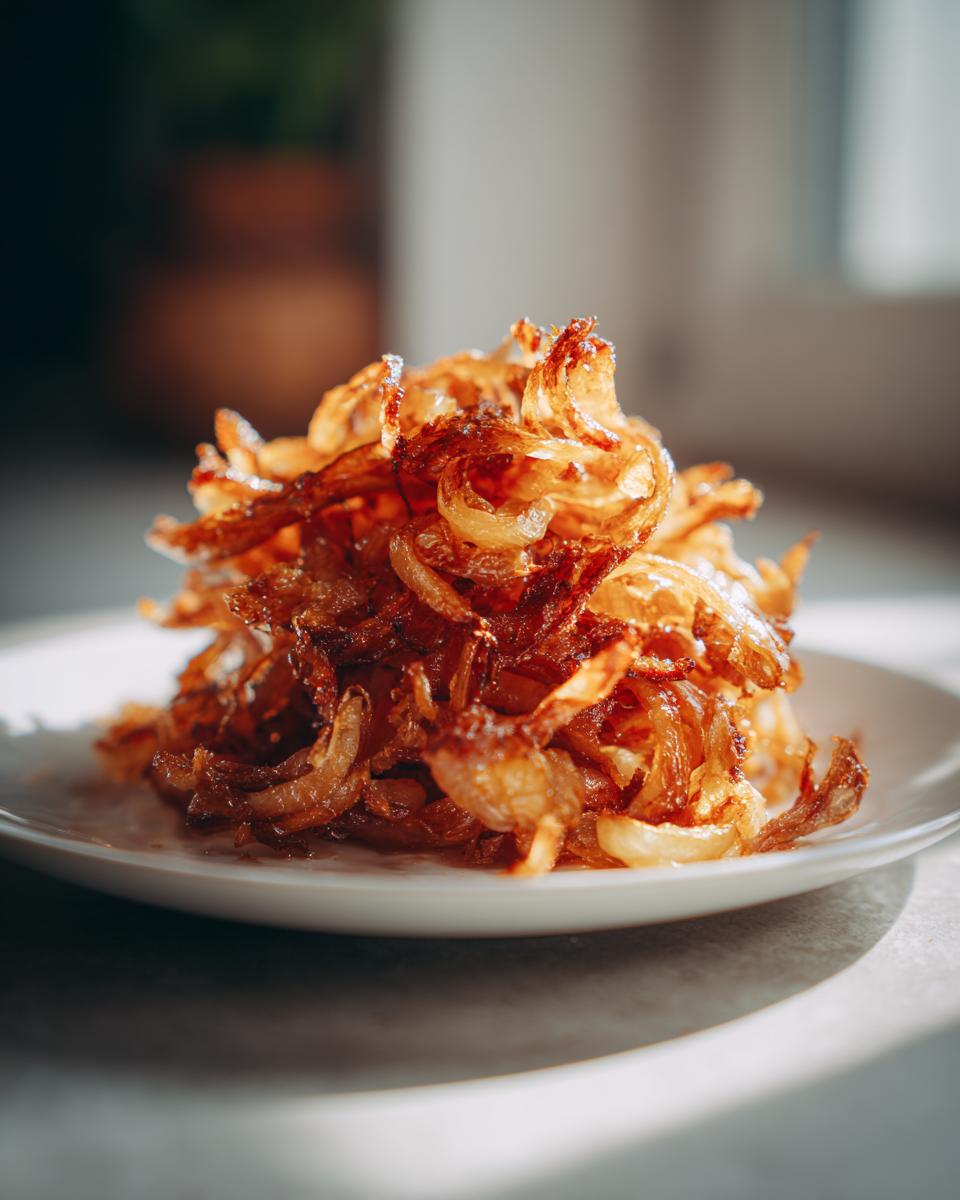
How to Caramelize Onions Fast: Stovetop Cooking Technique
Okay, let’s get down to business. This stovetop method is where the transformation happens, and while we want to go fast—because nobody has all day, right?—we have to respect the process. If the heat is too high, we burn the outside and end up with harsh, bitter results instead of beautifully rich caramelized onions. Remember, even when trying to go fast, true flavor takes patience, so plan for about an hour total! When you’re done, remember to check out quick, easy weeknight dinners for more ideas!
The Initial Softening Phase
First things first: get your onions sliced thinly and evenly. This is crucial! If they are all different thicknesses, some will burn while others are still raw. We start low. Combine your butter and oil in that big, heavy pan, add the onions and salt, and just let them hang out over medium-low heat. For the first 15 minutes, your goal is only to soften them up and get them to release all that moisture. This careful start ensures a consistent onion cooking technique across the whole batch.
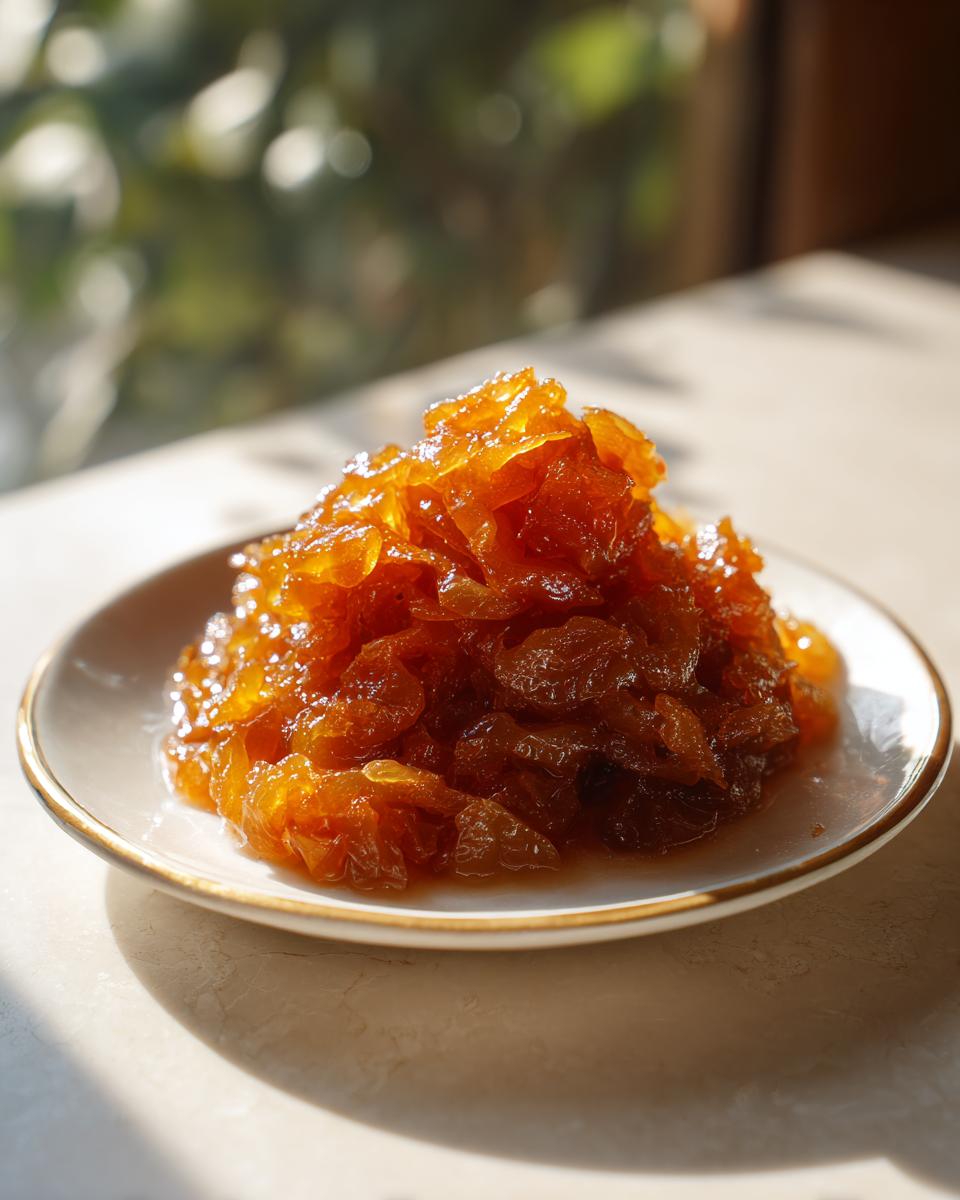
Achieving Golden Brown Onions Through Deglazing
Once they look translucent, we start building that color! If you are trying to speed things up, stir in your optional sugar now. Now, watch the bottom of your pan carefully. If you see those lovely brown bits—the fond—sticking there, it’s time to deglaze. Add a splash of broth or water and use your wooden spoon to scrape everything up. That sticky stuff is pure gold and builds incredible caramelized onion flavor. Keep cooking low and slow, stirring often, until you hit that deep, beautiful color. You are basically here for 40 to 60 minutes total, but the active stirring is minimal! You can see how someone else made something easy here if you’re still skeptical about the time involved.

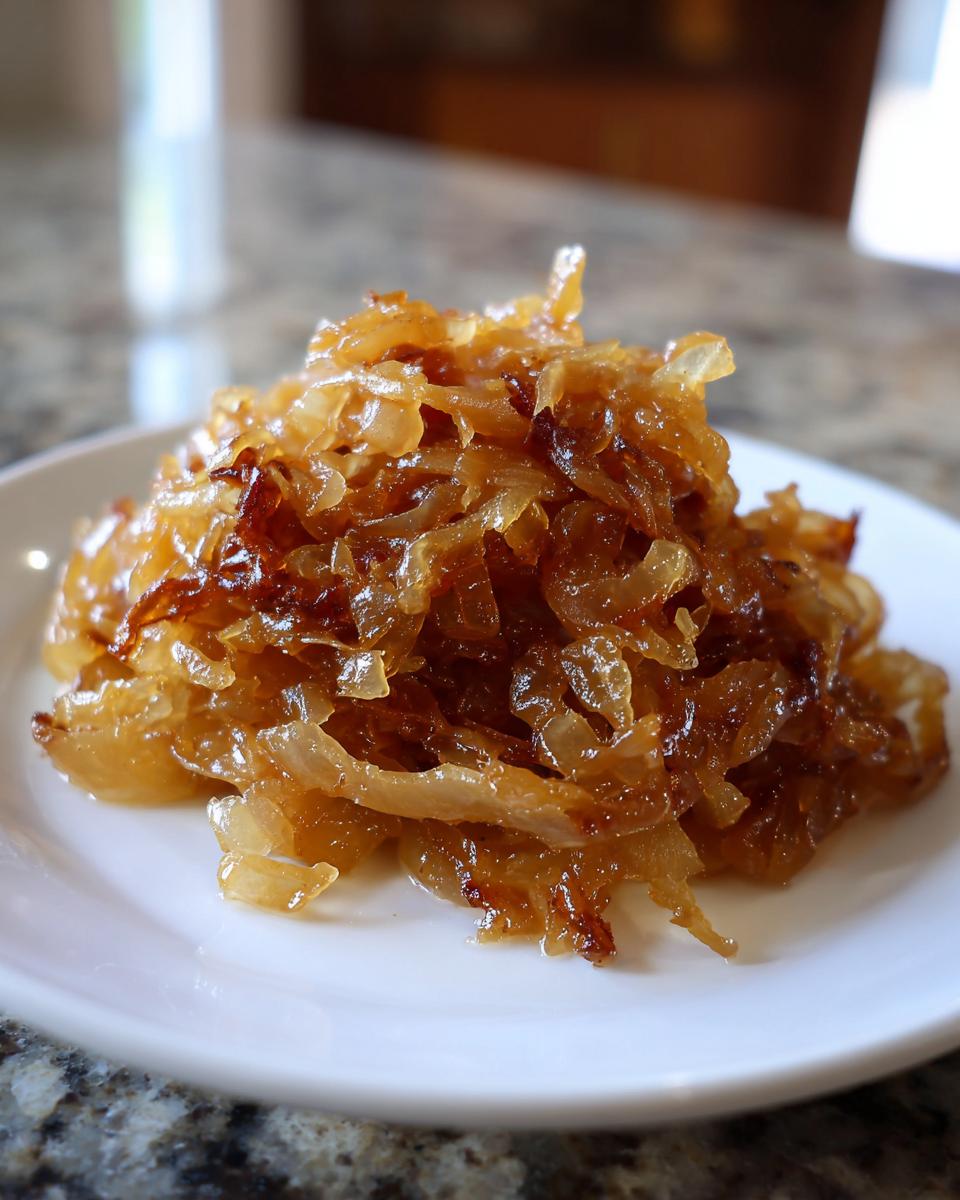
Oven Shortcut for Hands-Off Caramelized Onions
Now, I love the meditative aspect of standing over the stove, stirring those onions until they turn jammy, but sometimes life just doesn’t allow for 50 minutes of constant attention! That’s why I developed this oven trick. It’s not *faster* in terms of total time, but it is hands-off, which I consider a huge win when you’re trying to get other things done around the house. This method is perfect when you need to make a big batch for later use or when you’re just busy.
Here’s how you do it: After you toss your thinly sliced onions with the butter, olive oil, and salt—just like we did for the stovetop—don’t put them in a pot. Instead, spread them out in a single, nice layer on a baking sheet. Make sure you line that sheet with parchment paper first! That parchment is your friend; it prevents sticking and makes cleanup basically zero effort.
Pop that sheet into a 350°F (175°C) oven. They bake for about 45 minutes total. The only thing you have to do is pull them out halfway through, give them a good stir so all sides get a chance to brown evenly, and then slide them back in. When they come out, they’ll look beautifully golden brown and smell amazing. It’s such a great way to get that deep, sweet flavor without actively hovering, and you can find more great time-savers like this when you look at ideas for quick caramelized onions!
Tips for Perfect Caramelized Onions Every Time
Look, even when you follow the steps, sometimes you get onions that are just soft instead of truly jammy. That happens when we rush! Heat management is everything here. If you see the bottoms of your pan scorching black before the onions turn golden, pull the pan off the heat for sixty seconds. Let it cool down just a hair, then get it back on low. This is key to **sweet onions cooking**; you must go low and slow to draw out that interior sweetness.
Another thing I learned while testing recipes, like these for my braised short ribs, is to trust the weight of the onions. If you put too many in a small pan, they steam instead of caramelizing. Make sure your onions are spread out so they can gently weep their moisture first. I always test one finished onion: it should ooze sweetness when squeezed gently and have no residual raw, oniony bite left at all. For more great simple tips, check out what others are doing over here!
Dishes with Caramelized Onions: From Dips to Pasta
Now that you’ve got this beautiful, jammy ingredient ready to roll, the real question is: what are we going to do with them? Honestly, once you’ve made these, you’ll find yourself putting them on everything! They elevate humble dishes into something incredibly special, which is why they are the secret behind so many great comfort food onions recipes out there. If you’re looking for creamy weeknight inspiration, keep watching for great pasta sauces, or explore fantastic dips.
Making Comfort Food Onions: The Pasta Application
You’ve probably seen those viral recipes for French Onion Pasta—oh my gosh, they are popular for a reason! The core of that dish is using these rich, slow-cooked onions as the base for a luxurious, creamy caramelized onion pasta sauce. You just simmer them down with some broth and cream cheese, and suddenly, Tuesday night feels like a Saturday feast. I’ve got a creamy tomato sauce coming up soon that benefits wildly from this addition, so stay tuned!
Using Caramelized Onions as a Gourmet Onion Topping
If you don’t want to commit to a whole pot of pasta right now, treat these babies like the luxurious gourmet onion topping they are. Seriously, three ways right now that bring me massive joy include:
- Spoon them lavishly over a thick burger patty, maybe adding some Swiss cheese.
- Melt some cheddar on top of a slice of toasted sourdough bread with onions—perfection!
- Ditch the steak sauce and serve warm onions right alongside a perfectly seared steak.
And if you’re having people over, you absolutely must try turning them into a dip. If you want a stunning appetizer idea right now, check out how they shine in this Brie and Caramelized Onion Dip recipe. It’s unreal. You can find more great ideas to pair with your favorite pasta dishes right here on the site!
Storing and Reheating Your Caramelized Onions
One of the best things about spending that hour coaxing those deep, gorgeous flavors out of your onions is that you’ve basically made a powerhouse for future meals! They are the ultimate make-ahead ingredient, a true homemade flavor booster. You don’t have to make onions every time you want them—you can store them for quick use later.
Once they are completely cooled down—and I mean stone cold, don’t rush this part because warm food creates condensation—you can store them in an airtight container in the refrigerator. They will last beautifully for about a week, maybe even ten days if you were very meticulous during the cooking process. The flavor stays bright and sweet the whole time.
But for real long-term goodness, you absolutely have to freeze them. I often make a quadruple batch just so I can stock my freezer. Cool them completely, put them into a freezer-safe, airtight container, and they are good for about three months. When you go to reheat them, a little splash of broth or water in the pan over low heat thaws them out and brings them right back to life. You won’t even be able to tell they were frozen; the flavor is that robust!
Frequently Asked Questions About Caramelized Onions
I know you might have a few lingering questions after diving into the deep magic of slow cooking onions. It’s a technique newcomers often worry about, but trust me, these answers should help put your mind at ease so you can get to the delicious part! These are the things I used to ask myself back in the day when trying to figure out the right onion cooking technique!
Can I truly make caramelized onions without added sugar?
Yes, absolutely! That’s the beauty of this whole process. When you cook onions slowly, you are breaking down the cell walls and releasing the natural fructose—that’s the onion’s own sugar content. If you give them the full 45 to 60 minutes over low heat, you’ll get amazing sweetness just from patience. The added teaspoon of sugar is purely a cheat code if you only have 30 minutes and need to push them along a little faster toward that golden brown onions color. Otherwise, skip it!
What is the difference between sautéed and caramelized onions?
This is a huge one, and it explains why sometimes your onions just taste… regular. Sautéing onions usually happens over medium-high heat until they are soft and translucent—maybe 10 minutes max. They lose their raw bite, but that’s it. Caramelized onions, however, are cooked low and slow for a long time until the sugars actually brown. The texture changes from ‘soft’ to ‘jammy’ or almost melt-in-your-mouth, and the flavor goes from slightly sharp to deeply sweet and savory. They are truly wonderful for making rich comfort food onions because the flavor concentrates so much!
Is the oven method truly as good as the stovetop?
For me, the oven method is extremely close, especially if you are making a large batch. The stovetop allows you greater control right at the end for that last minute of browning and scraping up every bit of fond. But the oven is fantastic for achieving that deep flavor profile without you having to stand there constantly stirring. If you want truly *slow cooked onions*, the stovetop wins slightly, but the oven delivers 95% of the flavor with 10% of the hovering. Both methods result in amazing flavor!
How many onions should I start with?
This is so important for success! People tend to overcrowd their pan, and when that happens, the onions steam instead of caramelize. I always say to start with at least three large onions for a decent yield because they shrink down so much—we’re talking 75% reduction by volume! If you’re planning on making a massive batch for freezing or for a big recipe like Caramelized Onion Pasta Sauce, you should use a very wide Dutch oven and cook in batches if you have to. Don’t forget to check out my tips for easy lunch meal prep, because having these onions ready for sandwiches makes life so much better!
Share Your Caramelized Onions Creations
That’s it—you’ve mastered the technique! We’ve gone from sharp, watery vegetables to deep, jammy, golden treasure. I truly hope you feel a little bit of that kitchen magic knowing you’ve conquered one of the best foundational skills in savory cooking. Doesn’t that make you a little hungry?
I put so much heart into making sure this guide gives you the confidence to produce the best caramelized onions every single time, whether you used the patient stovetop method or the hands-off oven technique. Now that you have this incredibly versatile flavor base, I really want to see how you use them up!
Did you transform them into a creamy sauce base? Are you using them cold as a topping for a quick sandwich? Or maybe you made a huge double batch just to freeze for later? Don’t keep that deliciousness a secret!
Take a moment to let me know in the comments below how you featured your Dishes with Caramelized Onions. Rate the recipe so others know how much you enjoyed it, and tell me what you paired them with. If you have questions or just want to say hello, you can always send a quick note through my contact page. Happy cooking, friends—I can’t wait to hear about your sweet, savory success!
PrintThe Ultimate Guide to Perfect Caramelized Onions (Stovetop and Oven Method)
Learn the technique to transform raw onions into sweet, golden, and deeply flavorful caramelized onions using a simple stovetop method or a hands-off oven shortcut. This is the essential kitchen staple for gourmet toppings.
- Prep Time: 10 min
- Cook Time: 50 min
- Total Time: 60 min
- Yield: About 1.5 cups 1x
- Category: Side Dish
- Method: Stovetop / Baking
- Cuisine: American
- Diet: Vegetarian
Ingredients
- 3 large yellow onions, thinly sliced
- 2 tablespoons unsalted butter
- 1 tablespoon olive oil
- 1/2 teaspoon salt, plus more to taste
- 1 teaspoon granulated sugar (optional, for faster browning)
- 2 tablespoons water or low-sodium chicken/vegetable broth (for deglazing)
Instructions
- Prepare the Onions: Peel and slice the onions thinly and uniformly. Uniform slicing helps them cook evenly.
- Start on the Stovetop: In a large, heavy-bottomed skillet or Dutch oven, combine the butter and olive oil over medium-low heat. Add the sliced onions and the initial 1/2 teaspoon of salt. Stir to coat the onions completely in the fat.
- Initial Cook: Cook the onions slowly, stirring every 5 to 7 minutes. For the first 15 minutes, the onions will soften and release moisture. Keep the heat low to prevent burning.
- Caramelization Phase: After about 20 minutes, the onions will start to turn translucent. If you are using sugar, stir it in now. Reduce the heat to low. Continue cooking, stirring every 5 minutes. The goal is slow cooking to draw out the natural sugars.
- Deglaze (If Needed): If brown bits stick to the bottom of the pan (fond), add 1 tablespoon of water or broth, scrape the bottom of the pan gently with a wooden spoon, and incorporate the bits back into the onions. This adds deep flavor.
- Achieve Color: Continue cooking until the onions reach a deep, rich golden-brown color, which can take 40 to 60 minutes total, depending on the heat and quantity. They should be jammy and tender.
- Oven Shortcut (Optional): If you prefer a hands-off approach, after coating the onions in fat and salt, spread them in a single layer on a baking sheet lined with parchment paper. Bake at 350°F (175°C) for 45 minutes, stirring halfway through, until golden brown.
- Finish: Taste and adjust salt if necessary. Your **best caramelized onions** are ready to use as a **gourmet onion topping** or in dishes like **Caramelized Onion Pasta Sauce**.
Notes
- For a richer flavor, substitute 1 tablespoon of the butter with 1 tablespoon of balsamic vinegar during the last 10 minutes of cooking.
- These onions freeze well. Cool them completely, place them in an airtight container, and freeze for up to 3 months.
- If you are making **Vegan Caramelized Onions**, use only olive oil or vegan butter substitute instead of dairy butter.
Nutrition
- Serving Size: 1/4 cup
- Calories: 75
- Sugar: 7
- Sodium: 150
- Fat: 4
- Saturated Fat: 2
- Unsaturated Fat: 2
- Trans Fat: 0
- Carbohydrates: 9
- Fiber: 1
- Protein: 1
- Cholesterol: 5