
There’s something truly special about the flavor of cotton candy, isn’t there? It instantly whisks you back to long summer nights at the fair, pure, simple magic captured in spun sugar. When I’m planning a dessert for a big celebration—especially a birthday party where you just need that guaranteed ‘wow’ factor—I always turn to my cotton candy cake recipe. It’s designed to be incredibly fluffy, gorgeous with those soft pastel swirls, and surprisingly easy to handle, even if you’re not usually a home baker.
For me, baking is about forging those lasting memories around the table, and this vibrant cake does exactly that. We’ve perfected the base so you get that light, airy crumb you’re looking for, rather than something dense. Trust me, this is the showstopper party cake you’ve been searching for; it looks complex, but we keep the steps incredibly straightforward so you can spend less time worrying and more time celebrating.
- Why This Fluffy Cotton Candy Cake Recipe Works for Celebrations
- Gathering Ingredients for Your Cotton Candy Cake
- Step-by-Step Instructions for Your Easy Cotton Candy Cake
- Assembling Your Showstopper Party Cake
- Tips for a Perfect Homemade Cotton Candy Cake
- Storage and Reheating for Your Cotton Candy Cake
- Frequently Asked Questions About This Cotton Candy Cake Recipe
- Estimated Nutritional Data for This Cotton Candy Cake Recipe
- Share Your Magical Cotton Candy Cake Creations
Why This Fluffy Cotton Candy Cake Recipe Works for Celebrations
Planning big parties can be stressful, but I promise this recipe cuts through the fuss while delivering major impact. This fluffy cotton candy cake recipe hits every mark we need for a truly memorable dessert. It’s designed to be straightforward, yet look absolutely magical once it’s plated.
- The steps are simple enough for any home cook to master that light, fluffy texture.
- The flavor truly tastes like sweet nostalgia—that signature carnival hit!
- Those pastel swirls make it instantly eye-catching and perfect for birthdays.
Achieving the Best Cotton Candy Flavor
Listen, actual cotton candy dissolves almost immediately when it touches batter—it’s super disappointing. So, for the best cotton candy cake flavor, we rely on a high-quality extract. You want a rich, concentrated flavor that holds up during baking and in the frosting. A little goes a long way, but invest in a good one; it makes all the difference between a subtle hint and a full-on blast of carnival sweetness!
Gathering Ingredients for Your Cotton Candy Cake
Okay, let’s get organized! For this cotton candy cake, we need good quality staples for the cake part and specific items for that fluffy frosting. I’ve listed everything out below, paying close attention to the details because details matter here. You absolutely must make sure that butter for both the cake and the frosting is good and softened—think room temperature, not melted soup! And for color, skip the liquid dyes; we are using gel food coloring to get those bright, beautiful pastel shades without messing up the batter consistency.
Don’t fret about the specialized extract; it is the key to unlocking that spot-on carnival flavor. Once you have these items ready to go, the mixing part is really straightforward. You’ll be amazed at how quickly you amass the components for this beautiful dessert.
- 1 1/2 cups all-purpose flour
- 1 1/2 teaspoons baking powder
- 1/2 teaspoon salt
- 1 cup granulated sugar
- 1/2 cup unsalted butter, softened
- 2 large eggs
- 1 teaspoon vanilla extract
- 1/2 cup whole milk
- 1 teaspoon cotton candy extract
- Pink and blue gel food coloring
- 1 cup (2 sticks) unsalted butter, softened (for frosting)
- 4 cups powdered sugar, sifted (for frosting)
- 1/4 cup heavy cream or milk (for frosting)
- 1 teaspoon cotton candy extract (for frosting)
- Optional: Cotton candy for topping
Ingredient Notes and Substitutions for Your Cotton Candy Cake
I always prefer baking from scratch because it gives me control over the structure, but if you are really pressed for time, you can absolutely save a bit of time! Take two boxes of white cake mix, but make sure you follow my little trick: substitute the liquid the box calls for with milk, and then mix in 1 teaspoon of that cotton candy extract into the batter. That keeps the moisture high. Also, remember I mentioned gel coloring? That’s crucial for achieving that vibrant, clear pink and blue needed for the perfect pastel swirl cake tutorial look.
Step-by-Step Instructions for Your Easy Cotton Candy Cake
Alright, time to put on our aprons! I’ve tried to make this process as painless as possible, which is why we’re starting with a straightforward scratch cake base. Remember to preheat your oven to 350°F (175°C) right now, and get those 8-inch cake pans greased up and floured. We’re looking for clean release later, and a little prep saves so much heartache!
Once the ingredients are mixed, we move into the fun part: color! We divide the batter and make those gentle swirls that give us that incredible marbled effect inside the layers. If you mess up the mixing, you end up with just plain pink or blue cake, and we want that airy, unpredictable look. Pay close attention to the frosting steps too—that’s where we get that unbelievable light texture!
If you’re ever working on things like this and feel stuck, remember my guide on making fluffy vanilla cupcakes? The technique for the base cake is very similar, so you’re already ahead of the game!
Mixing the Fluffy Cake Batter for the Cotton Candy Cake
This is where we build the air, people! You absolutely must cream that softened butter and granulated sugar until it’s pale and truly fluffy—this creates those tiny pockets of air needed for a light crumb. Beat in your eggs one at a time. Then, when you mix in your dry ingredients (flour, baking powder, salt), alternate them slowly with the milk mixture containing the flavor extract. Stop mixing the second everything comes together. Overmixing at this stage deflates everything and you end up with a tough cake, and we don’t want tough!
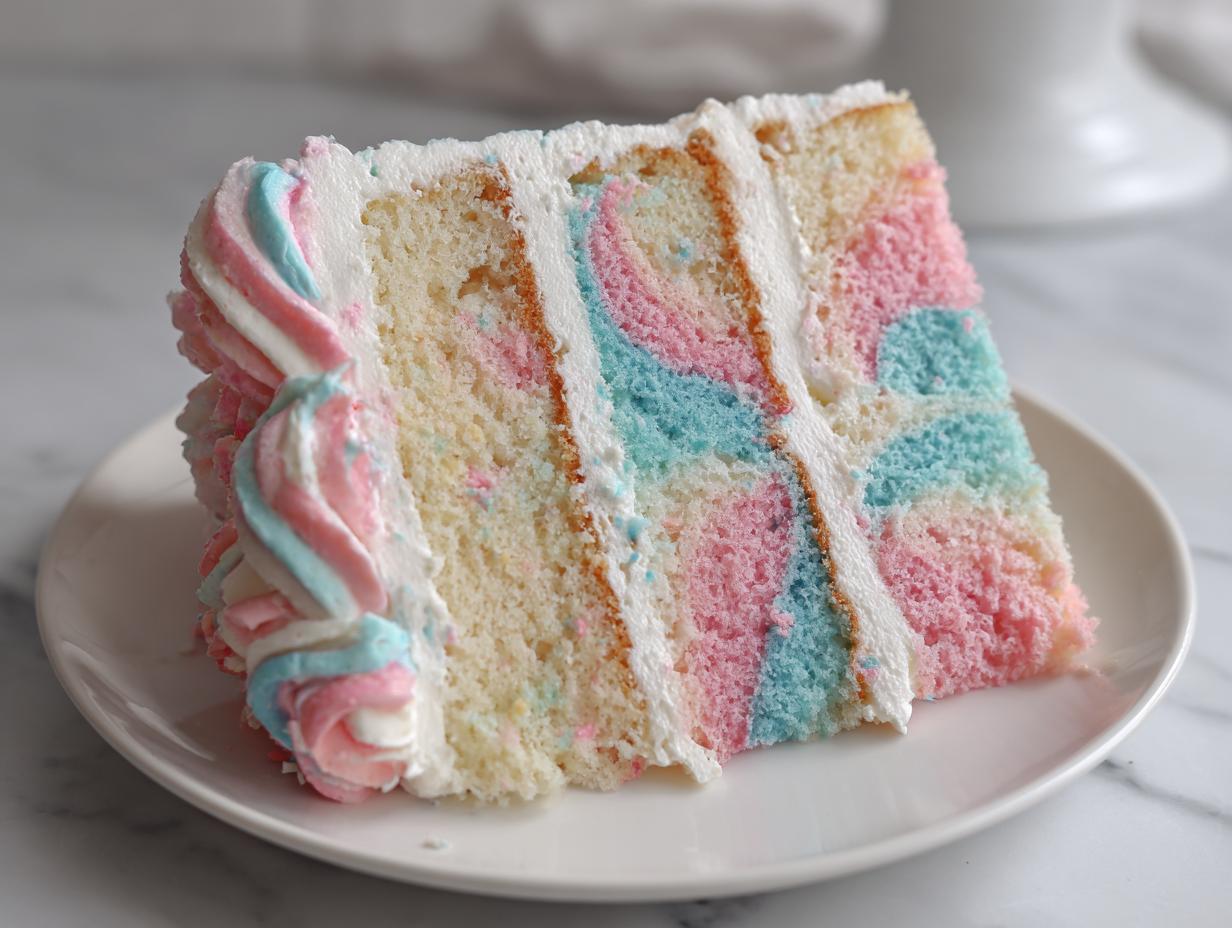
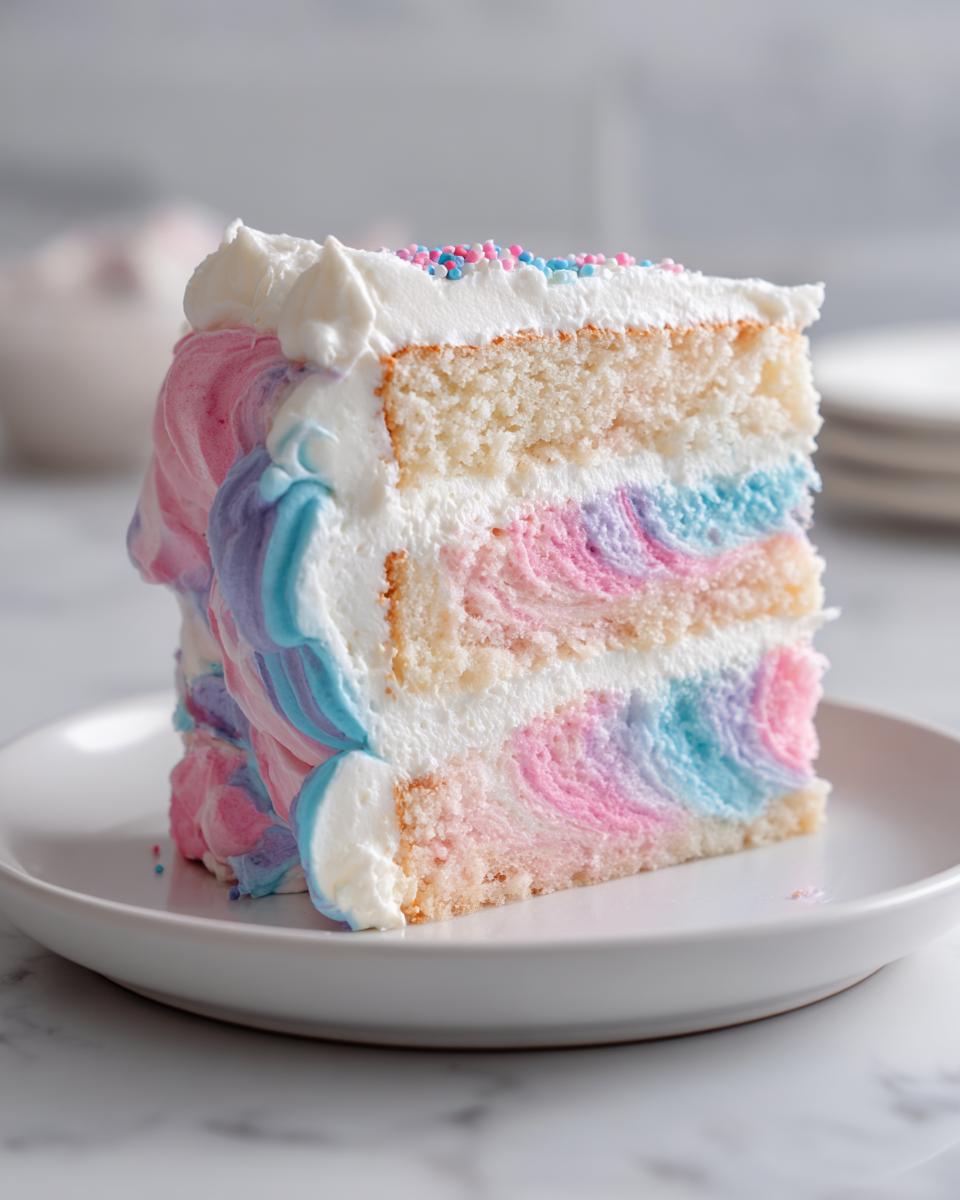
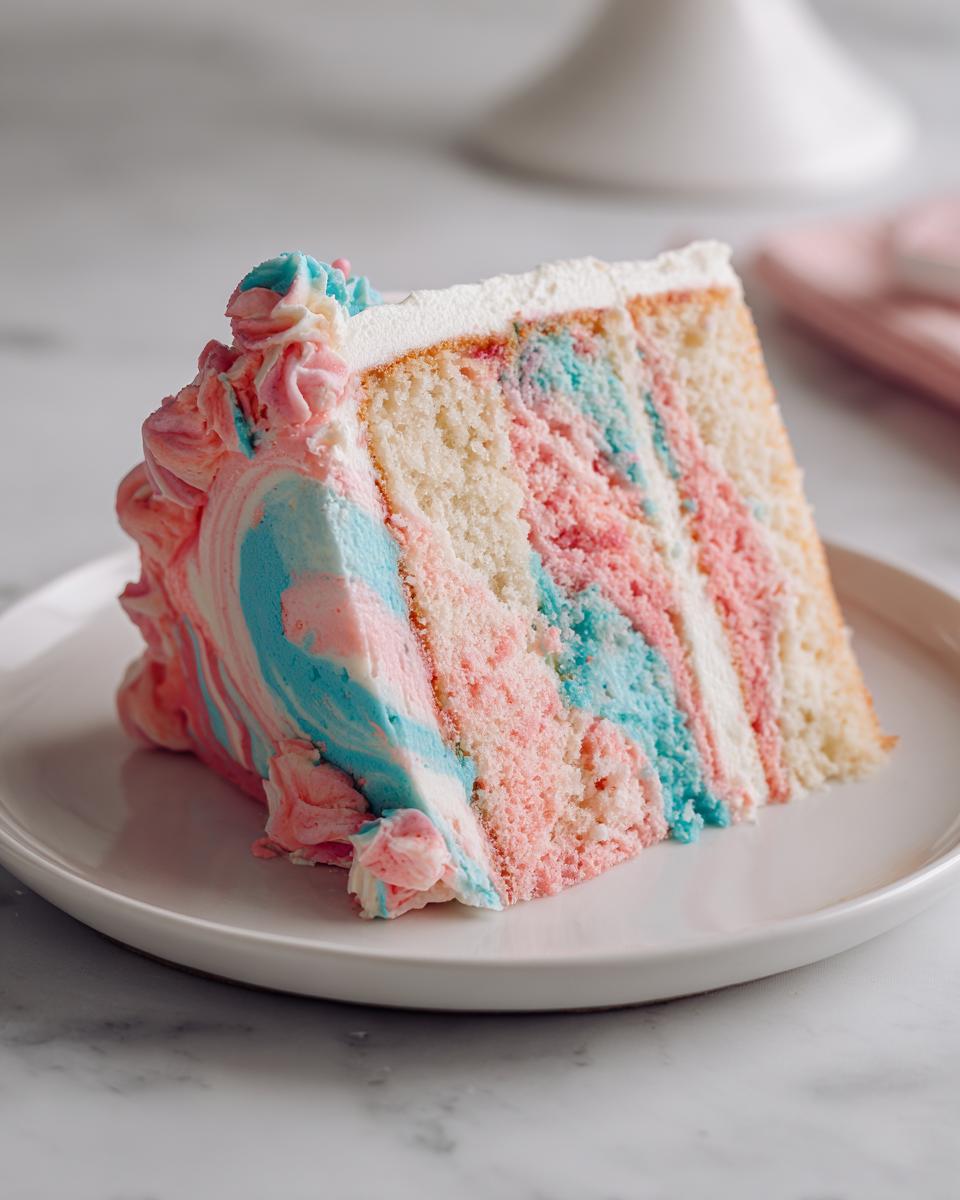
Creating Pastel Swirls in the Cotton Candy Cake Layers
Now for the magic trick! Divide your finished, light batter evenly into three small bowls. Leave one bowl its natural white color. Into the other two, gently mix in just a few drops of your pink and blue gel coloring—we’re aiming for soft pastels, not neon! Don’t stir until uniform; instead, we spoon alternating dollops of the white, pink, and blue batter randomly into your prepared pans. Don’t swirl them with a spatula! Just let them marble naturally as they bake. That random placement is what gives you that gorgeous, unique look in every slice.

How to Make Cotton Candy Frosting
Forget dense, crusty icing; we need fluffy clouds here! Start by beating that softened butter until it’s perfectly smooth. Then, gradually add that sifted powdered sugar bit by bit, alternating with splashes of heavy cream and your teaspoon of cotton candy extract. Beat it on high speed until it’s seriously light and airy—it should almost feel weightless. If you want the exterior to match the interior, divide a portion of this white frosting into two bowls and color them light pink and blue. Keeping the main batch white lets us create a beautiful contrast on the outside.
Assembling Your Showstopper Party Cake
Now we get to the fun part where this cake truly becomes a centerpiece! Make absolutely sure your cake layers are completely cool—warm cake equals melted frosting, and nobody wants that mess, trust me. Start by placing your first cooled cake layer down and spreading a nice, even layer of that plain white cotton candy frosting over the top. Stack the next layer right on top. Now, cover the entire exterior—top and sides—with your main batch of white frosting first. This gives us a perfect, clean canvas.
To get that dreamy, whimsical look other bakers have, take your bowls of pink and blue colored frosting and randomly place dollops all over the white-coated cake. Don’t try to make them perfect! Use an offset spatula and gently sweep it around the cake just once or twice. You want those colors to peek through the white, creating soft, magical swirls across your exterior. For the absolute grand finale, only when you are ready to bring this beauty to the table, lightly pile some actual cotton candy on top—it’s decoration that you eat!
If you need a refresher on stacking cakes or layering rich buttercreams—though this frosting is much lighter—check out my tips for assembling a classic red velvet; the structural techniques are similar. Remember, this amazing party cake concept is shared by many great bakers, like the folks over at Cook Orchard; it just shows how much people love this nostalgic vibe!
Tips for a Perfect Homemade Cotton Candy Cake
Even with an easy recipe, a few little tricks can take your cotton candy cake from great to truly unforgettable. Since this cake is all about that light, ethereal texture, we need to be mindful of the two things that can ruin it: drying out and topping melt!
- Use the cotton candy extract sparingly but don’t skip it! It’s the backbone of the flavor.
- Don’t ever overbake those layers, even by one minute. They should still feel delicate when you check them.
- The actual cotton candy topping is temperamental—it hates humidity and heat. Only put that fluffy stuff on right before you plan to serve the cake.
- For the absolute best, fluffiest experience, serve this cake the same day you make it. That’s when it seriously sings!
Storage and Reheating for Your Cotton Candy Cake
Because this cake relies on fresh, light textures, honestly, the best way to enjoy your cotton candy cake is the day you bake it. The real cotton candy topping we used dissolves if it sits too long, even in the fridge. If you have leftovers, cover the main frosted cake tightly with plastic wrap—gently, so you don’t smash your swirls—and keep it at room temperature for about 24 hours maximum. If you must chill it, wrap it well and let it sit out for at least an hour before serving so the cake softens back up!
Frequently Asked Questions About This Cotton Candy Cake Recipe
I get so many questions about making this fun cake! People are always curious about tweaking the flavor or if it’s just too fussy. Rest assured, I’ve tested all these scenarios so you don’t have to guess. If you’re looking for other fun ideas, I have a full collection of simple, delicious desserts that might tickle your fancy too!
Can I make this a no-bake cotton candy dessert?
Since we are focusing on that light, airy crumb, this specific recipe really needs the oven to set those fluffy layers correctly. If you strictly need a no-bake cotton candy dessert, you’d have to pivot strategies entirely! I’d suggest whipping up a no-bake cheesecake base or using stabilized whipped cream layered with crushed vanilla wafers and folding the extract into the whipped topping instead of baking a cake.
Is this cotton candy cake suitable for kid friendly party cakes?
Oh, definitely! This is tailor-made for kid friendly party cakes. It’s bright, it’s sweet, and it screams fun! Kids absolutely adore the pastel swirls, and the flavor hits that sweet spot we all associate with carnival themed desserts. It’s a visual stunner that tastes exactly like childhood joy.

Estimated Nutritional Data for This Cotton Candy Cake Recipe
Now, I hate to bring up math when we’re talking about pure sugary joy, but I always include this section for transparency. Remember, this is a celebration cake, so this isn’t an everyday slice! The numbers below are based on serving 1/10th of the entire cake, but please take them as a general guide because how much butter *I* use versus how much *you* use can change things!
- Serving Size: 1 slice
- Calories: 450
- Sugar: 65g
- Fat: 20g (Saturated Fat: 12g)
- Carbohydrates: 68g
- Protein: 4g
For accurate tracking, I always recommend weighing your finished cake and dividing by 10, but this gives you a solid sense of what’s in your piece of heaven. It’s rich, it’s sweet, and it’s worth every single amazing bite!
Share Your Magical Cotton Candy Cake Creations
Wow, I really hope you had as much fun making this cotton candy cake as I did sharing the secrets with you! Now, the best part: I want to see your results! Please take a photo of your beautiful, whimsical layers and tag me on social media. Drop a comment below and let me know what your favorite memory this cake brought back was. If you have any final questions, don’t hesitate to reach out through my contact page. Happy baking, friend!
PrintEasy Fluffy Cotton Candy Cake with Swirled Pastel Layers
Make a whimsical, sweet, and fluffy cotton candy cake perfect for birthdays or celebrations. This recipe features simple steps for achieving pastel swirls and a strong cotton candy flavor.
- Prep Time: 35 min
- Cook Time: 30 min
- Total Time: 65 min
- Yield: 10 servings 1x
- Category: Dessert
- Method: Baking
- Cuisine: American
- Diet: Vegetarian
Ingredients
- 1 1/2 cups all-purpose flour
- 1 1/2 teaspoons baking powder
- 1/2 teaspoon salt
- 1 cup granulated sugar
- 1/2 cup unsalted butter, softened
- 2 large eggs
- 1 teaspoon vanilla extract
- 1/2 cup whole milk
- 1 teaspoon cotton candy extract
- Pink and blue gel food coloring
- 1 cup (2 sticks) unsalted butter, softened (for frosting)
- 4 cups powdered sugar, sifted (for frosting)
- 1/4 cup heavy cream or milk (for frosting)
- 1 teaspoon cotton candy extract (for frosting)
- Optional: Cotton candy for topping
Instructions
- Preheat your oven to 350°F (175°C). Grease and flour two 8-inch round cake pans.
- In a medium bowl, whisk together the flour, baking powder, and salt. Set aside.
- In a large bowl, cream together the softened butter and granulated sugar until light and fluffy. Beat in the eggs one at a time, then mix in the vanilla extract.
- In a separate small bowl, mix the milk and cotton candy extract.
- Gradually add the dry ingredients to the wet ingredients, alternating with the milk mixture, beginning and ending with the dry ingredients. Mix until just combined. Do not overmix.
- Divide the batter evenly into three separate bowls. Leave one bowl white. Add a few drops of pink gel coloring to the second bowl and blue gel coloring to the third bowl. Mix gently until the colors are incorporated, creating pastel shades.
- Spoon alternating dollops of the white, pink, and blue batter randomly into the prepared cake pans to create a marbled or swirled effect. Do not mix the colors together with a spoon.
- Bake for 28 to 32 minutes, or until a toothpick inserted into the center comes out clean. Let the cakes cool in the pans for 10 minutes before inverting them onto a wire rack to cool completely.
- Prepare the cotton candy frosting: Beat the softened butter until smooth. Gradually add the sifted powdered sugar, alternating with the heavy cream and cotton candy extract. Beat until the frosting is light and fluffy.
- If you want pastel swirls in the frosting, divide the frosting into two bowls. Color one bowl light pink and the other light blue using gel coloring.
- To assemble, place one cooled cake layer on a serving plate. Spread a layer of plain white frosting over the top. Place the second layer on top. Frost the top and sides with white frosting.
- For the pastel swirl effect on the outside, randomly place dollops of the pink and blue frosting over the white frosted cake. Use an offset spatula to gently smooth and swirl the colors together for a whimsical look.
- Top with actual cotton candy just before serving for the best visual effect.
Notes
- For the best cotton candy flavor, use a high-quality cotton candy extract.
- Do not overbake the cake layers; they should remain light and airy.
- If you are short on time, you can use two boxes of white cake mix, following package directions but substituting the liquid with milk and adding 1 teaspoon of cotton candy extract to the batter.
- This cake is best served the day it is made, as the cotton candy topping dissolves quickly.
Nutrition
- Serving Size: 1 slice
- Calories: 450
- Sugar: 65
- Sodium: 250
- Fat: 20
- Saturated Fat: 12
- Unsaturated Fat: 8
- Trans Fat: 0
- Carbohydrates: 68
- Fiber: 1
- Protein: 4
- Cholesterol: 65