
There’s just something about a dessert that tastes like childhood, isn’t there? It takes me right back to those long, lazy days when the only thing that mattered was digging into something rich, cold, and ridiculously easy. If you’ve been searching for that quintessential crowd-pleaser—the one that disappears first at every single function—then you’ve found it. We’re talking about the Ultimate No-Bake Oreo Dirt Cake. I’ve spent years in kitchens, both professional and domestic, perfecting classic forms, and trust me, this specific sweet treat is foundational. It needs zero oven time, uses simple ingredients, and always delivers that satisfying crunch mixed with creamy bliss. Get ready, because this recipe will become your go-to party staple.
- Why This Ultimate No-Bake Oreo Dirt Cake Recipe Works (Easy Party Food)
- Essential Ingredients for Classic Dirt Cake
- Step-by-Step Instructions for Assembling Your Dirt Cake
- Fun Variations: Making Dirt Cups and Other Dirt Cake Ideas
- Tips for the Best No Oven Dessert Experience
- Storage and Reheating Instructions for Your Dirt Cake
- Frequently Asked Questions About This Oreo Dessert
- Estimated Nutritional Data for Classic Dirt Cake
- Share Your Dirt Cake Creations
Why This Ultimate No-Bake Oreo Dirt Cake Recipe Works (Easy Party Food)
I love a dessert that requires absolutely no babysitting in the oven. That’s the first major win here. This isn’t just another sweet thing; it’s a full-blown No Bake Dessert strategy for when you need reliable, incredible food fast. It’s designed specifically to be Easy Party Food, but you’ll want to steal bites straight from the pan before the guests arrive, I promise! If you’re looking for another smash hit for entertaining, you absolutely have to try my sausage pinwheels.
- The Creamy Texture of This Dirt Cake: We hit that perfect trifecta of texture. The combination of softened cream cheese, whipped topping, and rich chocolate pudding gives you a Creamy Dessert experience that is intensely satisfying.
- Perfect Make Ahead Dessert for Busy Cooks: This is the ultimate Make Ahead Dessert. Seriously, chill it overnight if you can. The chilling time lets all those wonderful flavors settle in and firm up perfectly.
Essential Ingredients for Classic Dirt Cake
When we talk about the classic Dirt Cake, we’re talking about simple, accessible things. No fancy extracts or arcane powders here! I’ve listed everything you need below, right down to the optional gummy worms. If you loved my no-bake peanut butter pie, you’ll appreciate how straightforward these components are.
- 1 package (14.3 ounces) Oreo cookies (Yes, all of them!)
- 1 package (8 ounces) cream cheese, softened until it’s mood-friendly
- 1 cup unsalted butter, softened—room temperature is key!
- 1 cup powdered sugar (Don’t substitute this for granulated!)
- 1 container (12 ounces) frozen whipped topping, thawed completely
- 2 packages (3.9 ounces each) instant chocolate pudding mix
- 3 cups cold milk (The colder, the faster the pudding sets.)
- 1 teaspoon vanilla extract
- Gummy worms for decoration (Because why wouldn’t you?)
Ingredient Notes and Substitutions for Your Dirt Cake
Listen, for this specific Oreo Cookie Dessert to shine, preparation matters on a couple of items. You absolutely must use instant chocolate pudding. Cook-and-serve often dries out too much when mixed with the cream cheese base later on. Also, when mixing the fats, make sure your butter and cream cheese are perfectly soft—if they’re cold, you’ll end up with lumps instead of that silky smooth base everyone loves.
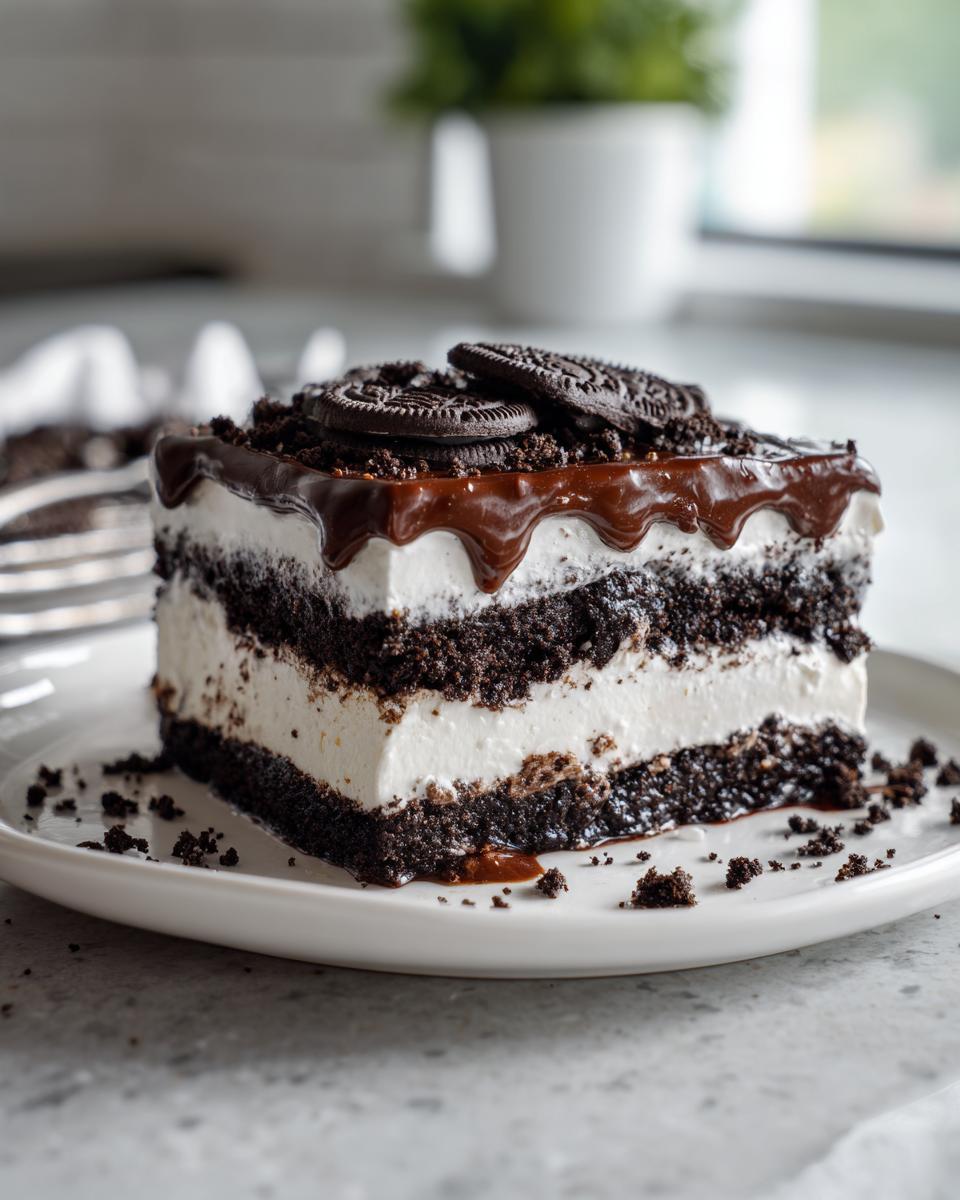
Step-by-Step Instructions for Assembling Your Dirt Cake
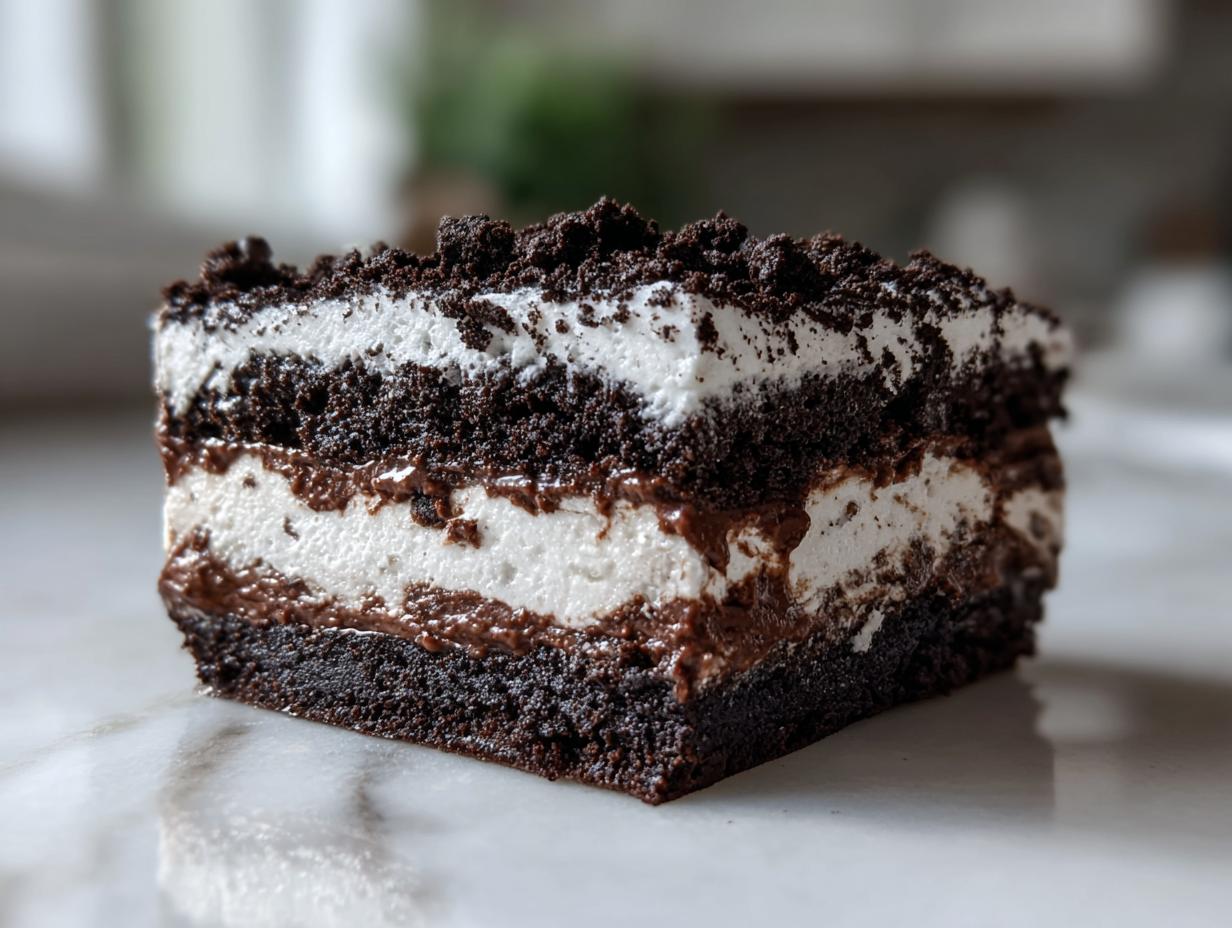
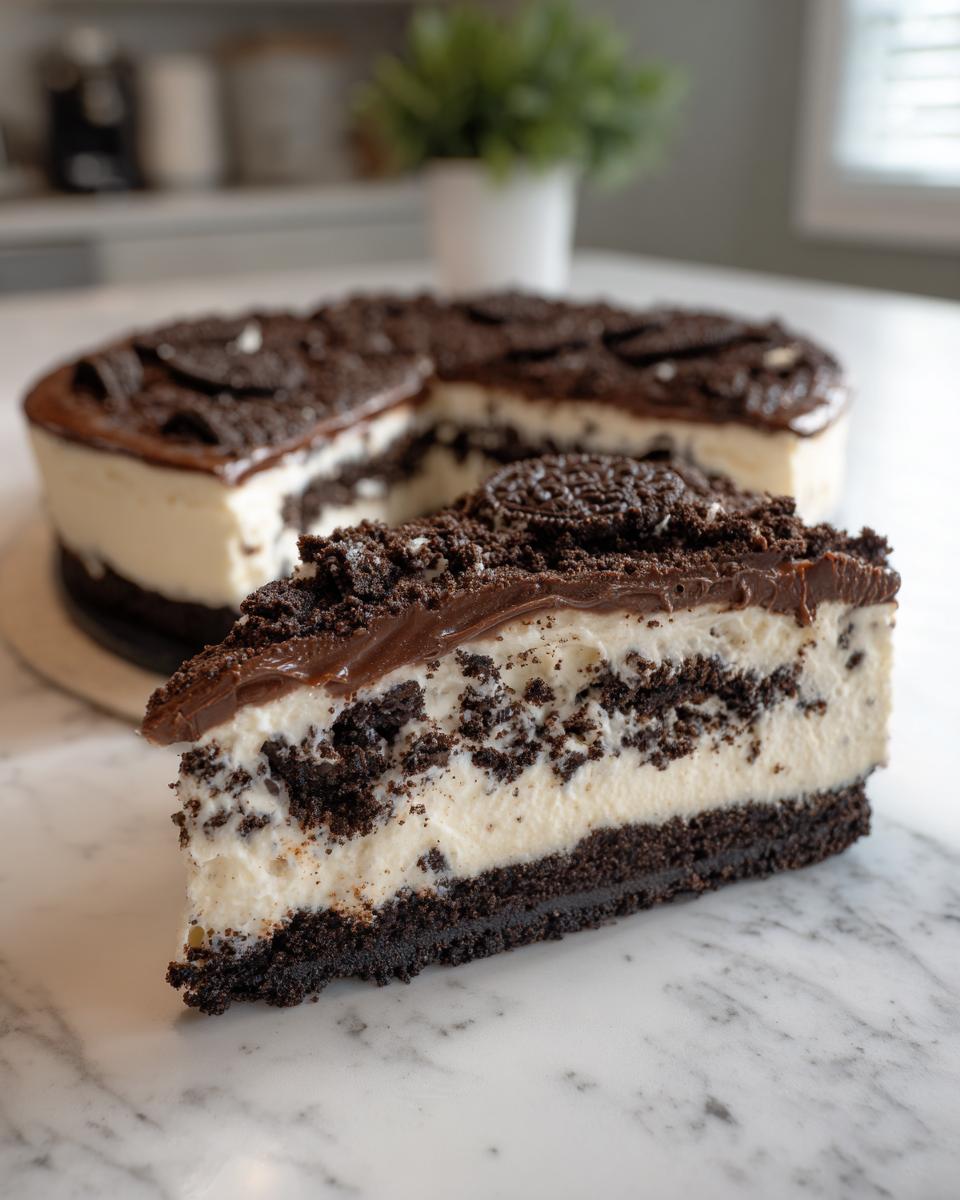
Okay, now for the fun part—putting this masterpiece together! It’s all about building those distinct layers, and trust me, taking your time here guarantees that beautiful cross-section when you finally slice into it. Remember, we’re going for elegance under the dirt disguise. If you’re looking for more layered magic, check out my notes on making fluffy shortcake.
First things first: get those Oreos crushed down until they genuinely look like rich soil. Set aside about a cup; that’s our pristine top dressing!
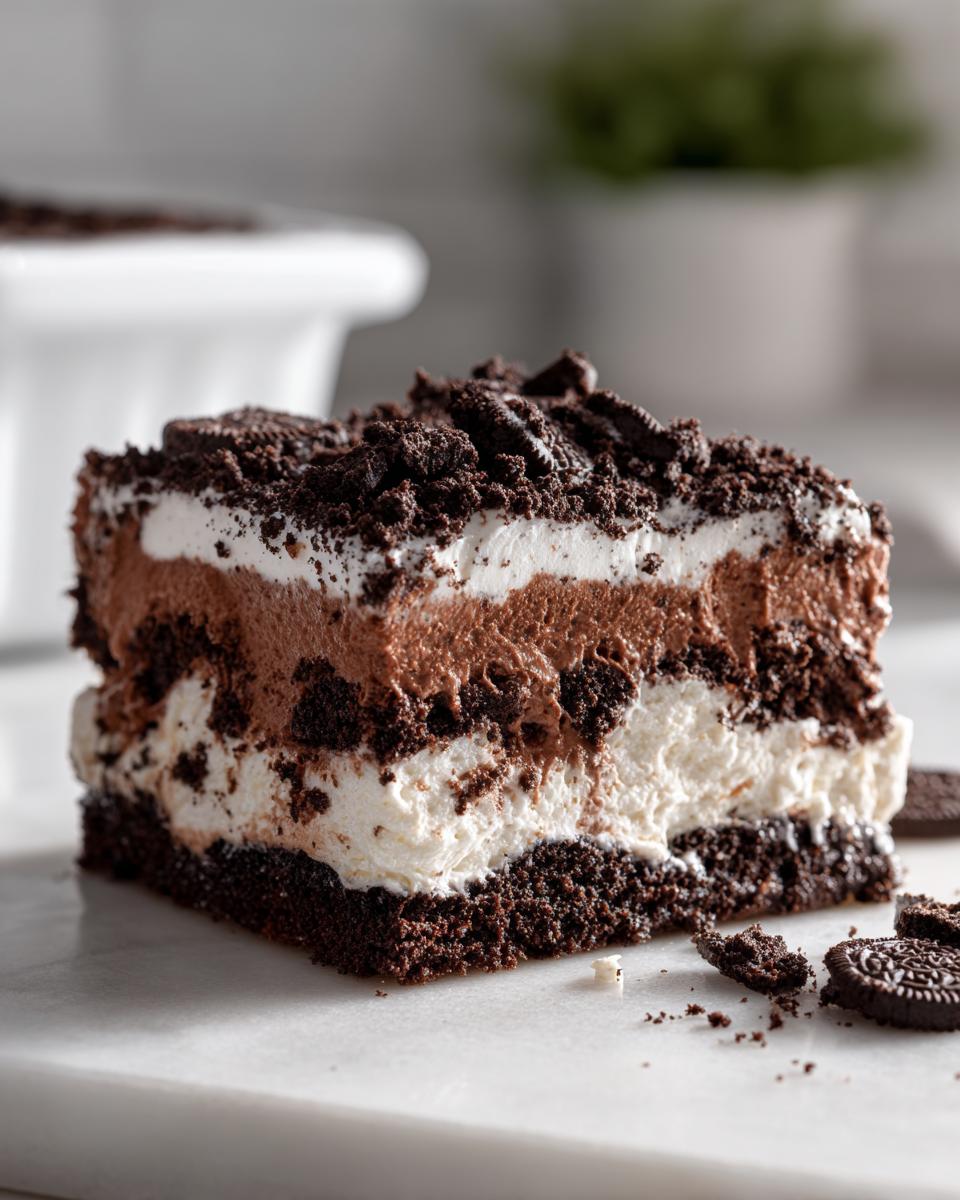
Preparing the Cream Cheese Filling Layer for the Dirt Cake
This layer is what makes this dessert so much better than just plain pudding. In your big bowl, dump in that softened cream cheese and that softened butter. You have to beat them together until they look absolutely silken—I mean smooth, no lumps surviving! Then, slowly add in the powdered sugar and whip until it looks fluffy and pale. Next, you’ll gently fold in your thawed whipped topping until you confirm there are no streaks remain where white topping meets the creamy base. That’s how you lock in the richness!
Layering and Chilling the Dirt Cake
While the cream layer is chilling slightly, whisk up your two types of instant chocolate pudding with the cold milk and vanilla. Whisk hard for about two minutes until it starts to barely thicken—it will set up more later! Once it’s thickened a bit, gently fold in about half of your remaining crushed Oreos. Now, assemble! Start with the pudding mixture, top that with the entire cream cheese mixture layer, and then cover that with the rest of the plain pudding.
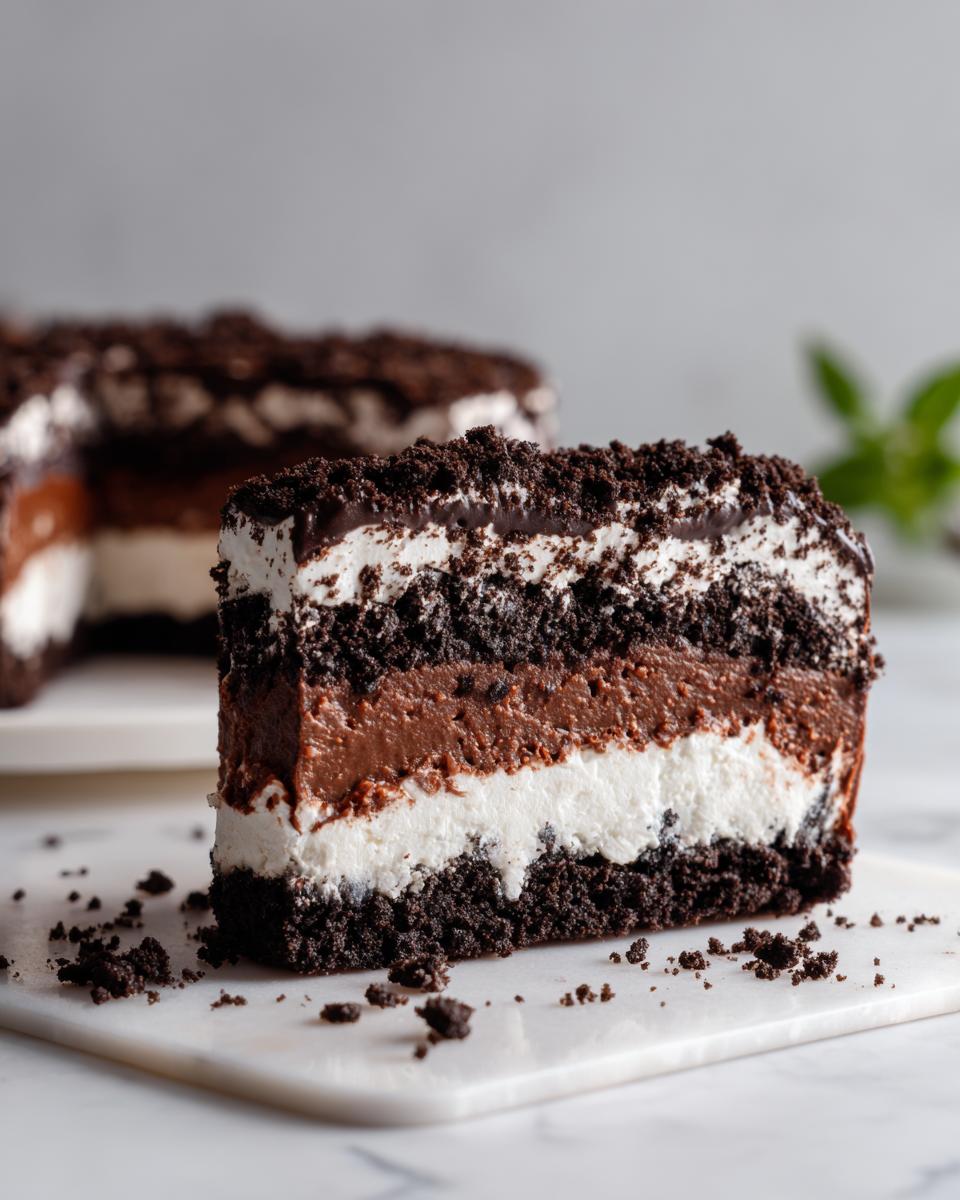
Finally, generously sprinkle that reserved cup of crumbs over the top. Cover it up tight and rush it to the fridge. You must let it chill for a minimum of four hours, but honestly, overnight is when this Layered Dessert truly becomes perfect.
Fun Variations: Making Dirt Cups and Other Dirt Cake Ideas
While I love presenting this glorious mixture in one big 9×13 dish—because who doesn’t love a dramatic reveal?—sometimes presentation needs to be a little more personal, especially when the little ones are around. This is when we pivot from a big cake to individual Dirt Cups. Honestly, turning this into individual servings screams pure fun and makes cleanup way simpler. If you’re looking for another amazing family favorite that disappears quickly, you need to try my chocolate cinnamon rolls.
Serving Dirt Cake as Individual Dirt Cups
For Dirt Cups, forget the spatula; grab some clear plastic cups! This is where those Desserts with Gummy Worms really shine. I always layer them just like the big pan: a spoonful of pudding mix, a dollop of cream, more pudding, and then the final dusting of crumbs on top. You get every texture in every bite this way, which is perfect for little hands!
The best part? The worms! Don’t just plop them on top. Stick a couple of gummy worms halfway into the crumb layer so it looks like they are actually digging their way out of the ‘dirt.’ It’s such a simple trick, but it instantly transforms this into one of the most anticipated Kid Friendly Treats at any party.
Tips for the Best No Oven Dessert Experience
Since this is a fantastic No Oven Dessert Recipe, we aren’t relying on heat for structure—we are relying on cold and technique! This means paying close attention to the temperature of our ingredients before mixing. If you’ve had issues with this kind of dessert before, I bet it was temperature related. It’s all about getting those fats right while keeping the liquid cold.
First, I mentioned it before, but it bears repeating: your cream cheese and butter must be perfectly room temperature. They need to blend into a fluffy, easily combined mass. If you skip that, your cream layer will be chunky, and we just can’t have that!
Conversely, for the chocolate pudding layer, the milk needs to be ice cold. If the milk is even slightly lukewarm, your pudding sets up weakly and won’t hold its shape when layered. Whisk that cold milk into the instant pudding mix until it just starts to firm up—it shouldn’t be runny at all. Pay attention to those details, and you’ll have a rock-solid dessert that tastes amazing. You should also check out my secrets for getting those truly fluffy pancakes—it’s all about temperature, too!
Storage and Reheating Instructions for Your Dirt Cake
Since this Dirt Cake is built on creams and instant pudding, our number one rule is refrigeration, refrigeration, refrigeration! This is designed to be a stunning Make Ahead Dessert, so don’t even think about leaving it on the counter. Once assembled and topped with those gorgeous Oreo crumbs, cover your dish—a tight layer of plastic wrap works best—and tuck it into the back of the fridge.
I always tell people that 4 hours is the absolute minimum chilling time to make sure the layers are firm enough to handle a serving spoon without everything sliding around. If you cover it tightly, it honestly tastes even better the next day. The time allows that chocolate flavor to deepen, and frankly, it just firms up beautifully. It makes serving effortless!
But here’s the sticking point with any no-bake creamy dessert: time changes things. If you try to keep this longer than say, three or four days, you might notice the Oreo topping starts to soften a bit too much. We want that satisfying crunch, right? Once the cookies get too soggy, you lose that vital textural contrast that makes this dessert so iconic. If you happen to have leftovers past day three and they are a bit too soft, don’t worry! You can refresh the top layer by crushing a few extra Oreos and sprinkling them on just before serving again.
Now, can you freeze it? Technically yes, but I really don’t recommend it for the best experience. Freezing and thawing can sometimes cause the cream cheese mixture to curdle slightly or become a little grainy once thawed. If you absolutely must freeze it, keep it wrapped super well, but plan to eat it within a month and let it thaw slowly in the fridge overnight before serving. If you’re interested in other make-ahead items that handle freezing well, you should check out my recipes for easy freezer jam—those are practically foolproof!
Frequently Asked Questions About This Oreo Dessert
I know you might have some questions when you’re diving into a Classic American Dessert like this—we want to make sure it turns out perfect on the first try! I’ve gathered the most common queries about making and storing this incredible layered creation so you can proceed with total confidence. If you love prepping things the night before, don’t forget to peek at my overnight oats recipe for quick breakfasts, too!
Can I use homemade pudding instead of instant pudding in the dirt cake?
That’s a great question, and the short answer is technically yes, but I strongly advise against it for this particular recipe. Homemade pudding is lovely, but it cooks and cools differently than the instant mix. We need that quick-setting nature of the instant variety so it can hold up to the heavy cream cheese layer we put on top. If you use a cooked pudding, you’ll have to chill it until it’s completely set—which could take hours—before you can even think about layering, and even then, the stability just isn’t the same. Stick to the instant for the very best structure in your Dirt Cake!
What is the best way to crush Oreos for the dirt layer?
Oh, my journey has involved many methods for crushing those beloved cookies! For the absolute finest, most authentic ‘dirt’ texture, I highly recommend using a food processor. Pulse a whole package of Oreos—cream and all—until they are fine crumbs. However, if you don’t want to pull out the big machine, the old-school way works perfectly fine for me sometimes too: toss the cookies into a heavy-duty zip-top bag, seal it tight (press out all the air!), and bash them with the bottom of a sturdy rolling pin or even a heavy sauce pot. Just be careful not to punch a hole in the bag; nobody wants chocolate shrapnel on their floor!
How long does this classic American dessert last in the fridge?
This is built to last you a few days, which is why it’s such a fantastic Potluck Dessert! When stored tightly covered in the refrigerator, this Oreo Dessert stays perfectly firm and delicious for about three to four days. Day one is always the best because you get that wonderful contrast between the firm, cold cream and the crunchy cookie topping. By day three, you’ll notice the Oreos on top have softened up considerably; this is normal because they absorb moisture from the layers below. If you wait until day five or six, the entire cookie layer might start melding into the pudding and lose that satisfying texture. So, aim for three days for peak performance!
Estimated Nutritional Data for Classic Dirt Cake
Look, I’m going to be upfront with you: this is a decadent, blissful, four-layer dessert loaded with cream cheese, butter, and Oreos. It’s not designed to be a health food! However, seeing the basic facts helps if you’re tracking things generally. I always calculate these numbers based on standard grocery store versions of the ingredients—the way most people make this Dirt Cake at home. Remember, these estimations are for one generous slice (1/12th of the pan) after it’s fully set, so treat these figures as guidelines, not strict mandates!
Here is the breakdown we’ve put together:
- Serving Size: 1 slice (1/12th of the recipe)
- Calories: Approximately 450 per serving
- Total Fat: Around 28g, meaning you definitely get that richness!
- Saturated Fat: Roughly 16g (That’s from the butter and cream cheese, naturally.)
- Carbohydrates: Coming in around 48g, mostly from the sugar and cookies.
- Protein: About 5g.
We are looking at a truly satisfying, slightly retro Creamy Dessert here. Don’t stress too much over the numbers when you’re setting out the ultimate, no-fuss treat for your friends and family. The smiles you get when they dig in far outweigh any minor calorie concerns!
Share Your Dirt Cake Creations
If you’ve made it this far, you’re ready to make some magic! And honestly, the best part of sharing a recipe isn’t just handing over the instructions; it’s seeing what you all create in your own kitchens. This Ultimate No-Bake Oreo Dirt Cake is one of those quintessential Family Favorite Desserts that just begs to be brought to a gathering.
I truly want to know how it turned out for you. Did you use the gummy worms, or did you stick to a simple, classic topping? Did you make individual Dirt Cups? Head down to the comments section below and leave me a rating—five stars if you’re already planning your next batch, of course! Don’t be shy about sharing photos on social media!
When you post your pictures, tag me! Seeing my recipes come to life on your tables is why I do all this work. It’s proof that good, honest, deeply comforting food shouldn’t be complicated. If you ever need to reach out directly with a cooking question or a success story, you can always find the link to contact me here. Happy digging!
PrintUltimate No-Bake Oreo Dirt Cake

Make this easy, creamy no-bake Oreo Dirt Cake. It features layers of crushed Oreos, chocolate pudding, and a rich cream cheese filling, making it a perfect, make-ahead party dessert.
- Prep Time: 25 min
- Cook Time: 0 min
- Total Time: 4 hr 25 min
- Yield: 12 servings 1x
- Category: Dessert
- Method: No Bake
- Cuisine: American
- Diet: Vegetarian
Ingredients
- 1 package (14.3 ounces) Oreo cookies
- 1 package (8 ounces) cream cheese, softened
- 1 cup unsalted butter, softened
- 1 cup powdered sugar
- 1 container (12 ounces) frozen whipped topping, thawed
- 2 packages (3.9 ounces each) instant chocolate pudding mix
- 3 cups cold milk
- 1 teaspoon vanilla extract
- Gummy worms for decoration (optional)
Instructions
- Crush all Oreo cookies until they resemble fine dirt. Set aside about 1 cup of the crumbs for the top layer.
- In a large bowl, beat the softened cream cheese and softened butter together until smooth. Gradually add the powdered sugar and mix until fully combined.
- Fold in the thawed whipped topping into the cream cheese mixture until no streaks remain. This is your cream layer.
- In a separate bowl, whisk together the instant chocolate pudding mix, cold milk, and vanilla extract until the pudding thickens, about 2 minutes.
- Gently fold about half of the crushed Oreo crumbs into the thickened chocolate pudding mixture.
- Assemble the dirt cake in a 9×13 inch dish or a large trifle bowl. Start with a layer of the Oreo-pudding mixture, followed by the entire cream cheese mixture layer.
- Top the cream layer with the remaining plain chocolate pudding mixture.
- Sprinkle the reserved 1 cup of crushed Oreo crumbs evenly over the top layer to create the ‘dirt’ effect.
- Cover the dish and chill in the refrigerator for at least 4 hours, or preferably overnight, to allow the layers to set firmly.
- Before serving, press gummy worms into the top layer if you are making Dirt Cups or decorating the main dish.
Notes
- For individual servings, assemble this recipe in small clear plastic cups to create ‘Dirt Cups’ with gummy worms.
- You can substitute vanilla pudding for chocolate pudding if you prefer a lighter cream layer.
- This dessert tastes best when chilled for a full 8 hours, allowing the flavors to meld.
Nutrition
- Serving Size: 1 slice
- Calories: 450
- Sugar: 45g
- Sodium: 350mg
- Fat: 28g
- Saturated Fat: 16g
- Unsaturated Fat: 12g
- Trans Fat: 0.5g
- Carbohydrates: 48g
- Fiber: 1g
- Protein: 5g
- Cholesterol: 60mg