
There’s just something about those Girl Scout cookies, isn’t there? That perfect trio of caramel, toasted coconut, and chocolate—it’s pure magic bundled into a little green box. I’ve spent years honoring classic American desserts, trying to capture that feeling of nostalgia and indulgence in my own kitchen. And trust me, converting that legendary cookie experience into a truly magnificent, creamy **Samoa Cheesecake** was a quest worth taking! Forget waiting for spring; we’re bringing this flavor explosion to your table right now. If you love desserts that hit every flavor preference, you’ll want to check out my guide to simple delicious desserts too. This baked version is rich, it’s decadent, and it’s definitely destined to be the centerpiece of your next big gathering. It just feels right, you know?
- Why This Decadent Samoa Cheesecake Recipe Works
- Essential Ingredients for Your Samoa Cheesecake
- How to Prepare the Best Samoa Cheesecake Recipe
- Tips for Success Making Your Samoa Cheesecake
- Variations: No Bake Samoa Cheesecake Options
- Serving Suggestions for Your Layered Cheesecake Dessert
- Storage and Reheating Instructions for Samoa Cheesecake
- Frequently Asked Questions About Your Samoa Cheesecake
- Share Your Show-Stopping Cheesecake Creation
- Share Your Show-Stopping Cheesecake Creation
Why This Decadent Samoa Cheesecake Recipe Works
Look, I’ve made no-bake cheesecakes, and they are fine for a quick fix, but if you want that genuinely rich, perfectly dense, never-gummy texture that makes a cheesecake legendary, you have to bake it. Baking it low and slow in a water bath might sound fussy, but trust me, it’s the secret handshake to avoiding cracks and achieving that smooth, melt-in-your-mouth sensation. This approach turns the cookie flavors into a truly sugar cookie cheesecake relative—just way more indulgent! We’re aiming for a genuine **showstopping cheesecake** experience here. You get the satisfying crunch from that heavy chocolate cookie crust, the velvety smooth interior, and then that glorious mess of chewy caramel and toasted coconut on top. It’s a textural masterpiece, making this the ultimate **decadent cheesecake dessert** you’ve been dreaming about.
Essential Ingredients for Your Samoa Cheesecake
You can’t fake flavor here, folks. To get that true Samoa profile—rich, nutty, sweet, and balanced—we need quality starting points. I’ve always believed that the true secret to any great bake lies in prepping your ingredients correctly before they even hit the bowl. If you’re looking for more cream cheese inspiration, I’ve got a fantastic guide on cream cheese frosting easy recipe for cakes that walks through getting that perfect texture everywhere!
For the Chocolate Coconut Crust Cheesecake Base
- 1 3/4 cups chocolate cookie crumbs (I insist on using chocolate sandwich cookies, crumbs and all, for that authentic dark base!)
- 6 tablespoons unsalted butter, melted
Make sure those crumbs are fine—we want a solid, packed base that holds up to the creamy filling!
For the Creamy Caramel Coconut Cheesecake Filling
- 3 (8 ounce) packages cream cheese, softened to room temperature (This is non-negotiable; cold cream cheese gives you lumps, and we want silk!)
- 1 1/2 cups granulated sugar
- 1 teaspoon vanilla extract
- 1/2 cup sour cream
- 3 large eggs (Add these one at a time once everything else is mixed. Seriously, don’t rush the eggs!)
- 1 cup caramel sauce, divided (You’ll use half for swirling now and half later for the top.)
For the Toasted Coconut Topping and Drizzle
- 1 cup sweetened shredded coconut (We toast this until it’s golden brown—the smell alone is worth it.)
- 1/2 cup semi-sweet chocolate chips
- 1 tablespoon coconut oil (This helps the chocolate stay glossy and pourable.)
- 1/2 cup whole Samoa cookies, for garnish (You deserve these!)
How to Prepare the Best Samoa Cheesecake Recipe
Okay, buckle up, because this is where the magic happens. Getting that incredible texture in the final product—the ultimate **Caramel Coconut Cheesecake**—requires following these steps precisely, especially when dealing with the oven. Don’t worry if the water bath sounds like something only a pastry chef does. I promise it’s easy, and it makes all the difference! This process ensures your cheesecake is smooth, creamy, and ready for its close-up. If you need more hints on keeping things moist, definitely check out my tips on moist carrot cake with cream cheese frosting—the principles of slow cooling are the same!
Building and Baking the Chocolate Coconut Crust Cheesecake
First things first: heat your oven up to 350°F (175°C). In a simple bowl, mix your chocolate cookie crumbs with that melted butter; just toss it until it looks like wet sand. Press that mixture down firmly into your 9-inch springform pan. Don’t be shy about pressing it hard across the bottom! Pop that crust in the oven for about 10 minutes just to set it. Then, take it out and let it cool down a bit while you tackle the filling.
Now, for the water bath—this is crucial for that creamy texture. Wrap the outside bottom of your springform pan really well with heavy-duty foil—like, three layers, just to be safe against leaks. Set that wrapped pan inside a larger roasting pan. Once the cheesecake batter is ready, carefully pour boiling hot water into the roasting pan until it comes about halfway up the sides of your cheesecake pan. That steam keeps things wonderfully gentle in the oven! You can see how others approach this beloved bake over at Gimme Some Oven, but follow my method for the best results!
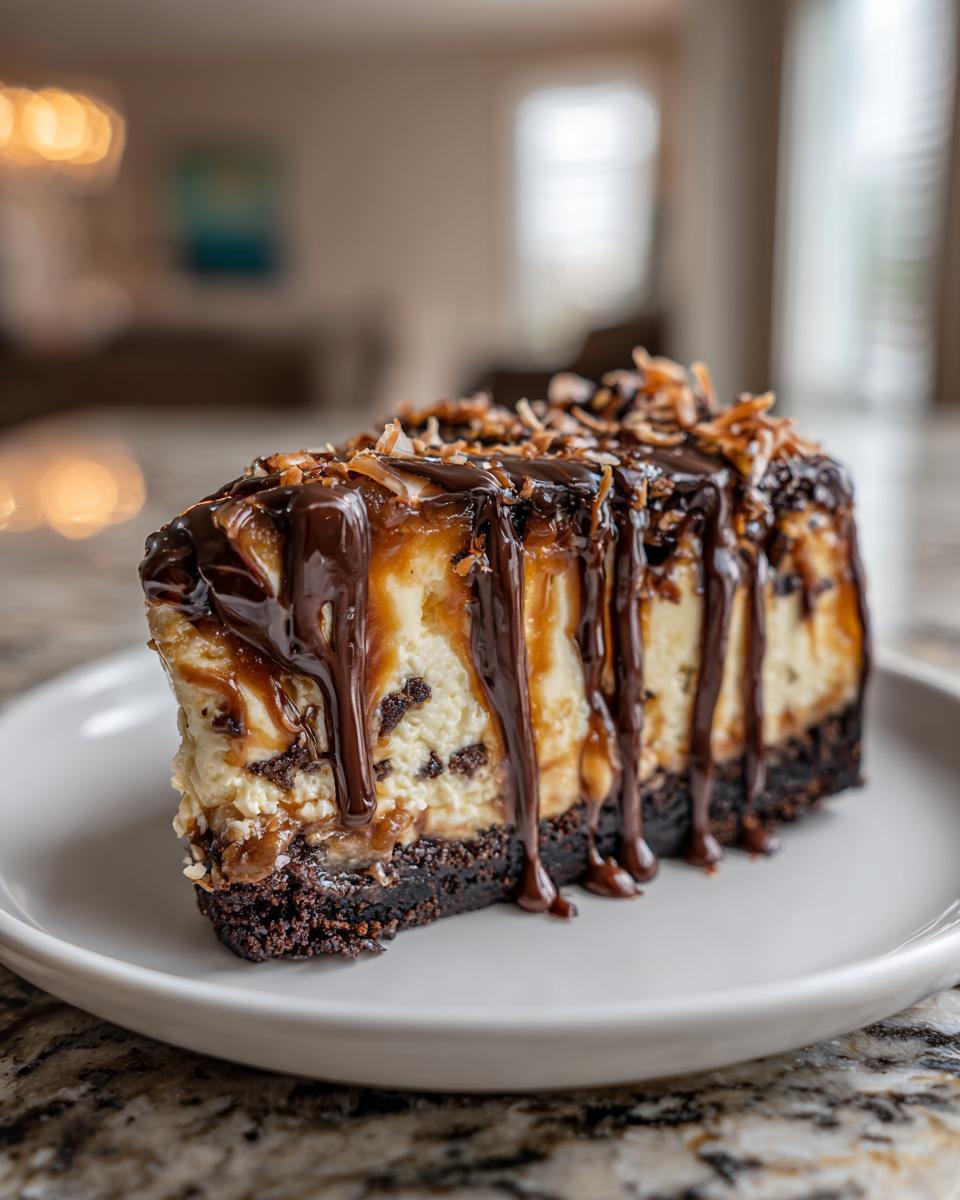
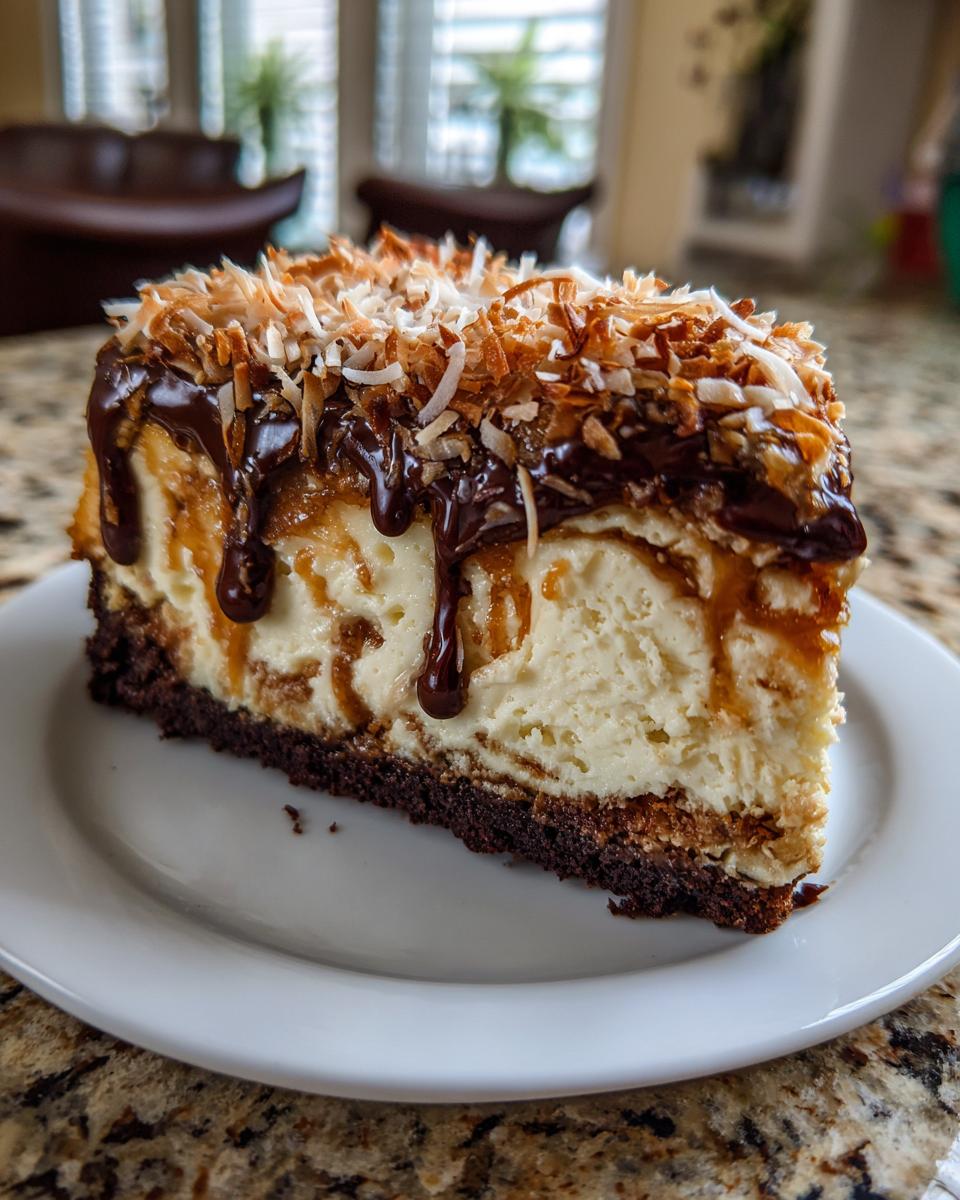
Achieving the Perfect Caramel Swirl in Your Samoa Cheesecake
Once your filling is mixed, pour about half of it right over that cooled crust. Then, take half of your caramel sauce and drizzle it right over that first layer. Now, pour the remaining batter on top. Finish this by drizzling the *rest* of that wonderful caramel sauce over the very top layer. Grab a knife or even a skewer and gently drag it through the layers a few times. You want ribbons of caramel, not one homogenous brown mess. Keep those swirls light!

Cooling and Chilling for Creamy Caramel Cheesecake Texture
Time to bake! Pop the whole roasting pan contraption into the oven for about 55 to 65 minutes. You’re looking for the edges to be set, but the very center should still wobble just a tiny bit if you nudge the pan. That wiggle means it’s perfect inside. Here’s my favorite pro tip: turn the oven off, crack the door open slightly, and let that **Decadent Cheesecake Dessert** sit inside for a full hour. This gradual cooling stops it from shrinking or cracking! After the hour, remove it from the water bath, let it come to room temp on a rack, cover it, and stick it in the fridge for at least six hours—but honestly, overnight is when it truly shines.
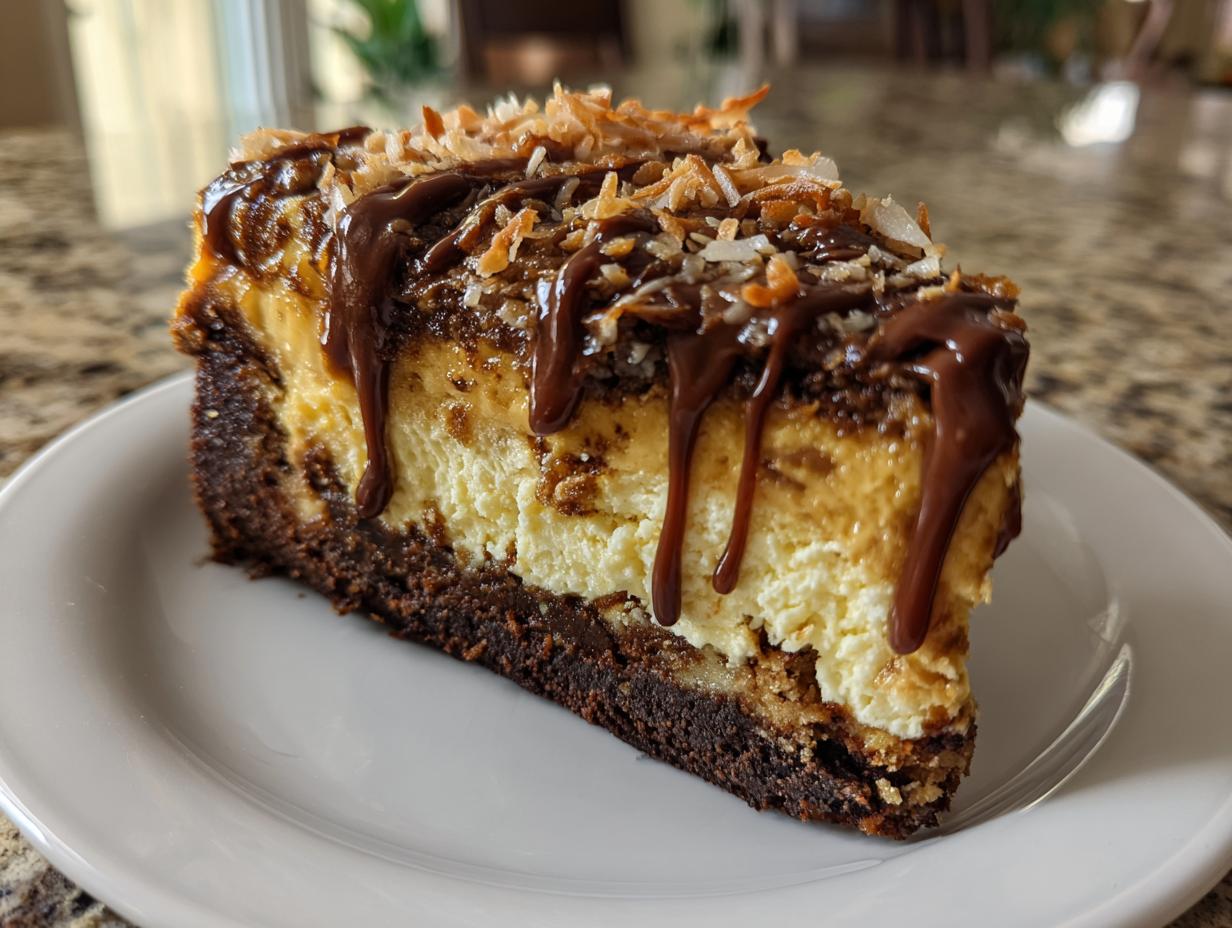
Finishing Your Showstopping Samoa Cheesecake Topping
Before you serve this beauty, we need the crunch! Put your chocolate chips and coconut oil into a little microwave-safe bowl. Heat it in short bursts—30 seconds at a time—stirring really well in between until it’s smooth as silk. Now, mix in that toasted coconut. Spread this glorious chocolate-coconut mixture right over the top of your deeply chilled cheesecake. I love topping the edges with a few whole **Girl Scout Cookie Cheesecake** duplicates just for looks. Slice it clean, and get ready for applause!
Tips for Success Making Your Samoa Cheesecake
When you are working with a rich dessert like this, sometimes you need a little nudge to go from ‘good’ to ‘absolutely unforgettable.’ My goal in the kitchen, whether it’s cookies or cheesecake, is always reliability. You deserve a showstopper every single time, so let’s talk about dodging those little cheesecake dramas, like cracks or a runny middle. To make sure you get that perfectly smooth bite, always remember the rule of temperature: room temperature ingredients yield the best results. If your cream cheese or eggs are cold, you’ll end up fighting lumps and over-mixing—and over-mixing is the enemy of a light, creamy texture!
To prevent those dreaded surface cracks, the water bath is your best friend; it keeps the ambient heat gentle around the cake. But if you see a tiny fissure forming anyway, don’t panic! A little bit of extra caramel sauce drizzled artfully over the top will hide almost anything. We talk about keeping things soft and chewy in my guide to the best sugar cookies, and the same gentle approach applies here.
Let’s talk about that amazing toasted coconut topping. Toasting coconut is tricky because it burns faster than most things you bake! To get it perfectly golden brown—nutty, not bitter—spread it thinly on a rimmed baking sheet. Watch it like a hawk after the 5-minute mark. You might need to gently stir it twice, but honestly, you want to pull it out right when you think, ‘Maybe it should go in for one more minute.’ That small window is where the flavor peaks!

Finally, patience during the cooling process is everything. I know you’re eager to cut into your amazing **Caramel Coconut Cheesecake**, but letting it cool slowly in the off oven for an hour before moving it to the counter, and then forcing yourself to wait for that full overnight chill, guarantees a firm, sliceable cheesecake. Shortcuts here will result in a softer texture, which isn’t always what we want in this particular **Girl Scout Cookie Cheesecake** variation. If you want to see how other talented bakers handle this classic, check out the tips they share over at Cheff Recipes!
Variations: No Bake Samoa Cheesecake Options
I totally hear you if you need a dessert fast, or if you just don’t want to fire up the oven when it’s already hot outside. While I stand by my baked **Decadent Cheesecake Dessert** for the absolute creamiest results, the good news is you can absolutely create an incredible **No Bake Samoa Cheesecake** that captures all those incredible cookie flavors!
The main difference, of course, is ditching the eggs. Since we aren’t baking, we don’t need that structure, but we *do* need something to firm up the filling. Most great no-bake recipes rely on heavy stabilizers.
When adapting this recipe for a chilled version, you’ll basically swap out the eggs and sour cream for something that sets up nicely in the fridge. Sometimes that means adding a little gelatin dissolved in warm water, or, even better, incorporating stabilized whipped cream or Cool Whip right into the cream cheese mixture after it’s blended. This really lightens the texture up, making it feel incredibly airy compared to the dense baked version.
You’ll also need to adjust your chill time significantly. Instead of that initial 1-hour cooling period and overnight refrigeration, you need a solid 6 to 8 hours minimum for a no-bake filling to truly set. I’d still recommend chilling it overnight, especially since it’s so heavily topped!
For inspiration on how others handle the no-bake method beautifully, I always point folks over to Life Love and Sugar—they have some neat twists on this concept. Remember, we still want that chocolate cookie crust, but you can skip the initial 10-minute bake time! You simply mix the crumbs and butter, press it in, and move straight to the fridge while you whip up that lighter filling. It’s a great alternative for keeping things simple when you’re making treats like my cheesecake stuffed red velvet cookies!
Serving Suggestions for Your Layered Cheesecake Dessert
Once you’ve carefully nurtured your **Samoa Cheesecake** through baking and that loooong chilling period, the final act is presenting this masterpiece! Since this is such a rich, **indulgent dessert**, you don’t want to overwhelm it with heavy sides. We want accompaniments that either sing along with the coconut and caramel or provide a little lift to cut through the decadence.
Serving temperature is actually really important here. You want this bad boy served cold, straight from the fridge. A room-temperature cheesecake gets soft—almost unpleasantly so—once you add all those gooey toppings. Keep it chilled right up until you slice it!
If you’re looking for something warm to balance that cold creaminess, you absolutely cannot go wrong with a robust, strong cup of coffee. I mean a deep, dark roast—nothing too sweet on the side, because we’ve got plenty of sugar happening already! My recipe for homemade hot cocoa is fantastic, but maybe save that for enjoying *with* the leftovers the next day, ha!
For something lighter on the plate, a tiny dollop of lightly sweetened, fresh whipped cream is perfect. It adds a cloud-like texture without fighting the existing caramel and chocolate layers. Or, if you really want something to brighten up all that richness, a few fresh raspberries or even thinly sliced bright strawberries offer a needed tart acidity. It keeps the focus on the **layered cheesecake dessert** in front of you while making the plate look stunningly professional. Just try one bite with a tart berry—it’s revelation!
Storage and Reheating Instructions for Samoa Cheesecake
This is where the patience we showed during baking pays off! Because this **Samoa Cheesecake** is so rich, with all those creamy dairy products and that sticky caramel topping, good storage practices are super important. We want to make sure that when you come back for a second slice—because you absolutely will—it tastes just as incredible as it did fresh out of the fridge.
After you’ve thoroughly chilled your masterpiece (remember, overnight is best!), you need to keep it covered tightly. I highly recommend using plastic wrap or foil, but be careful not to let it touch the topping directly if you used a lot of coconut or chocolate drizzle, as it can stick and pull bits off.
In the refrigerator, this layered beauty will easily last for about five days. That’s five days of having a fancy, show-stopping dessert at your fingertips! If you’re planning ahead, storing it is simple, but keep in mind that the texture of the crust and topping might change slightly after thawing, which is why I always prioritize eating it fresh when possible. If you want to tuck the leftovers away for later, you can actually freeze it!
If you decide to freeze your cheesecake, first make sure it’s fully chilled (24 hours minimum). Then, give it a good wrap—plastic wrap, then a layer of foil over the entire pan or sliced pieces. It freezes wonderfully for up to a month. When you’re ready to bring it back to life, don’t try to rush it on the counter, or the top will get gooey too fast! Move it directly from the freezer to the refrigerator and let it thaw slowly over 12 to 24 hours. Once it’s fully thawed in the fridge, let it sit on the counter for about 30 minutes before slicing. It’s a simple process, but it respects the integrity of the cheesecake filling. For more tips on keeping flavors fresh, check out my guide on easy lemon parmesan kale salad—because even greens need proper storage!
Frequently Asked Questions About Your Samoa Cheesecake
I totally get it—baking something this magnificent can bring up a few questions. It’s all about making sure you get that perfect, creamy result every single time. You’ve already made the effort to create this **Girl Scout Cookie Cheesecake**, so let’s ensure the finishing touches are spot-on! If you’re looking for other things to make after this magnificent bake, my chicken tortellini soup is a fantastic savory contrast!
Can I use store-bought caramel sauce for this Samoa Cheesecake Recipe?
Oh, absolutely! Please don’t stress if you don’t have time to whip up homemade caramel; store-bought is perfectly acceptable and totally safe to use here. That’s what makes recipes accessible for busy cooks like us! That said, because the caramel is such a star player in the flavor profile, I will say that splurging on a higher-quality salted caramel sauce really does elevate the final taste. It pushes this from a great dessert to a truly amazing **Creamy Caramel Cheesecake**. If you use store-bought, just make sure it’s thick enough not to completely dissolve into the batter during the swirl!
What is the best way to slice a chilled Samoa Cheesecake?
This is the secret to keeping your slice looking as gorgeous as it tastes! Since this cheesecake has that thick, creamy filling and a gooey topping, a regular knife isn’t going to cut it cleanly. You need heat! After the cheesecake is fully chilled and you’ve taken the sides of the springform pan off, grab a long, thin knife—a slicing knife works best. Dip that knife into a tall glass of really hot water for about 30 seconds. Wipe the blade completely dry, and then make your cut. Wipe, dip, dry, slice! Repeat this process for every single slice. It melts right through the caramel and chocolate, leaving beautifully clean edges. If you’re looking for other show-stoppers, check out what the folks over at Savoring Moments are making!
Is the chocolate cookie crust necessary for this Girl Scout Cookie Cheesecake?
Look, I won’t lie to you—you *could* swap it. Maybe you prefer a graham cracker crust, or perhaps you’re going for a lighter **No Bake Samoa Cheesecake** and need something simpler. However, if you want that true, iconic Samoa flavor hitting you right at the start, the chocolate cookie crust is really important. The dark, slightly bitter chocolate of the cookie base contrasts absolutely perfectly with the sweet, rich caramel swirl we have going on inside. Skipping it means you’re missing that signature crunch and the dark flavor note that balances the whole thing out. I highly recommend sticking to the recipe and using that **Chocolate Coconut Crust Cheesecake** foundation! It makes the whole experience feel authentic.
Share Your Show-Stopping Cheesecake Creation
Now that you have the roadmap to this incredible **Decadent Cheesecake Dessert**, I truly hope you make it! There’s nothing better than knowing you brought a little joy and a whole lot of caramel and coconut goodness into someone’s life. Baking is about sharing, always. Once you’ve let it chill out overnight and you’ve cut that first perfect slice, please come back here and let me know how it went!
Did the swirl turn out right? Did everyone go back for seconds? Drop a rating below and tell me all about your experience in the comments. If you snapped a picture of your glorious, drizzled **Samoa Cheesecake**, I’d love to see it! Tag me or share it around—we celebrate every success in the Julia Meal family. If you ever want to dive deeper into my philosophy on making great food accessible, head over to my About Page. Happy baking, friend!
PrintDecadent Baked Samoa Cheesecake with Chocolate Cookie Crust
Create a show-stopping dessert inspired by the Girl Scout Samoa cookie, featuring a rich chocolate crust, creamy caramel-swirled cheesecake filling, and a toasted coconut topping.
- Prep Time: 30 min
- Cook Time: 1 hour 10 min
- Total Time: 8 hours 40 min
- Yield: 12 servings 1x
- Category: Dessert
- Method: Baking
- Cuisine: American
- Diet: Vegetarian
Ingredients
- 1 3/4 cups chocolate cookie crumbs (about 30 cookies)
- 6 tablespoons unsalted butter, melted
- 3 (8 ounce) packages cream cheese, softened to room temperature
- 1 1/2 cups granulated sugar
- 1 teaspoon vanilla extract
- 1/2 cup sour cream
- 3 large eggs
- 1 cup caramel sauce, divided
- 1 cup sweetened shredded coconut, toasted
- 1/2 cup semi-sweet chocolate chips
- 1 tablespoon coconut oil
- 1/2 cup whole Samoa cookies, for garnish (optional)
Instructions
- Prepare the crust: Preheat your oven to 350°F (175°C). Mix the chocolate cookie crumbs and melted butter in a bowl until combined. Press this mixture firmly into the bottom of a 9-inch springform pan. Bake the crust for 10 minutes. Remove and let it cool while you prepare the filling.
- Prepare the cheesecake filling: In a large bowl, beat the softened cream cheese with an electric mixer until smooth. Gradually add the sugar and beat until fully incorporated. Mix in the vanilla extract and sour cream. Beat in the eggs one at a time, mixing just until combined after each addition. Do not overmix the batter.
- Create the caramel swirl: Pour half of the cheesecake batter over the cooled crust. Drizzle 1/2 cup of the caramel sauce over the batter. Pour the remaining batter on top. Drizzle the remaining 1/2 cup of caramel sauce over the top layer. Use a knife or skewer to gently swirl the caramel into the batter to create a marbled effect.
- Bake the cheesecake: Wrap the bottom of the springform pan tightly in heavy-duty aluminum foil. Place the wrapped pan into a larger roasting pan. Carefully pour hot water into the roasting pan until the water reaches halfway up the sides of the springform pan (this creates a water bath). Bake for 55 to 65 minutes, or until the edges are set but the center still has a slight jiggle.
- Cool the cheesecake: Turn off the oven, crack the door open slightly, and let the cheesecake cool inside the oven for 1 hour. Remove the cheesecake from the water bath and foil. Let it cool completely on a wire rack. Once cool, cover and refrigerate for at least 6 hours, or preferably overnight.
- Prepare the topping: In a small, microwave-safe bowl, combine the chocolate chips and coconut oil. Microwave in 30-second intervals, stirring between each, until the chocolate is smooth. Stir in the toasted coconut.
- Finish and serve: Once the cheesecake is fully chilled, carefully remove the sides of the springform pan. Spread the toasted coconut-chocolate mixture evenly over the top of the cheesecake. If desired, garnish the edges with whole Samoa cookies. Slice and serve this indulgent dessert.
Notes
- For the smoothest texture, bring your cream cheese and eggs to room temperature before starting the filling.
- To toast the coconut, spread it in a single layer on a baking sheet and bake at 350°F (175°C) for 5 to 8 minutes, watching closely to prevent burning.
- If you prefer a no-bake version, chill the cheesecake for 8 hours instead of baking, and use a pre-made chocolate cookie crust.
Nutrition
- Serving Size: 1 slice
- Calories: 550
- Sugar: 45g
- Sodium: 350mg
- Fat: 38g
- Saturated Fat: 22g
- Unsaturated Fat: 16g
- Trans Fat: 0.5g
- Carbohydrates: 50g
- Fiber: 2g
- Protein: 8g
- Cholesterol: 110mg